← experiment index

Official-data balanced probe

Decoding: Greedy text decoding (deterministic main-repo control), with 50 image-flow steps. The selected records and all other settings are checkpoint-matched. VSP selection: 3 examples per grid size (3–8). VisPuzzle: 3 examples per answer label. This is an early stratified probe; the full 600+400 evaluation per model remains separately queued.

Published paper reference: BAGEL 0.83% VSP / 35.00% VisPuzzle; ThinkMorph 75.83% VSP / 79.00% VisPuzzle on the complete sets. The small balanced probe is not expected to reproduce those percentages exactly, but large disagreement is an audit signal.

Metrics

DatasetModelnAccuracyEmits imageMedian latencyMax latency
VSP_maze_task_main_originalBAGEL-7B-MoT180.0%0.0%77.8s218.6s
VSP_maze_task_main_originalThinkMorph-7B185.6%88.9%53.9s217.3s
VisPuzzleBAGEL-7B-MoT1225.0%0.0%33.3s201.6s
VisPuzzleThinkMorph-7B1258.3%100.0%76.9s149.3s

VSP by grid size

SizeModelnValid-path accuracy
3×3BAGEL-7B-MoT30.0%
4×4BAGEL-7B-MoT30.0%
5×5BAGEL-7B-MoT30.0%
6×6BAGEL-7B-MoT30.0%
7×7BAGEL-7B-MoT30.0%
8×8BAGEL-7B-MoT30.0%
3×3ThinkMorph-7B30.0%
4×4ThinkMorph-7B333.3%
5×5ThinkMorph-7B30.0%
6×6ThinkMorph-7B30.0%
7×7ThinkMorph-7B30.0%
8×8ThinkMorph-7B30.0%

VSP_maze_task_main_original

frozenlake_s3_0 · 3×3 maze
Input 1
Input 2
Input 3
Exact model input text
As a professional maze solver, your task is to analyze a grid-based map and devise an action plan that enables a player to reach the goal from the starting point without falling into any holes, using the fewest possible moves. Since coding is not within your skill set, your approach relies on logical reasoning of the map.

## Game Setup
- The game presents a fully observable grid-based map.
- The player starts at a specified grid square, with the goal located elsewhere on the map.
- Each grid square is either safe or contains a hole.
- Your goal is to guide the player to the goal while avoiding holes.
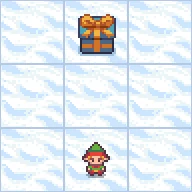
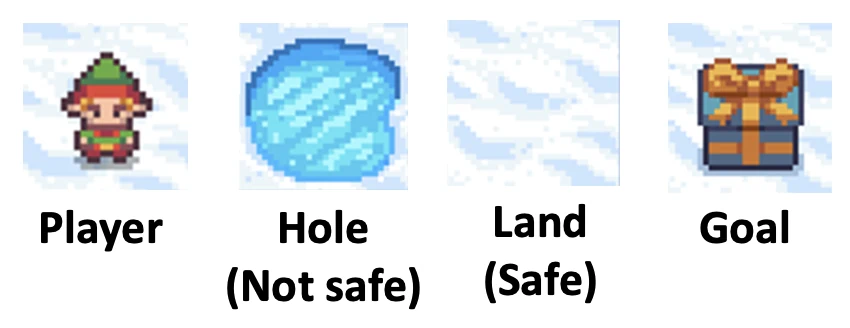
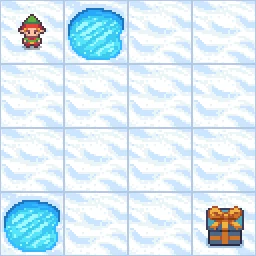
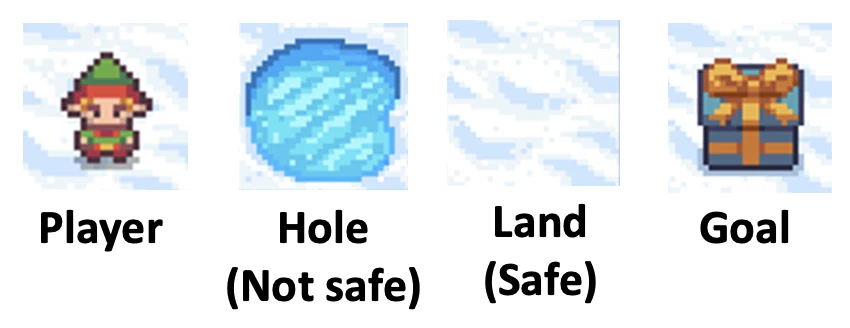
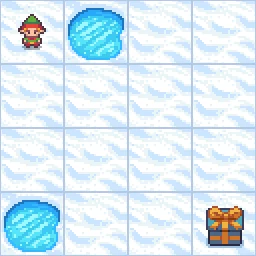
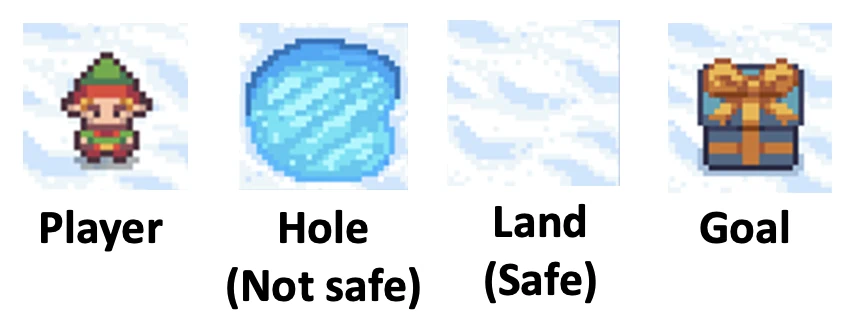
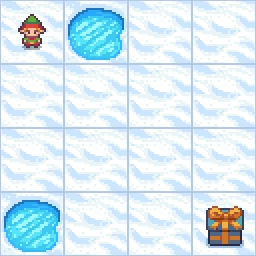
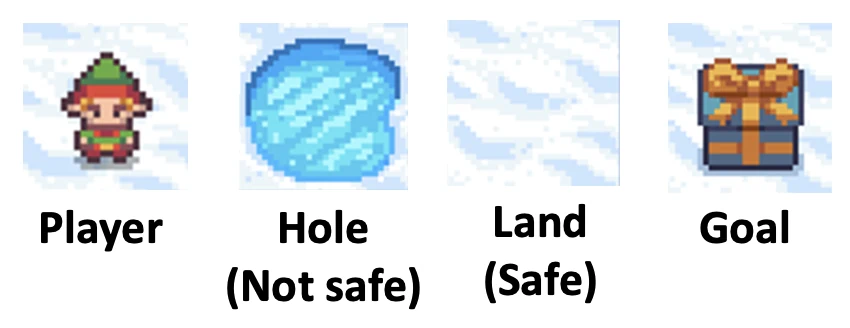
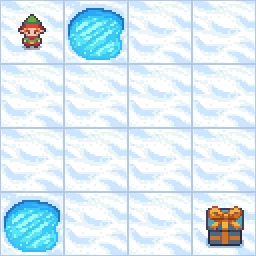
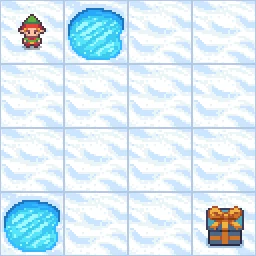
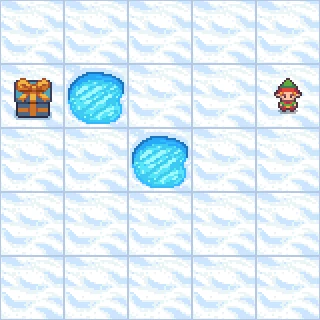
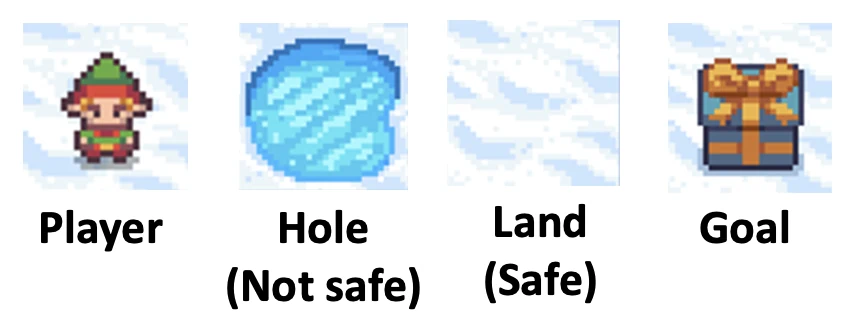
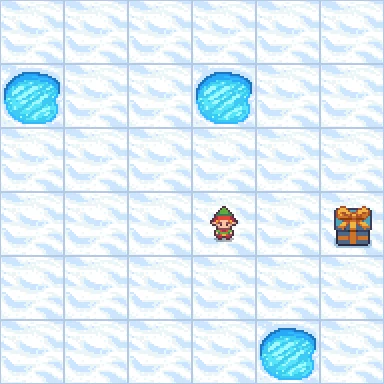
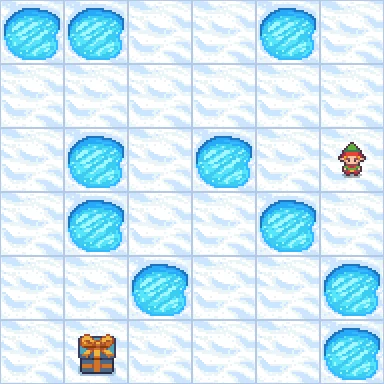
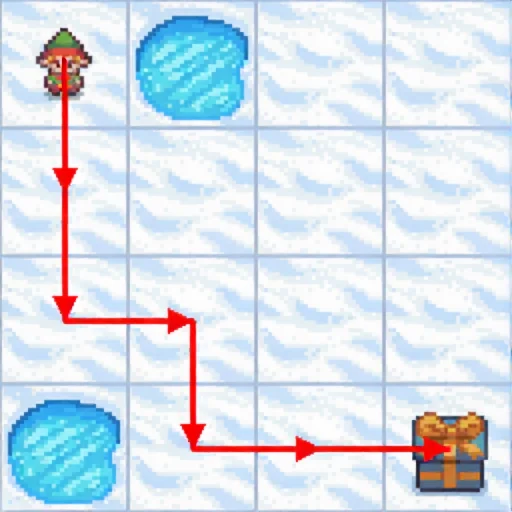
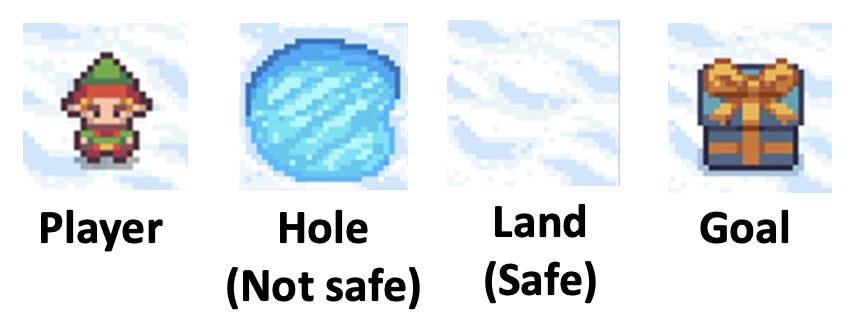
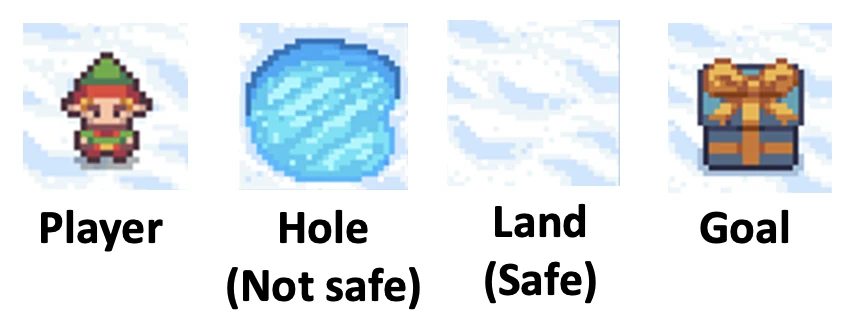
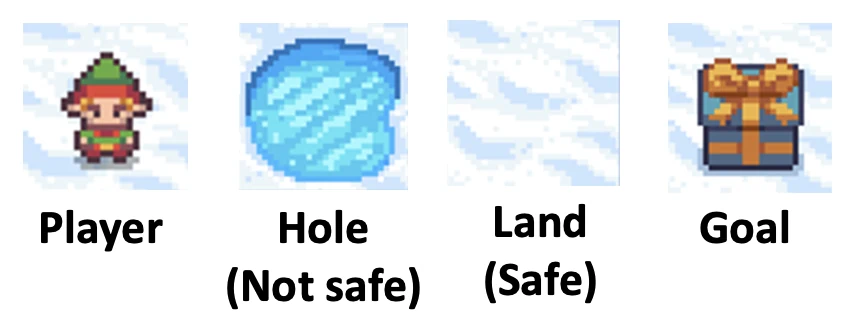
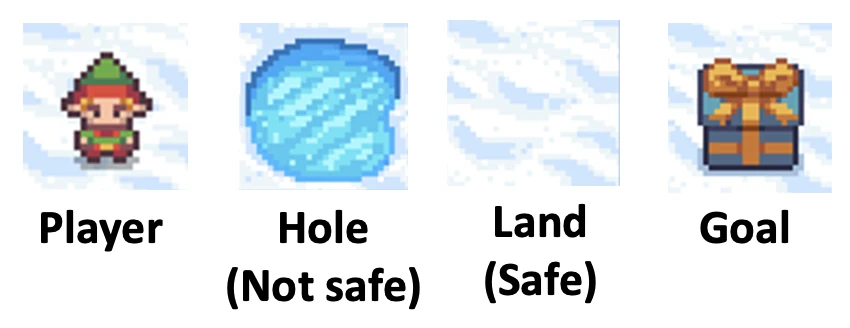
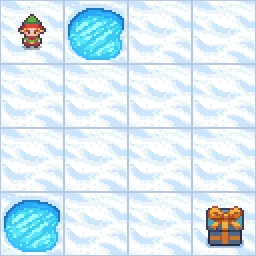
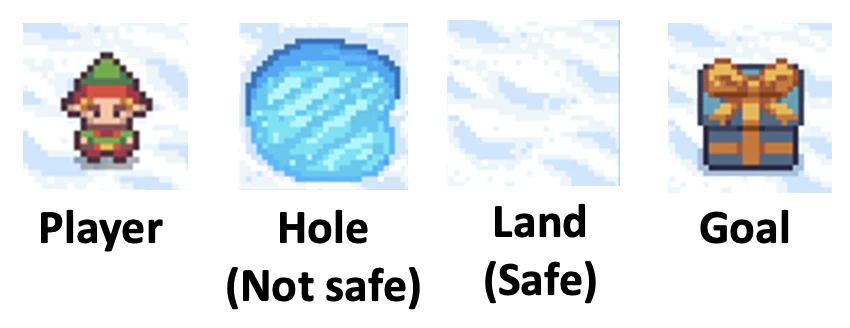
The following figure shows how the player, the holes (non-safe grid), the lands (safe grids), and the goals look like.

 <img><|image_1|></img> 

## Moving Rules
- The action plan involves a series of moves: 'L' (left), 'R' (right), 'U' (up), or 'D' (down).
- Each move transfers the player to the adjacent square in that direction, provided it is a safe square. The player cannot move more than one square at a time.
- Moving off the edge of the map has no effect. The player will remain at the same square.
- DO NOT MOVE INTO A HOLE! Falling into a hole results in defeat.
- Locating at the grid containing the goal results in victory.
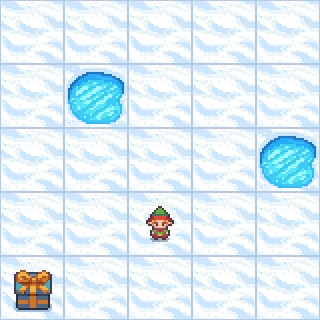
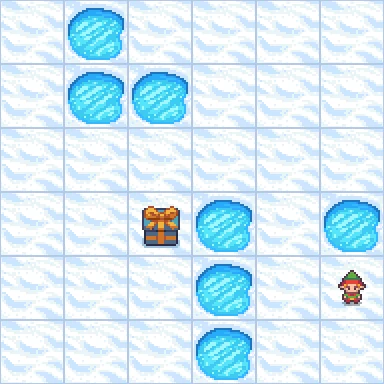
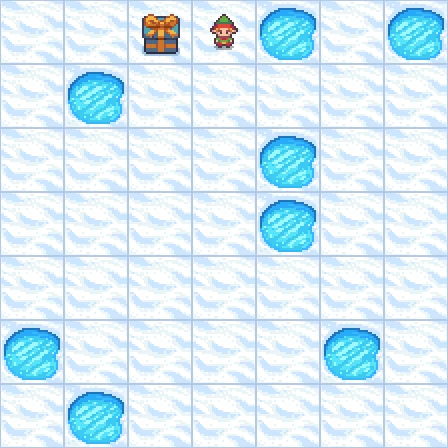
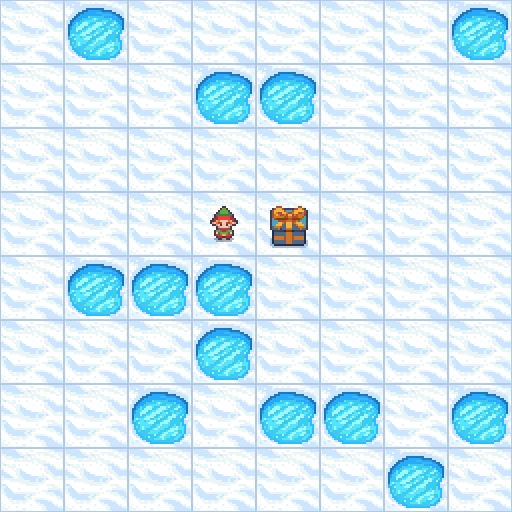
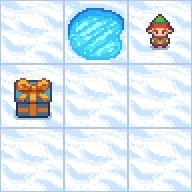
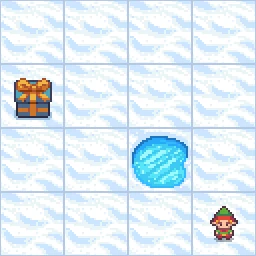
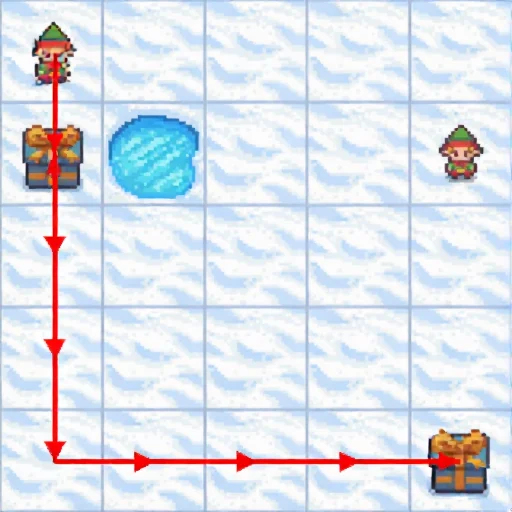
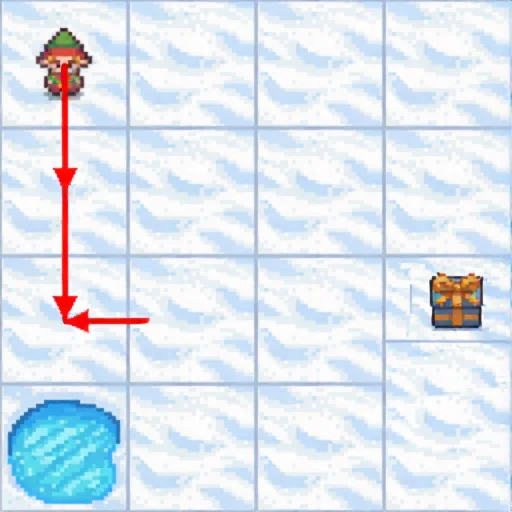
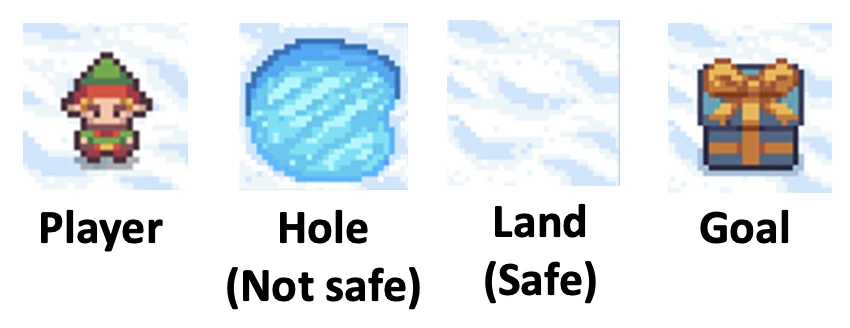
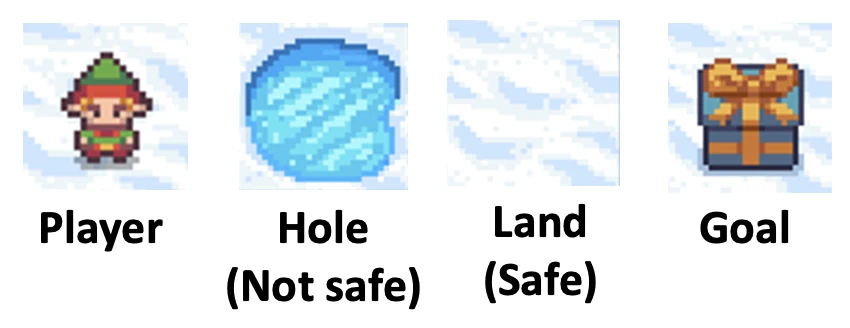
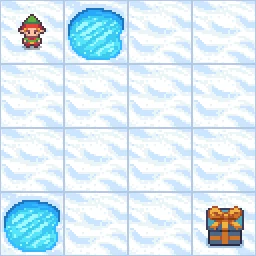
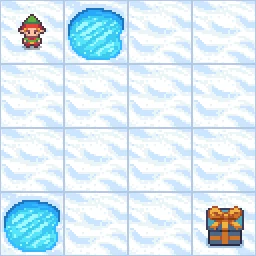
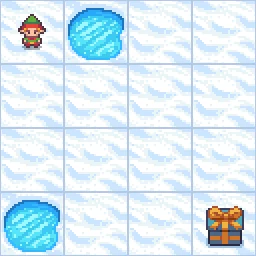
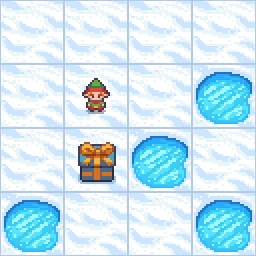
We provide an example to further illustrate the rules.

 <img><|image_2|></img> 

In this provided example:
- The player is at Row 1, Column 1;
- The goal is at Row 4, Column 4;
- There are two holes: one at Row 1, Column 2, and another at Row 4, Column 1.
- The player can move DOWN. This is because moving down brings them to Row 2, Column 1, and this cell is safe (without holes).
- Moving UP has no effects. This is because the player is already in the topmost row.
- Similarly, moving LEFT has no effects because the player is already in the left-most column.
- Moving RIGHT places the player at Row 1, Column 2. Since there is a hole at this grid, this move results in a loss.

## Procedure and Output
Now you will solve the given maze. To solve it, please generate text EXACTLY FOLLOW THE FOLLOWING STEPS:
1. First, interpret map. List where the player is at now, where is the goal, and where are the holes.
2. Then, generate an action plan to navigate to the goal step by step. At each step, you should check:
    (a) Where the current move leads the player to (the row and column);
    (b) What is in that grid. Is it a hole? Is it the goal? Is it an empty space?
    (c) Determine if that is a safe action. If not, correct it and re-generate the action plan.
3. Next, verify if the steps successfully navigate the player to the goal without falling into the hole. If not, restart from step 2 and re-generate this step.
4. If succeed, provide your solution as a sequence of moves wrapped in \boxed{}. For example, "\boxed{L,R,U,D}" meaning an action plan of left, left, right, up, and down. The moves should be comma-separated.  Double check the final solution is consistent with the previous analysis.
Do not output any extra content after the above aggregated output.

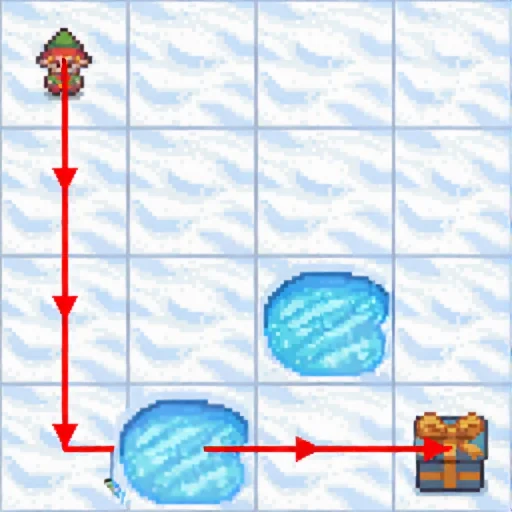
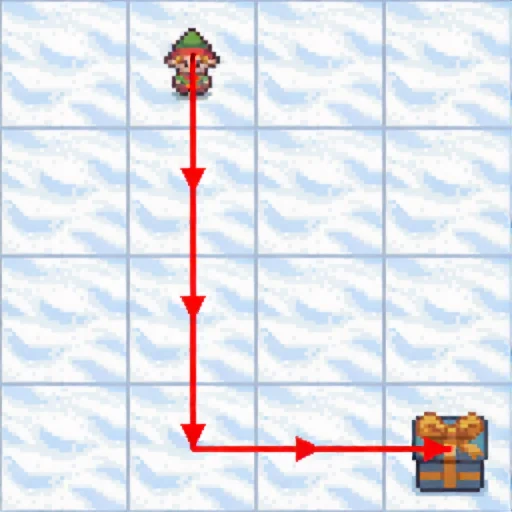
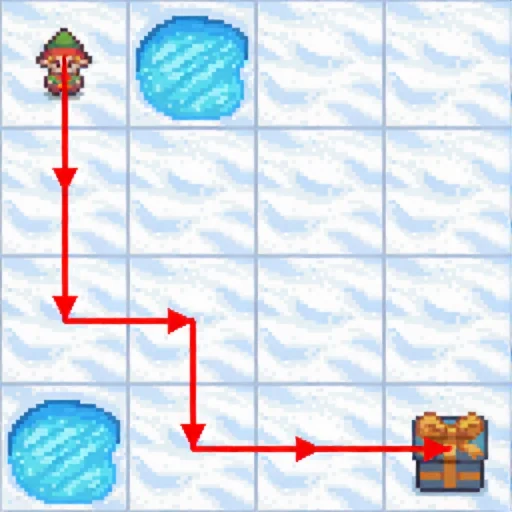
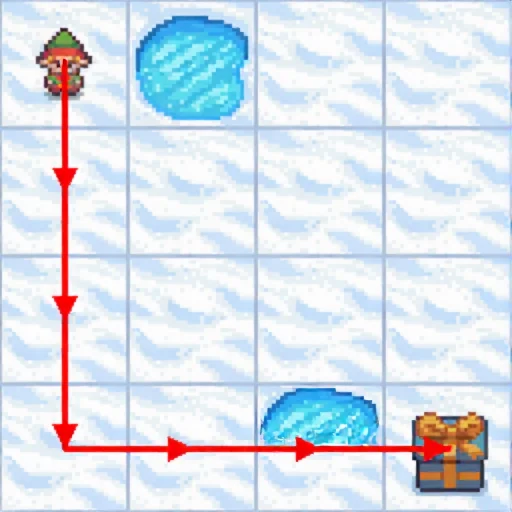
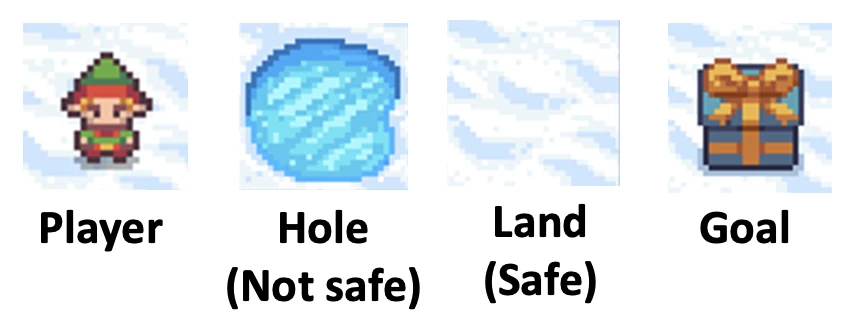
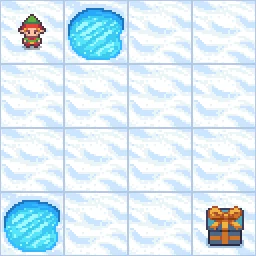
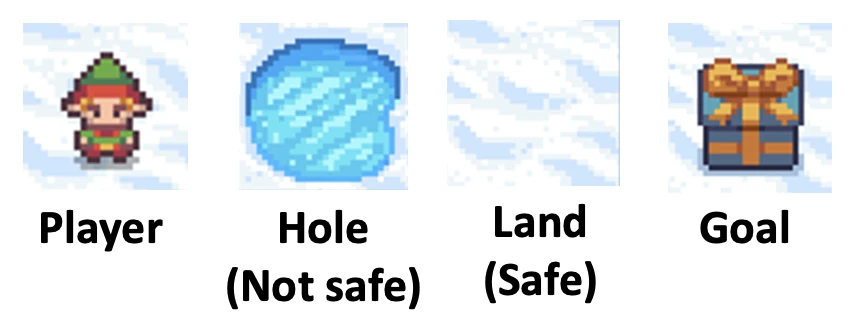
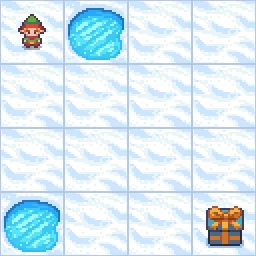
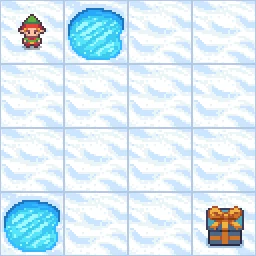
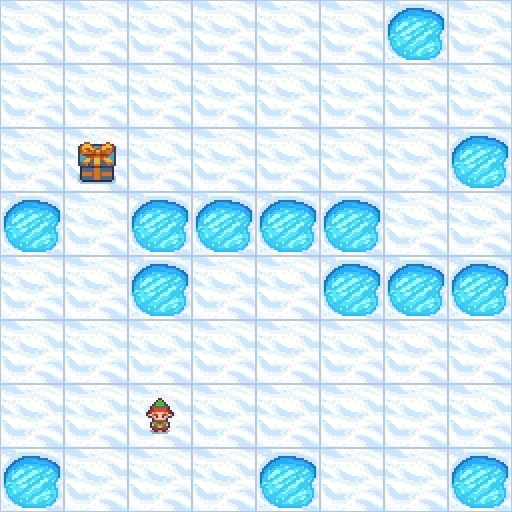
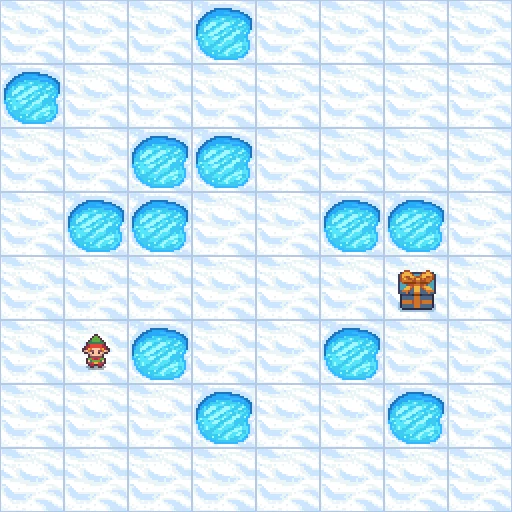
Please generate action plan for the following maze:

 <img><|image_3|></img>

BAGEL-7B-MoT wrong

Parsed: D,R,R · time: 35.4s

No image emitted.

Raw model output
<think>
Okay, let's see. I need to find a path from the player's starting position to the goal without stepping on any holes. The player starts at the top-left corner, and the goal is the box with the bow in the top-right corner. The holes are the blue circles. 

First, I should list the positions. The player is at (1,1), the goal is at (2,3). The holes are at (1,2) and (4,1). Wait, no, looking at the image, the holes are in the first row, second column and the fourth row, first column. So the player is at (1,1), which is safe. The goal is at (2,3). The holes are at (1,2) and (4,1). 

So the player needs to move from (1,1) to (2,3). Let's think about possible moves. The player can move right or down. Let's check the possible paths.

If the player moves right to (1,2), but that's a hole. So that's not allowed. So the first move can't be right. So the first move must be down to (2,1). Is (2,1) safe? Looking at the image, the second row, first column is land, so yes. So first move is D.

Now at (2,1). From here, possible moves are right, up (but can't go up), down to (3,1), or left (can't). So moving right to (2,2). Is (2,2) safe? Yes, it's land. So move R.

Now at (2,2). Next moves: up (back to 2,1), down to (3,2), left to (2,1), or right to (2,3). The goal is at (2,3). So moving right here would reach the goal. So the next move is R. That would take the player to (2,3), which is the goal. So the path is D, R, R.

Wait, but let me check again. Starting at (1,1). Move down to (2,1). Then right to (2,2). Then right to (2,3). Yes, that's correct. The holes are at (1,2) and (4,1), which are not on the path. So the moves are D, R, R. That should work.
</think>

\boxed{D,R,R}

ThinkMorph-7B wrong

Parsed: D,D,D,R,R · time: 51.7s
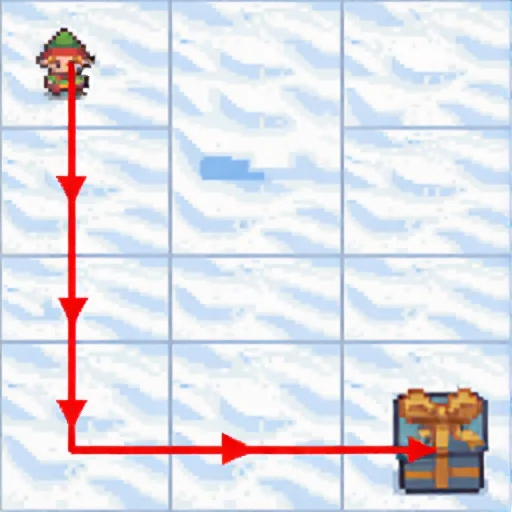
Generated thought 1
Raw model output
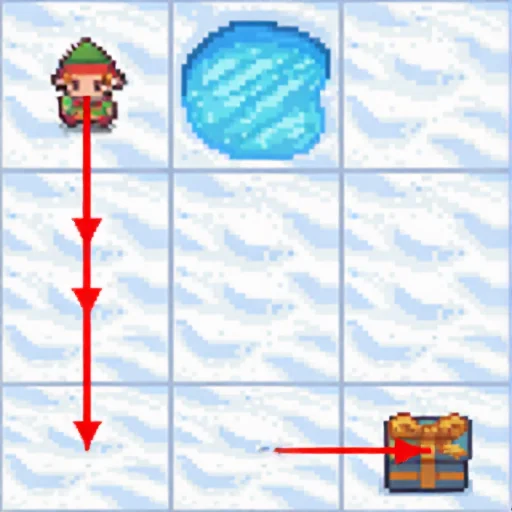
<think>First, I need to interpret the layout of the maze. The player starts in the bottom row, second column from the left (Row 4, Column 2). The goal is in the top row, second column from the left (Row 1, Column 2). There is one hole present: it is located in the top row, first column (Row 1, Column 1). All other squares are safe.

With this setup in mind, it's time to plot out the best route from the starting position to the goal, while avoiding the hole. Let's visualize the steps and ensure each move is safe.</think><image_start>
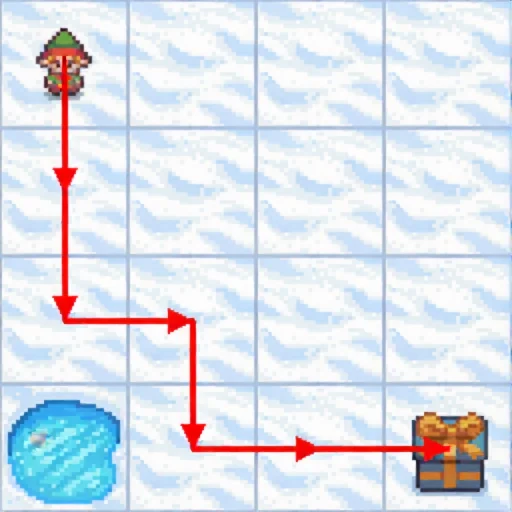
<image_end><think>Now, I need to verify the action plan I visualized. Starting from the initial position (bottom row, second column), the path goes straight down three times, bringing the player to the top row, second column, which is the same column as the goal. Then, the player moves right twice, ending up in the goal square.

At each step:
- Moving down three times avoids the hole in the top-left corner.
- Shifting right twice keeps the player on safe tiles, never stepping onto the goal before the final move.
- The final position lands exactly on the goal square, and there are no holes encountered along the way.

Therefore, the path is correct. The solution is:
\boxed{D,D,D,R,R}</think><answer>\boxed{D,D,D,R,R}</answer>
frozenlake_s4_0 · 4×4 maze

Input 1
Input 2
Input 3
Exact model input text
As a professional maze solver, your task is to analyze a grid-based map and devise an action plan that enables a player to reach the goal from the starting point without falling into any holes, using the fewest possible moves. Since coding is not within your skill set, your approach relies on logical reasoning of the map.

## Game Setup
- The game presents a fully observable grid-based map.
- The player starts at a specified grid square, with the goal located elsewhere on the map.
- Each grid square is either safe or contains a hole.
- Your goal is to guide the player to the goal while avoiding holes.
The following figure shows how the player, the holes (non-safe grid), the lands (safe grids), and the goals look like.

 <img><|image_1|></img> 

## Moving Rules
- The action plan involves a series of moves: 'L' (left), 'R' (right), 'U' (up), or 'D' (down).
- Each move transfers the player to the adjacent square in that direction, provided it is a safe square. The player cannot move more than one square at a time.
- Moving off the edge of the map has no effect. The player will remain at the same square.
- DO NOT MOVE INTO A HOLE! Falling into a hole results in defeat.
- Locating at the grid containing the goal results in victory.
We provide an example to further illustrate the rules.

 <img><|image_2|></img> 

In this provided example:
- The player is at Row 1, Column 1;
- The goal is at Row 4, Column 4;
- There are two holes: one at Row 1, Column 2, and another at Row 4, Column 1.
- The player can move DOWN. This is because moving down brings them to Row 2, Column 1, and this cell is safe (without holes).
- Moving UP has no effects. This is because the player is already in the topmost row.
- Similarly, moving LEFT has no effects because the player is already in the left-most column.
- Moving RIGHT places the player at Row 1, Column 2. Since there is a hole at this grid, this move results in a loss.

## Procedure and Output
Now you will solve the given maze. To solve it, please generate text EXACTLY FOLLOW THE FOLLOWING STEPS:
1. First, interpret map. List where the player is at now, where is the goal, and where are the holes.
2. Then, generate an action plan to navigate to the goal step by step. At each step, you should check:
    (a) Where the current move leads the player to (the row and column);
    (b) What is in that grid. Is it a hole? Is it the goal? Is it an empty space?
    (c) Determine if that is a safe action. If not, correct it and re-generate the action plan.
3. Next, verify if the steps successfully navigate the player to the goal without falling into the hole. If not, restart from step 2 and re-generate this step.
4. If succeed, provide your solution as a sequence of moves wrapped in \boxed{}. For example, "\boxed{L,R,U,D}" meaning an action plan of left, left, right, up, and down. The moves should be comma-separated.  Double check the final solution is consistent with the previous analysis.
Do not output any extra content after the above aggregated output.

Please generate action plan for the following maze:

 <img><|image_3|></img>

BAGEL-7B-MoT wrong

Parsed: D,D,R · time: 36.4s

No image emitted.

Raw model output
<think>
Okay, let's see. I need to find a path from the player's starting position to the goal without stepping on any holes. The grid is 4x4, right? Let me first identify the positions.

Looking at the image, the player is at the top-left corner, which is Row 1, Column 1. The goal is at Row 3, Column 2. The holes are in Row 1, Column 2; Row 4, Column 1; and Row 4, Column 4. Wait, no, looking again. The holes are the blue circles. In the third image, there are three holes: one at (1,2), one at (4,1), and another at (4,4). The player starts at (1,1), and the goal is at (3,2).

So the player needs to move from (1,1) to (3,2) without stepping on any of the holes. Let's plan the path step by step.

Starting at (1,1). The possible moves are down (to (2,1)) or right (to (1,2)), but (1,2) is a hole, so can't go there. So first move must be down to (2,1). Now at (2,1), which is safe. From here, possible moves: up (back to 1,1, which is safe), down to (3,1), right to (2,2). Let's go down to (3,1). Now at (3,1). Next moves: up to (2,1), down to (4,1) which is a hole, can't go there. Right to (3,2), which is the goal. So the path would be down, down, right. Wait, but from (3,1), moving right to (3,2) is the goal. So the steps are D, D, R. Let me check if that works.

First move D: from (1,1) to (2,1). Safe. Second move D: to (3,1). Safe. Third move R: to (3,2), which is the goal. That seems correct. Are there any holes in that path? The holes are at (1,2), (4,1), (4,4). The path taken doesn't hit any holes. So the action plan is D, D, R. Let me confirm again. Starting at (1,1), move down to (2,1), then down to (3,1), then right to (3,2). Yes, that works. No holes in the path. So the answer should be D,D,R.
</think>

\boxed{D,D,R}

ThinkMorph-7B wrong

Parsed: D,D,D,R · time: 51.6s

Generated thought 1
Raw model output
<think>First, I need to interpret the layout of the maze. The player starts at Row 2, Column 2. The goal is located at Row 4, Column 2. There are holes in the following positions: Row 1, Column 2; Row 4, Column 1; Row 3, Column 3; Row 4, Column 4.

With this configuration in mind, I can now proceed to plotting the correct path to the goal.</think><image_start>
<image_end><think>Time to verify my solution. The red path starts from the player’s position at Row 2, Column 2. The moves are: Down, Down, Down, Right.

Step-by-step verification:
- First move Down: Row 3, Column 2. This is a safe square, no hole.
- Second move Down: Row 4, Column 2. This is also safe, no hole.
- Third move Down: Row 5, Column 2. This is safe, and the player is not at the goal yet, but still on a safe square.
- Fourth move Right: Row 5, Column 3. This is safe, and then Row 5, Column 4, which is the goal.

I see that the path avoids all holes and leads directly to the goal at Row 4, Column 2, with the final move landing exactly on the goal square. The path is correct.

\boxed{D,D,D,R}</think><answer>\boxed{D,D,D,R}</answer>

frozenlake_s5_0 · 5×5 maze

Input 1
Input 2
Input 3
Exact model input text
As a professional maze solver, your task is to analyze a grid-based map and devise an action plan that enables a player to reach the goal from the starting point without falling into any holes, using the fewest possible moves. Since coding is not within your skill set, your approach relies on logical reasoning of the map.

## Game Setup
- The game presents a fully observable grid-based map.
- The player starts at a specified grid square, with the goal located elsewhere on the map.
- Each grid square is either safe or contains a hole.
- Your goal is to guide the player to the goal while avoiding holes.
The following figure shows how the player, the holes (non-safe grid), the lands (safe grids), and the goals look like.

 <img><|image_1|></img> 

## Moving Rules
- The action plan involves a series of moves: 'L' (left), 'R' (right), 'U' (up), or 'D' (down).
- Each move transfers the player to the adjacent square in that direction, provided it is a safe square. The player cannot move more than one square at a time.
- Moving off the edge of the map has no effect. The player will remain at the same square.
- DO NOT MOVE INTO A HOLE! Falling into a hole results in defeat.
- Locating at the grid containing the goal results in victory.
We provide an example to further illustrate the rules.

 <img><|image_2|></img> 

In this provided example:
- The player is at Row 1, Column 1;
- The goal is at Row 4, Column 4;
- There are two holes: one at Row 1, Column 2, and another at Row 4, Column 1.
- The player can move DOWN. This is because moving down brings them to Row 2, Column 1, and this cell is safe (without holes).
- Moving UP has no effects. This is because the player is already in the topmost row.
- Similarly, moving LEFT has no effects because the player is already in the left-most column.
- Moving RIGHT places the player at Row 1, Column 2. Since there is a hole at this grid, this move results in a loss.

## Procedure and Output
Now you will solve the given maze. To solve it, please generate text EXACTLY FOLLOW THE FOLLOWING STEPS:
1. First, interpret map. List where the player is at now, where is the goal, and where are the holes.
2. Then, generate an action plan to navigate to the goal step by step. At each step, you should check:
    (a) Where the current move leads the player to (the row and column);
    (b) What is in that grid. Is it a hole? Is it the goal? Is it an empty space?
    (c) Determine if that is a safe action. If not, correct it and re-generate the action plan.
3. Next, verify if the steps successfully navigate the player to the goal without falling into the hole. If not, restart from step 2 and re-generate this step.
4. If succeed, provide your solution as a sequence of moves wrapped in \boxed{}. For example, "\boxed{L,R,U,D}" meaning an action plan of left, left, right, up, and down. The moves should be comma-separated.  Double check the final solution is consistent with the previous analysis.
Do not output any extra content after the above aggregated output.

Please generate action plan for the following maze:

 <img><|image_3|></img>

BAGEL-7B-MoT wrong

Parsed: D,R,D,R,D · time: 48.9s

No image emitted.

Raw model output
<think>
Okay, let's see. I need to find a path from the player's starting position to the goal without stepping on any holes. The grid is 4x4, right? Let me first identify the positions.

Looking at the image, the player is at the top-left corner, which is Row 1, Column 1. The goal is at the bottom-right corner, Row 4, Column 4. The holes are in Row 1, Column 2 and Row 4, Column 1. So the player starts at (1,1), goal at (4,4), holes at (1,2) and (4,1).

The first step is to check possible moves. From (1,1), the player can move right (R) to (1,2), but that's a hole. So that's not allowed. Moving down (D) to (2,1) is safe. So the first move should be D.

After moving down to (2,1), the next possible moves are up, down, left, or right. Let's check each. Up would take us back to (1,1), which is the start, but maybe that's okay. Down to (3,1) is safe. Left is out of bounds. Right to (2,2) is safe. So possible moves are D, U, or R.

If we go down to (3,1), then from there, next steps. Let's see. From (3,1), moving up to (2,1) is safe, but maybe moving right to (3,2) is better. Alternatively, moving down to (4,1) is a hole, so can't do that. So moving right to (3,2) is safe. Then from (3,2), possible moves: up to (2,2), down to (4,2) which is safe, left to (3,1) again, or right to (3,3). Let's see. If we go down to (4,2), then from there, moving right to (4,3) is safe, then down to (4,4) which is the goal. That seems like a path.

So the steps would be D (to 2,1), then R (to 3,2), then D (to 4,2), then R (to 4,3), then D (to 4,4). Let me check if any of these steps hit a hole. The holes are at (1,2) and (4,1). The path taken doesn't include those. So the moves would be D, R, D, R, D. Let me confirm each step:

1. Start at (1,1). Move D to (2,1). Safe.
2. From (2,1), move R to (2,2). Safe.
3. From (2,2), move D to (3,2). Safe.
4. From (3,2), move R to (3,3). Safe.
5. From (3,3), move D to (4,3). Safe.
6. From (4,3), move D to (4,4). Goal reached.

Wait, but in the image, the goal is at (4,4). So the path would be D, R, D, R, D. Let me check again. Starting at (1,1):

Move D to (2,1). Then R to (2,2). Then D to (3,2). Then R to (3,3). Then D to (4,3). Then D to (4,4). Yes, that works. None of the steps hit a hole. So the action plan is D, R, D, R, D. So the answer is \boxed{D,R,D,R,D}.
</think>

\boxed{D,R,D,R,D}

ThinkMorph-7B wrong

Parsed: D,D,D,R,R · time: 53.3s

Generated thought 1
Raw model output
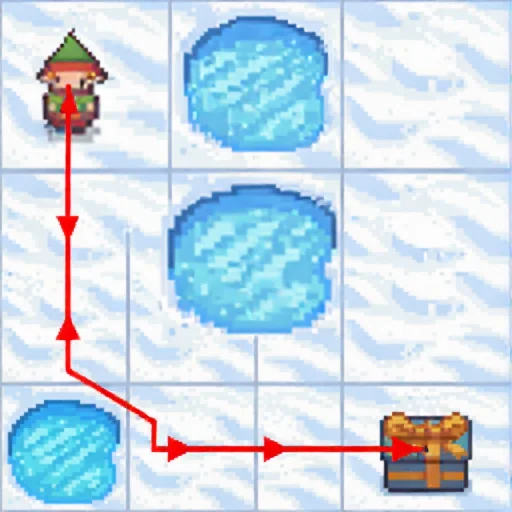
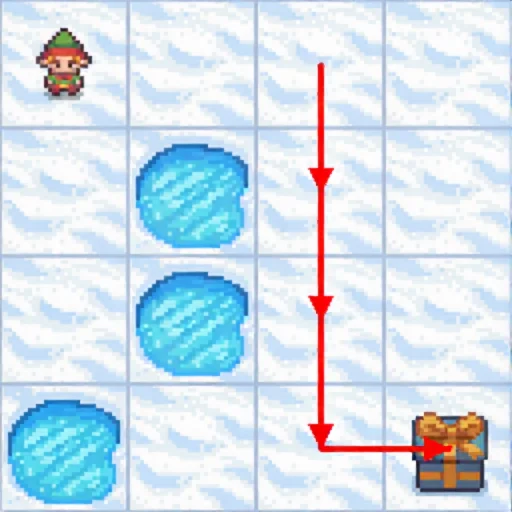
<think>First, I need to interpret the layout of the maze. The player starts in the top-left corner, at row 1, column 1. The goal is located in the bottom-left corner, at row 5, column 1. There are three holes on the map: one at row 1, column 2; one at row 2, column 2; and another at row 3, column 5. All other squares are safe.

With this clear map in mind, it's time to plot the optimal path to the goal, carefully avoiding all holes.</think><image_start>
<image_end><think>Now, I will verify my solution by tracing the red path shown in the image. Starting from the player at row 1, column 1, the path moves down three times: to row 2, column 1; row 3, column 1; and row 4, column 1. Then, it moves right twice: first to row 4, column 2, and then to row 4, column 3, finally reaching the goal at row 4, column 4. However, the last move lands the player at the goal square, but I need to check if any holes are crossed along the way.

Upon inspection, the moves never cross any holes: the downward steps avoid the hole at row 2, column 2, and the rightward moves bypass the hole at row 4, column 2. The path is safe and successfully leads the player to the goal.

Thus, the correct action plan is \boxed{D,D,D,R,R}.</think><answer>\boxed{D,D,D,R,R}</answer>
frozenlake_s6_0 · 6×6 maze

Input 1
Input 2
Input 3
Exact model input text
As a professional maze solver, your task is to analyze a grid-based map and devise an action plan that enables a player to reach the goal from the starting point without falling into any holes, using the fewest possible moves. Since coding is not within your skill set, your approach relies on logical reasoning of the map.

## Game Setup
- The game presents a fully observable grid-based map.
- The player starts at a specified grid square, with the goal located elsewhere on the map.
- Each grid square is either safe or contains a hole.
- Your goal is to guide the player to the goal while avoiding holes.
The following figure shows how the player, the holes (non-safe grid), the lands (safe grids), and the goals look like.

 <img><|image_1|></img> 

## Moving Rules
- The action plan involves a series of moves: 'L' (left), 'R' (right), 'U' (up), or 'D' (down).
- Each move transfers the player to the adjacent square in that direction, provided it is a safe square. The player cannot move more than one square at a time.
- Moving off the edge of the map has no effect. The player will remain at the same square.
- DO NOT MOVE INTO A HOLE! Falling into a hole results in defeat.
- Locating at the grid containing the goal results in victory.
We provide an example to further illustrate the rules.

 <img><|image_2|></img> 

In this provided example:
- The player is at Row 1, Column 1;
- The goal is at Row 4, Column 4;
- There are two holes: one at Row 1, Column 2, and another at Row 4, Column 1.
- The player can move DOWN. This is because moving down brings them to Row 2, Column 1, and this cell is safe (without holes).
- Moving UP has no effects. This is because the player is already in the topmost row.
- Similarly, moving LEFT has no effects because the player is already in the left-most column.
- Moving RIGHT places the player at Row 1, Column 2. Since there is a hole at this grid, this move results in a loss.

## Procedure and Output
Now you will solve the given maze. To solve it, please generate text EXACTLY FOLLOW THE FOLLOWING STEPS:
1. First, interpret map. List where the player is at now, where is the goal, and where are the holes.
2. Then, generate an action plan to navigate to the goal step by step. At each step, you should check:
    (a) Where the current move leads the player to (the row and column);
    (b) What is in that grid. Is it a hole? Is it the goal? Is it an empty space?
    (c) Determine if that is a safe action. If not, correct it and re-generate the action plan.
3. Next, verify if the steps successfully navigate the player to the goal without falling into the hole. If not, restart from step 2 and re-generate this step.
4. If succeed, provide your solution as a sequence of moves wrapped in \boxed{}. For example, "\boxed{L,R,U,D}" meaning an action plan of left, left, right, up, and down. The moves should be comma-separated.  Double check the final solution is consistent with the previous analysis.
Do not output any extra content after the above aggregated output.

Please generate action plan for the following maze:

 <img><|image_3|></img>

BAGEL-7B-MoT wrong

Parsed: U,L,U,L · time: 58.3s

No image emitted.

Raw model output
<think>
Okay, let's see. I need to find a path from the player's starting position to the goal without stepping on any holes. The grid has holes in certain positions, and the player can only move up, down, left, or right, staying on safe land.

First, I should identify the player's starting position and the goal. From the image, the player is at the bottom right corner, and the goal is in the middle of the grid. The holes are scattered around, mostly in the top left and middle sections.

The player starts at the bottom right. Let me visualize the grid. The player is at (4,4) if we consider rows and columns starting from 1. The goal is at (3,3). The holes are at (1,1), (1,2), (2,1), (2,2), (3,1), (3,2), (4,1), (4,2), (4,3), (5,1), (5,2), (5,3). Wait, no, looking at the image, the holes are in the top left and middle. Let me recount. The first image shows the player, hole, land, and goal. The second image shows the initial setup with the player at (1,1), hole at (1,2), and goal at (4,4). The third image has more holes. Wait, maybe the grid is 5x5? Let me check the third image again. The player is at the bottom right, and the goal is in the middle. The holes are in the top left and middle rows. So the player is at (5,5) if rows and columns are numbered from 1 to 5. The goal is at (3,3). The holes are in positions like (1,1), (1,2), (2,1), (2,2), (3,1), (3,2), (4,1), (4,2), (4,3), (5,1), (5,2), (5,3). Wait, maybe I'm miscounting. Let me look again.

In the third image, the player is at the bottom right (row 5, column 5). The goal is at row 3, column 3. The holes are in the top left (rows 1-2, columns 1-2), middle (rows 2-4, columns 1-3), and bottom (rows 4-5, columns 1-3). So the player is at (5,5), goal at (3,3). The holes are in various positions around. The player needs to move up and left, but avoiding the holes.

Possible path: Start at (5,5). Move up to (4,5). Then left to (4,4). Then left to (4,3). Then up to (3,3). But wait, (4,3) is a hole? Let me check. In the third image, the holes are in the top left, middle, and bottom. The hole at (4,3) is present. So moving to (4,3) would be a hole. So that path is invalid.

Alternative path: From (5,5), move left to (5,4). Then up to (4,4). Then left to (4,3) which is a hole. No good. Another option: Move up to (4,5), then left to (4,4), then up to (3,4). Then left to (3,3). But (3,4) is a hole? Let me check. The holes in the middle are in rows 2-4, columns 1-3. So (3,4) is safe. Then moving left to (3,3) which is the goal. That seems possible.

So steps: U, L, U, L. Let's check each step.

1. Start at (5,5). Move U to (4,5). Safe.
2. Move L to (4,4). Safe.
3. Move U to (3,4). Safe.
4. Move L to (3,3). Goal. Success.

Yes, that path avoids all holes. Let me confirm each move:

- From (5,5) to (4,5): Up, safe.
- (4,5) to (4,4): Left, safe.
- (4,4) to (3,4): Up, safe.
- (3,4) to (3,3): Left, which is the goal. Correct.

So the action plan is U, L, U, L. So the answer is \boxed{U,L,U,L}.
</think>

\boxed{U,L,U,L}

ThinkMorph-7B wrong

Parsed: D,D,D,R,R · time: 56.5s

Generated thought 1
Raw model output
<think>First, I need to interpret the layout of the maze. The player starts in the bottom row, second column from the right (Row 5, Column 5). The goal is in the fourth row, third column from the left (Row 4, Column 3). 

There are several holes scattered throughout the grid:
- One hole is in the top row, second column from the left (Row 1, Column 2).
- Another is in the second row, second column (Row 2, Column 2).
- The second row also has a hole in the third column (Row 2, Column 3).
- In the fourth row, there is a hole in the fourth column (Row 4, Column 4).
- The third row, fourth column (Row 3, Column 4) also contains a hole.
- There is a hole in the bottom row, third column (Row 5, Column 3).
- Finally, there is another hole in the bottom row, fourth column (Row 5, Column 4).

With this setup in mind, I can now proceed to plotting the safest route from the starting position to the goal.</think><image_start>
<image_end><think>Time to verify the solution I’ve plotted. The red path begins at the starting square in the bottom row, second column from the right. From there, it moves straight down three times, landing in the bottom row, first column. Then, it turns right twice, ending at the goal in the fourth row, third column from the left.

Checking each step:
- Down x3: Each move lands on a safe square, without touching any holes.
- Right x2: Both moves are onto safe ground; the final square contains the goal.

Therefore, the path avoids all holes and successfully reaches the goal. The correct action plan is:

\boxed{D,D,D,R,R}</think><answer>\boxed{D,D,D,R,R}</answer>
frozenlake_s7_0 · 7×7 maze

Input 1
Input 2
Input 3
Exact model input text
As a professional maze solver, your task is to analyze a grid-based map and devise an action plan that enables a player to reach the goal from the starting point without falling into any holes, using the fewest possible moves. Since coding is not within your skill set, your approach relies on logical reasoning of the map.

## Game Setup
- The game presents a fully observable grid-based map.
- The player starts at a specified grid square, with the goal located elsewhere on the map.
- Each grid square is either safe or contains a hole.
- Your goal is to guide the player to the goal while avoiding holes.
The following figure shows how the player, the holes (non-safe grid), the lands (safe grids), and the goals look like.

 <img><|image_1|></img> 

## Moving Rules
- The action plan involves a series of moves: 'L' (left), 'R' (right), 'U' (up), or 'D' (down).
- Each move transfers the player to the adjacent square in that direction, provided it is a safe square. The player cannot move more than one square at a time.
- Moving off the edge of the map has no effect. The player will remain at the same square.
- DO NOT MOVE INTO A HOLE! Falling into a hole results in defeat.
- Locating at the grid containing the goal results in victory.
We provide an example to further illustrate the rules.

 <img><|image_2|></img> 

In this provided example:
- The player is at Row 1, Column 1;
- The goal is at Row 4, Column 4;
- There are two holes: one at Row 1, Column 2, and another at Row 4, Column 1.
- The player can move DOWN. This is because moving down brings them to Row 2, Column 1, and this cell is safe (without holes).
- Moving UP has no effects. This is because the player is already in the topmost row.
- Similarly, moving LEFT has no effects because the player is already in the left-most column.
- Moving RIGHT places the player at Row 1, Column 2. Since there is a hole at this grid, this move results in a loss.

## Procedure and Output
Now you will solve the given maze. To solve it, please generate text EXACTLY FOLLOW THE FOLLOWING STEPS:
1. First, interpret map. List where the player is at now, where is the goal, and where are the holes.
2. Then, generate an action plan to navigate to the goal step by step. At each step, you should check:
    (a) Where the current move leads the player to (the row and column);
    (b) What is in that grid. Is it a hole? Is it the goal? Is it an empty space?
    (c) Determine if that is a safe action. If not, correct it and re-generate the action plan.
3. Next, verify if the steps successfully navigate the player to the goal without falling into the hole. If not, restart from step 2 and re-generate this step.
4. If succeed, provide your solution as a sequence of moves wrapped in \boxed{}. For example, "\boxed{L,R,U,D}" meaning an action plan of left, left, right, up, and down. The moves should be comma-separated.  Double check the final solution is consistent with the previous analysis.
Do not output any extra content after the above aggregated output.

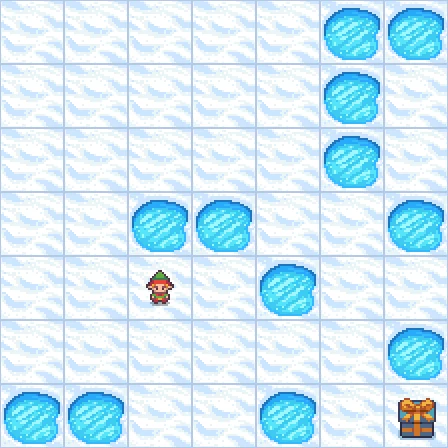
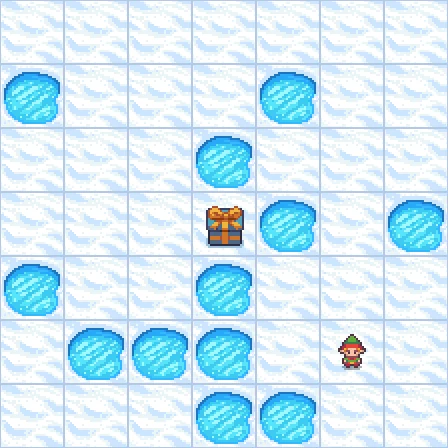
Please generate action plan for the following maze:

 <img><|image_3|></img>

BAGEL-7B-MoT wrong

Parsed: None · time: 131.7s

No image emitted.

Raw model output
<think>
Okay, let's see. I need to find a path from the player's starting position to the goal without stepping on any holes. The grid has holes represented by blue circles, safe land, and the goal is the gift box. The player starts at the top-left corner, I think. Let me visualize the grid again.

Looking at the image, the player is at the top-left cell. The goal is in the top-right corner, but there are holes scattered around. The first thing I notice is that moving right immediately would take the player into a hole. So that's not possible. So the first move can't be right. Let's check the possible directions.

The player is at (1,1). The adjacent cells are up (which is out of bounds), down to (2,1), left (also out of bounds), and right to (1,2), which is a hole. So the only possible first move is down to (2,1). Let's confirm: (2,1) is safe. So first move is D.

Now, from (2,1), where can we go? Let's check the adjacent cells. Up is back to (1,1), which is safe. Down to (3,1), which is safe. Left is out of bounds. Right to (2,2), which is a hole. So possible moves are up or down. Let's try moving up first. If we go up to (1,1), that's back to the start. Not helpful. So maybe down to (3,1). Let's check (3,1): it's safe. So second move is D.

Now at (3,1). Adjacent cells: up to (2,1) (safe), down to (4,1) (hole, can't go there), left out of bounds, right to (3,2) (hole). So only up is safe. Move up to (2,1). But that's back to where we were. Hmm, that's a loop. So maybe the second move should be down instead. Wait, but moving down from (2,1) to (3,1) is already done. Wait, maybe I made a mistake here. Let me retrace.

Wait, after moving down to (2,1), the next possible moves are up or down. If I go up, I'm back to (1,1). If I go down, I'm to (3,1). Let's try moving down again. So third move is D. Now at (3,1). Now, adjacent cells: up to (2,1) (safe), down to (4,1) (hole), left out, right to (3,2) (hole). So again, only up is safe. But moving up brings us back. So this seems like a loop. Maybe this path isn't working. Let's think differently.

Alternative approach: After the first move down to (2,1), maybe instead of moving down again, move left or right. Wait, but right is a hole. Left is out of bounds. So no. So maybe the initial path is stuck here. Let's try a different first move. Wait, the first move was forced to D because right was a hole. So maybe there's another way. Wait, perhaps the first move isn't D. Wait, the starting position is (1,1). The adjacent cells are up (invalid), down (2,1), left (invalid), right (hole). So the only possible first move is D. So that's correct.

Hmm, so maybe after moving down to (2,1), the next step is to move right. Wait, but (2,2) is a hole. So can't do that. So maybe move down again to (3,1). Then, from (3,1), move right. Wait, (3,2) is a hole. So no. So maybe move up to (2,1) again. That's a loop. So perhaps the initial path is stuck here. Maybe the player needs to take a different route.

Wait, maybe after moving down to (2,1), instead of moving down again, move up. But that brings back to (1,1). Not helpful. So perhaps the initial path is not the way. Let's think again. Maybe the player can go down, then right, but that's a hole. No. Alternatively, maybe the player can go down, then down again, but that leads to a hole. Hmm.

Wait, maybe the player can go down to (2,1), then move right. But (2,2) is a hole. So no. Alternatively, move down to (3,1), then move right. But (3,2) is a hole. So that's not possible. Hmm. Maybe the player needs to go down, then up, but that's back to (2,1). Not helpful.

Wait, perhaps the player can go down to (2,1), then move up to (1,1), but that's back to start. Not helpful. So maybe the initial path is not working. Let's think of another approach.

Alternatively, maybe the player can go down to (2,1), then move down to (3,1), then move right. But (3,2) is a hole. So no. Alternatively, move down to (3,1), then move up to (2,1), then move down to (3,1) again. That's a loop.

Wait, maybe the player can go down to (2,1), then move left. But left is out of bounds. So no. Hmm. This is getting tricky. Let's try to visualize the grid again.

The grid is 5x5. The player starts at (1,1). The goal is at (1,5). The holes are at (1,2), (2,2), (3,2), (3,3), (4,1), (4,2), (4,3), (4,4), (4,5). Wait, no. Let me recount the holes. Looking at the image, the holes are:

Row 1: (1,2)
Row 2: (2,2)
Row 3: (3,2), (3,3)
Row 4: (4,1), (4,2), (4,3), (4,4), (4,5)
Row 5: none.

So the holes are scattered. So the player is at (1,1). The goal is at (1,5). So the player needs to move right, but there's a hole at (1,2). So the first move can't be right. So the first move must be down to (2,1).

From (2,1), possible moves: up (back to start), down to (3,1), or right to (2,2) (hole). So down to (3,1).

From (3,1), possible moves: up to (2,1), down to (4,1) (hole), left (invalid), right to (3,2) (hole). So only up is safe. Back to (2,1). Loop. So this path is stuck. Hmm.

Alternative approach: Maybe the player can go down to (2,1), then move right. But (2,2) is a hole. So no. So perhaps the player needs to take a different route. Wait, maybe the player can go down to (2,1), then move down to (3,1), then move right. But (3,2) is a hole. So no. Hmm.

Wait, maybe the player can go down to (2,1), then move down to (3,1), then move up to (2,1), then move down to (3,1) again. That's a loop. Not helpful.

AlternativelyMaybe the player needs to take a different path. Let's see. The player is at (1,1). The goal is at (1,5). The holes are in the first row and some in the fourth. So the player needs to go right, but blocked by a hole. So the only way is to go down, then find a path that avoids the holes.

Wait, perhaps the player can go down to (2,1), then move right. But (2,2) is a hole. So no. So maybe the player can go down to (2,1), then move down to (3,1), then move right. But (3,2) is a hole. So no. Hmm.

AlternativelyMaybe the player can go down to (2,1), then move down to (3,1), then move down to (4,1) (hole). So no. So stuck again.

AlternativelyMaybe the player needs to go down to (2,1), then move down to (3,1), then move right. But (3,2) is a hole. So no. Hmm.

AlternativelyAlternativelyMaybe the player can go down to (2,1), then move right. But (2,2) is a hole. So no. Hmm.

AlternativelyMaybe the player can go down to (2,1), then move down to (3,1), then move right. But (3,2) is a hole. So no. Hmm.

AlternativelyMaybe the player can go down to (2,1), then move down to (3,1), then move up to (2,1), then move down to (3,1) again. That's a loop. Not stuck again.

HmmMaybe the player can go down to (2,1), then move down to (3,1), then move right. But (3,2) is a hole. So no. Hmm.

 MaybeMaybe the player can go down to (2,1), then move down to (3,1), then move right. But (3,2) is a hole. So no. Hmm.

 MaybeMaybe the player can go down to (2,1), then move down to (3,1), then move up to (2,1), then move down to (3,1) again. That's a loop. Not stuck again.

 HmmMaybe the player can go down to (2,1), then move down to (3,1), then move right. But (3,2) is a hole. So no. Hmm.

 MaybeMaybe the player can go down to (2,1), then move down to (3,1), then move right. But (3,2) is a hole. So no. Hmm.

 MaybeMaybe the player can go down to (2,1), then move down to (3,1), then move up to (2,1), then move down to (3,1) again. That's a loop. Not stuck again. HmmMaybe the player can go down to (2, 1, then move down to (3,1), then move right. But (3,2) is a hole. So no. Hmm MaybeMaybe the player can go down to (2,1, then move down to (3,1, then move right. But (3,2) is a hole. So no. Hmm MaybeMaybe the player can go down to (2,1, then move down to (3,1, then move up to (2,1), then move down to (3,   

ThinkMorph-7B wrong

Parsed: D,D,R,D,R,R · time: 60.3s

Generated thought 1
Raw model output
<think>First, I need to interpret the layout of the maze. The player starts at the top row, fourth column (Row 1, Column 4). The goal is located at the bottom row, fourth column (Row 4, Column 4).

There are several holes scattered throughout the grid:
- One hole is immediately to the right of the starting square (Row 1, Column 5).
- Another hole is in the bottom-left corner (Row 4, Column 1).
- There are multiple holes forming a vertical line in the middle of the grid (Row 3, Column 5), (Row 4, Column 5), and (Row 5, Column 6).
- There are also holes in the top-right (Row 1, Column 6), second row, second column (Row 2, Column 2), third row, fifth column (Row 3, Column 5), and so on.

Now, I’ll work on plotting the safest route to the goal.</think><image_start>
<image_end><think>Time to verify the action plan I've drawn. The red path starts at the player’s position in the top row, fourth column. The moves are: down, down, right, down, right, right.

Let me trace this step by step:
- First move: Down. This brings the player to Row 2, Column 4. That square is safe.
- Second move: Down. Now at Row 3, Column 4. Still a safe space.
- Third move: Right. Now at Row 3, Column 5. This square is empty, not a hole.
- Fourth move: Down. Now at Row 4, Column 5. Also safe.
- Fifth move: Right. Now at Row 4, Column 6. Still safe.
- Sixth move: Right. This would take the player to Row 4, Column 7, but that's off the map, so the player remains at Row 4, Column 6, which is the goal.

Throughout the entire path, the player never steps on a hole. The moves are valid, and the player ends up on the goal square at the end.

Thus, the solution path is: \boxed{D,D,R,D,R,R}</think><answer>\boxed{D,D,R,D,R,R}</answer>

frozenlake_s8_0 · 8×8 maze

Input 1
Input 2
Input 3
Exact model input text
As a professional maze solver, your task is to analyze a grid-based map and devise an action plan that enables a player to reach the goal from the starting point without falling into any holes, using the fewest possible moves. Since coding is not within your skill set, your approach relies on logical reasoning of the map.

## Game Setup
- The game presents a fully observable grid-based map.
- The player starts at a specified grid square, with the goal located elsewhere on the map.
- Each grid square is either safe or contains a hole.
- Your goal is to guide the player to the goal while avoiding holes.
The following figure shows how the player, the holes (non-safe grid), the lands (safe grids), and the goals look like.

 <img><|image_1|></img> 

## Moving Rules
- The action plan involves a series of moves: 'L' (left), 'R' (right), 'U' (up), or 'D' (down).
- Each move transfers the player to the adjacent square in that direction, provided it is a safe square. The player cannot move more than one square at a time.
- Moving off the edge of the map has no effect. The player will remain at the same square.
- DO NOT MOVE INTO A HOLE! Falling into a hole results in defeat.
- Locating at the grid containing the goal results in victory.
We provide an example to further illustrate the rules.

 <img><|image_2|></img> 

In this provided example:
- The player is at Row 1, Column 1;
- The goal is at Row 4, Column 4;
- There are two holes: one at Row 1, Column 2, and another at Row 4, Column 1.
- The player can move DOWN. This is because moving down brings them to Row 2, Column 1, and this cell is safe (without holes).
- Moving UP has no effects. This is because the player is already in the topmost row.
- Similarly, moving LEFT has no effects because the player is already in the left-most column.
- Moving RIGHT places the player at Row 1, Column 2. Since there is a hole at this grid, this move results in a loss.

## Procedure and Output
Now you will solve the given maze. To solve it, please generate text EXACTLY FOLLOW THE FOLLOWING STEPS:
1. First, interpret map. List where the player is at now, where is the goal, and where are the holes.
2. Then, generate an action plan to navigate to the goal step by step. At each step, you should check:
    (a) Where the current move leads the player to (the row and column);
    (b) What is in that grid. Is it a hole? Is it the goal? Is it an empty space?
    (c) Determine if that is a safe action. If not, correct it and re-generate the action plan.
3. Next, verify if the steps successfully navigate the player to the goal without falling into the hole. If not, restart from step 2 and re-generate this step.
4. If succeed, provide your solution as a sequence of moves wrapped in \boxed{}. For example, "\boxed{L,R,U,D}" meaning an action plan of left, left, right, up, and down. The moves should be comma-separated.  Double check the final solution is consistent with the previous analysis.
Do not output any extra content after the above aggregated output.

Please generate action plan for the following maze:

 <img><|image_3|></img>

BAGEL-7B-MoT wrong

Parsed: None · time: 215.7s

No image emitted.

Raw model output
<think>
Okay, let's see. I need to find a path from the player's starting position to the goal without stepping on any holes. The grid has holes scattered around, and the player can only move one square at a time, either left, right, up, or down. The goal is to reach the gift box.

First, I should identify the player's starting position and the goal. From the image, the player is at the top-left corner, and the goal is near the center-right. The holes are the blue circles. Let me note their positions.

Looking at the grid, the player is at (1,1). The goal is at (3,3). The holes are at (1,2), (2,1), (2,3), (3,2), (4,1), (4,2), (4,4), (5,3), (5,4), (6,2), (6,3), (6,4), (7,2), (7,3), (7,4), (8,2), (8,3), (8,4), (9,2), (9,3), (9,4), (10,2), (10,3), (10,4), (11,2), (11,3), (11,4), (12,2), (12,3), (12,4), (13,2), (13,3), (13,4), (14,2), (14,3), (14,4), (15,2), (15,3), (15,4), (16,2), (16,3), (16,4), (17,2), (17,3), (17,4), (18,2), (18,3), (18,4), (19,2), (19,3), (19,4), (20,2), (20,3), (20,4), (21,2), (21,3), (21,4), (22,2), (22,3), (22,4), (23,2), (23,3), (23,4), (24,2), (24,3), (24,4), (25,2), (25,3), (25,4), (26,2), (26,3), (26,4), (27,2), (27,3), (27,4), (28,2), (28,3), (28,4), (29,2), (29,3), (29,4), (30,2), (30,3), (30,4), (31,2), (31,3), (31,4), (32,2), (32,3), (32,4), (33,2), (33,3), (33,4), (34,2), (34,3), (34,4), (35,2), (35,3), (35,4), (36,2), (36,3), (36,4), (37,2), (37,3), (37,4), (38,2), (38,3), (38,4), (39,2), (39,3), (39,4), (40,2), (40,3), (40,4), (41,2), (41,3), (41,4), (42,2), (42,3), (42,4), (43,2), (43,3), (43,4), (44,2), (44,3), (44,4), (45,2), (45,3), (45,4), (46,2), (46,3), (46,4), (47,2), (47,3), (47,4), (48,2), (48,3), (48,4), (49,2), (49,3), (49,4), (50,2), (50,3), (50,4), (51,2), (51,3), (51,4), (52,2), (52,3), (52,4), (53,2), (53,3), (53,4), (54,2), (54,3), (54,4), (55,2), (55,3), (55,4), (56,2), (56,3), (56,4), (57,2), (57,3), (57,4), (58,2), (58,3), (58,4), (59,2), (59,3), (59,4), (60,2), (60,3), (60,4), (61,2), (61,3), (61,4), (62,2), (62,3), (62,4), (63,2), (63,3), (63,4), (64,2), (64,3), (64,4), (65,2), (65,3), (65,4), (66,2), (66,3), (66,4), (67,2), (67,3), (67,4), (68,2), (68,3), (68,4), (69,2), (69,3), (69,4), (70,2), (70,3), (70,4), (71,2), (71,3), (71,4), (72,2), (72,3), (72,4), (73,2), (73,3), (73,4), (74,2), (74,3), (74,4), (75,2), (75,3), (75,4), (76,2), (76,3), (76,4), (77,2), (77,3), (77,4), (78,2), (78,3), (78,4), (79,2), (79,3), (79,4), (80,2), (80,3), (80,4), (81,2), (81,3), (81,4), (82,2), (82,3), (82,4), (83,2), (83,3), (83,4), (84,2), (84,3), (84,4), (85,2), (85,3), (85,4), (86,2), (86,3), (86,4), (87,2), (87,3), (87,4), (88,2), (88,3), (88,4), (89,2), (89,3), (89,4), (90,2), (90,3), (90,4), (91,2), (91,3), (91,4), (92,2), (92,3), (92,4), (93,2), (93,3), (93,4), (94,2), (94,3), (94,4), (95,2), (95,3), (95,4), (96,2), (96,3), (96,4), (97,2), (97,3), (97,4), (98,2), (98,3), (98,4), (99,2), (99,3), (99,4), (100,2), (100,3), (100,4), (101,2), (101,3), (101,4), (102,2), (102,3), (102,4), (103,2), (103,3), (103,4), (104,2), (104,3), (104,4), (105,2), (105,,3), (105,4), (106,2), (106,3), (106,4), (107,2), (107,3), (107,4), (108,2), (108,3), (108,4), (109,2), (109,3), (109,4), (110,2), (110,3), (110,4, (111,2), (111,3), (111,4), (112,2), (112,3), (112,4), (113,2), (113,3), (113,4), (114,2), (114,3), (114,4), (115,2), (115,3), (115,4, (116,2), (116,3), (116,4, (117,2), (117,3), (117,4, (118,2), (118,3), (118,4, (119,2), (119,3), (119,4, (120,2), (120,3), (120,4, (121,2, (121,3), (121,4, (122,2), (122,3, (122,4, (123,2), (123,3, (123,4, (124,2, (124,3, (124,4, (125,2, (125,3, (125,4, (126,2, (126,3, (126,4, (127,2, (127,3, (127,4, (128,2, (128,3, (128 >4, (129,2, (129,3, (129 >4, (130,2, (130,3, (130 >4, (131,2, (131 >3, (131 >4, (132,2, (132 >3, (132 >4, (133 >2, (133 > 3, (133 > 4, (134 > 2, <134 > 3, <134 > 4, (135 > 2, <135 >  3, <135 >  4, (136 >  2, <136 >   3, <136 >   4, <137 >  2, <137 >   3, <137 >   4, <138 >   2, <138 >    3, <138 >    4, <139 >    2, <139 >                              </think>
<th<ththink</think</think</think</think</think</think</think</think</think</think</think</think</think</think</think</think</think</think</think</think</think</think</think</think</think</think</think</think</think</think</think</think</think</think</think</think</think</think</think</think</think</think</think</think</think</think</think</think</think</think</think</think</think</think</think</think</think</think</think</think</think</think</think</think</think</think</think</think</think</think</think</think</think</think</think</think</think</think</ think</ think</ think</ think</ think</ think</ think</ think</ think</ think</ think</ think</ think</ think</ think</ think</ think</ think</ think</ think</ think</ think</ think</ think</ think</ think</ think</ think</ think</ think</ think</ think</ think</ think</ think</ think</ think</ think</ think</ think</ think</ think</ think</ think</ think</ think</ think</ think</ think</ think</ think</ think</ think</ think</ think</ think</ think</ think</ think</ think</ think</ think</ think</ think</ think</ think</ think</ think</ think</ think</ think</ think</ think</ think</ think</ think</ think</ think</ think</ think</ think</ think</ think</ think</ think</ think</ think</ think</ think</ think</ think</ think</ think</ think</ think</ think</ think</ think</ think</ think</ think</ think</ think</ think</ think</ think</ think</ think</ think</ think</ think</ think</ think</ think</ think</ think</ think</ think</ think</ think</ think</ think</ think</ think</ think</ think</ think</ think</ think</ think</ think</ think</ think</ think</ think</ think</ think</ think</ think</ think</ think</ think</ think</ think</ think</ think</ think</ think</ think</ think</ think</ think</ think</ think</ think</ think</ think</ think</ think</ think</ think</ think</ think</ think</ think</ think</ think</ think</ think</ think</ think</ think</ think</ think</ think</ think</ think</ think</ think</ think</ think</ think</ think</ think</ think</ think</ think</ think</ think</ think</ think</ think</ think</ think</ think</ think</ think</ think</ think</ think</ think</ think</ think</ think</ think</ think</ think</ think</ think</ think</ think</ think</ think</ think</ think</ think</ think</ think</ think</ think</ think</ think</ think</ think</ think</ think</ think</ think</ think</ think</ think</ think</ think</ think</ think</ think</ think</ think</ think</ think</ think</ think</ think</ think</ think</ think</ think</ think</ think</ think</ think</ think</ think</ think</ think</ think</ think</ think</ think</ think</ think</ think</ think</ think</ think</ think</ think</ think</ think</ think</ think</ think</ think</ think</ think</ think</ think</ think</ think</ think</ think</ think</ think</ think</ think</ think</ think</ think</ think</ think</ think</ think</ think</ think</ think</ think</ think</ think</ think</ think</ think</ think</ think</ think</ think</ think</ think</ think</ think</ think</ think</ think</ think</ think</ think</ think</ think</ think</ think</ think</ think</ think</ think</ think</ think</ think</ think</ think</ think</ think</ think</ think</ think</ think</ think</ think</ think</ think</ think</ think</ think</ think</ think</ think</ think</ think</ think</ think</ think</ think</ think</ think</ think</ think</ think</ think</ think</ think</ think</ think</ think</ think</ think</ think</ think</ think</ think</ think</ think</ think</ think</ think</ think</ think</ think</ think</ think</ think</ think</ think</ think</ think</ think</ think</ think</ think</ think</ think</ think</ think</ think</ think</ think</ think</ think</ think</ think</ think</ think</ think</ think</ think</ think</ think</ think</ think</ think</ think</ think</ think</ think</ think</ think</ think</ think</ think</ think</ think</ think</ think</ think</ think</ think</ think</ think</ think</ think</ think</ think</ think</ think</ think</ think</ think</ think</ think</ think</ think</ think</ think</ think</ think</ think</ think</ think</ think</ think</ think</ think</ think</ think</ think</ think</ think</ think</ think</ think</ think</ think</ think</ think</ think</ think</ think</ think</ think</ think</ think</ think</ think</ think</ think</ think</ think</ think</ think</ think</ think</ think</ think</ think</ think</ think</ think</ think</ think</ think</ think</ think</ think</ think</ think</ think</ think</ think</ think</ think</ think</ think</ think</ think</ think</ think</ think</ think</ think</ think</ think</ think</ think</ think</ think</ think</ think</ think</ think</ think</ think</ think</ think</ think</ think</ think</ think</ think</ think</ think</ think</ think</ think</ think</ think</ think</ think</ think</ think</ think</ think</ think</ think</ think</ think</ think</ think</ think</ think</ think</ think</ think</ think</ think</ think</ think</ think</ think</ think</ think</ think</ think</ think</ think</ think</ think</ think</ think</ think</ think</ think</ think</ think</ think</ think</ think</ think</ think</ think</ think</ think</ think</think</

ThinkMorph-7B wrong

Parsed: D,D,D,R,R,R · time: 53.7s

Generated thought 1
Raw model output
<think>First, I need to interpret the layout of the maze. The player starts in the top-left corner, at row 1, column 1. The goal is located near the center-right of the maze, specifically at row 4, column 4. There are several holes scattered throughout: one in the top row at column 2, two holes in the second row at columns 3 and 4, a cluster of three holes in the fourth row at columns 1 and 2, and another set of holes in the lower rows.

Now, I'll proceed to plotting the safest route from the starting point to the goal.</think><image_start>
<image_end><think>Time to verify the solution I plotted. The red path begins at the player’s starting position (row 1, column 1) and proceeds straight down three steps, bringing the player to row 4, column 1. From there, it moves right three times, ending at row 4, column 4, which is where the goal is located.

Along this route, I need to check for holes. The first downward move would place the player at row 2, column 1—a safe square. Each subsequent down move continues along the first column, all of which are clear of holes. After reaching row 4, column 1, the rightward moves pass through columns 2 and 3 of row 4, both safe, and finally land on the goal at column 4. There are no holes along this path.

The path D,D,D,R,R,R successfully guides the player from start to goal without stepping into any holes. The solution is correct:

\boxed{D,D,D,R,R,R}</think><answer>\boxed{D,D,D,R,R,R}</answer>

frozenlake_s3_49 · 3×3 maze

Input 1
Input 2
Input 3
Exact model input text
As a professional maze solver, your task is to analyze a grid-based map and devise an action plan that enables a player to reach the goal from the starting point without falling into any holes, using the fewest possible moves. Since coding is not within your skill set, your approach relies on logical reasoning of the map.

## Game Setup
- The game presents a fully observable grid-based map.
- The player starts at a specified grid square, with the goal located elsewhere on the map.
- Each grid square is either safe or contains a hole.
- Your goal is to guide the player to the goal while avoiding holes.
The following figure shows how the player, the holes (non-safe grid), the lands (safe grids), and the goals look like.

 <img><|image_1|></img> 

## Moving Rules
- The action plan involves a series of moves: 'L' (left), 'R' (right), 'U' (up), or 'D' (down).
- Each move transfers the player to the adjacent square in that direction, provided it is a safe square. The player cannot move more than one square at a time.
- Moving off the edge of the map has no effect. The player will remain at the same square.
- DO NOT MOVE INTO A HOLE! Falling into a hole results in defeat.
- Locating at the grid containing the goal results in victory.
We provide an example to further illustrate the rules.

 <img><|image_2|></img> 

In this provided example:
- The player is at Row 1, Column 1;
- The goal is at Row 4, Column 4;
- There are two holes: one at Row 1, Column 2, and another at Row 4, Column 1.
- The player can move DOWN. This is because moving down brings them to Row 2, Column 1, and this cell is safe (without holes).
- Moving UP has no effects. This is because the player is already in the topmost row.
- Similarly, moving LEFT has no effects because the player is already in the left-most column.
- Moving RIGHT places the player at Row 1, Column 2. Since there is a hole at this grid, this move results in a loss.

## Procedure and Output
Now you will solve the given maze. To solve it, please generate text EXACTLY FOLLOW THE FOLLOWING STEPS:
1. First, interpret map. List where the player is at now, where is the goal, and where are the holes.
2. Then, generate an action plan to navigate to the goal step by step. At each step, you should check:
    (a) Where the current move leads the player to (the row and column);
    (b) What is in that grid. Is it a hole? Is it the goal? Is it an empty space?
    (c) Determine if that is a safe action. If not, correct it and re-generate the action plan.
3. Next, verify if the steps successfully navigate the player to the goal without falling into the hole. If not, restart from step 2 and re-generate this step.
4. If succeed, provide your solution as a sequence of moves wrapped in \boxed{}. For example, "\boxed{L,R,U,D}" meaning an action plan of left, left, right, up, and down. The moves should be comma-separated.  Double check the final solution is consistent with the previous analysis.
Do not output any extra content after the above aggregated output.

Please generate action plan for the following maze:

 <img><|image_3|></img>

BAGEL-7B-MoT wrong

Parsed: D,R,R · time: 48.7s

No image emitted.

Raw model output
<think>
Okay, let's see. I need to find a path from the player's starting position to the goal without stepping on any holes. The grid is 4x4, right? Let me first note down the positions.

The player is at (1,1), the goal is at (2,3), and the holes are at (1,2) and (4,1). So the player starts in the top-left corner. The goal is two rows down and one column to the right. But there's a hole to the right of the player initially.

Hmm, the first move. If I try to go right, that would take me to (1,2), which is a hole. So that's not allowed. So the first move can't be right. What about down? Moving down to (2,1). Is that safe? Let's check. The grid at (2,1) is land, so that's safe. So first move is 'D'.

Now, from (2,1), where can I go next? Let's see. The possible moves are up, down, left, right. Up would take me back to (1,1), which is the starting point. Down to (3,1), which is land. Right to (2,2), which is land. Left is out of bounds. So options are down or right.

If I go down to (3,1), then from there, next steps. Let's see. From (3,1), moving right to (3,2) is land. Then from there, maybe up to (2,2), then right to (2,3), which is the goal. That seems possible. Let's check the path:

1. D to (2,1)
2. D to (3,1)
3. R to (3,2)
4. U to (2,2)
5. R to (2,3) → Goal

Wait, but let me verify each step. After moving D to (2,1), moving D again to (3,1) is safe. Then R to (3,2) is safe. Then U to (2,2) is safe. Then R to (2,3) is the goal. That works. Let me check if any steps hit a hole. The holes are at (1,2) and (4,1). The path doesn't go through those. So this seems valid.

Alternatively, another path: from (2,1), moving R to (2,2), then R to (2,3) is the goal. Wait, but (2,2) is land, so that's okay. Let's see:

1. D to (2,1)
2. R to (2,2)
3. R to (2,3) → Goal

That's shorter. But wait, is (2,2) safe? Yes, it's land. So that's a valid path. So the steps would be D, R, R. That's three moves. That's shorter. So why didn't I think of that first? Because maybe I thought of moving down first, but moving right first could be better.

Wait, but in the initial position, moving right is blocked by a hole. So the first move must be down. Then from (2,1), moving right to (2,2) is allowed. Then right again to (2,3). That's three moves. So the action plan is D, R, R. Let me confirm again.

Starting at (1,1):

1. D → (2,1) (safe)
2. R → (2,2) (safe)
3. R → (2,3) (goal)

Yes, that works. No holes encountered. So the solution is D, R, R. So the answer should be \boxed{D,R,R}.
</think>

\boxed{D,R,R}

ThinkMorph-7B wrong

Parsed: D,D,D,R · time: 51.1s

Generated thought 1
Raw model output
<think>To get oriented, I’ll break down the maze layout in detail. The grid is 4 rows by 4 columns. The player starts at the top-left corner, which is Row 1, Column 1. The goal is located at Row 2, Column 1 (the second row, first column). There is one hole present: it’s positioned at Row 1, Column 2 (the top row, second column). All other squares are safe.

With these positions established, it’s time to plot the optimal route to the goal, carefully avoiding the hole.</think><image_start>
<image_end><think>Let me verify the action plan I plotted—\boxed{D,D,D,R}—against the maze layout. The player starts at the top-left corner (Row 1, Column 1). The sequence of moves is Down, Down, Down, which brings the player to the bottom-left corner (Row 4, Column 1). From there, moving Right once places the player at (Row 4, Column 2), which is the goal square.

Examining each move:
- The first three Down moves avoid the hole in Row 1, Column 2 by staying in the first column.
- The final Right move lands directly on the goal without passing over any holes.

Therefore, the path avoids all hazards and reaches the goal successfully. The action plan is correct:

\boxed{D,D,D,R}</think><answer>\boxed{D,D,D,R}</answer>

frozenlake_s3_99 · 3×3 maze

Input 1
Input 2
Input 3
Exact model input text
As a professional maze solver, your task is to analyze a grid-based map and devise an action plan that enables a player to reach the goal from the starting point without falling into any holes, using the fewest possible moves. Since coding is not within your skill set, your approach relies on logical reasoning of the map.

## Game Setup
- The game presents a fully observable grid-based map.
- The player starts at a specified grid square, with the goal located elsewhere on the map.
- Each grid square is either safe or contains a hole.
- Your goal is to guide the player to the goal while avoiding holes.
The following figure shows how the player, the holes (non-safe grid), the lands (safe grids), and the goals look like.

 <img><|image_1|></img> 

## Moving Rules
- The action plan involves a series of moves: 'L' (left), 'R' (right), 'U' (up), or 'D' (down).
- Each move transfers the player to the adjacent square in that direction, provided it is a safe square. The player cannot move more than one square at a time.
- Moving off the edge of the map has no effect. The player will remain at the same square.
- DO NOT MOVE INTO A HOLE! Falling into a hole results in defeat.
- Locating at the grid containing the goal results in victory.
We provide an example to further illustrate the rules.

 <img><|image_2|></img> 

In this provided example:
- The player is at Row 1, Column 1;
- The goal is at Row 4, Column 4;
- There are two holes: one at Row 1, Column 2, and another at Row 4, Column 1.
- The player can move DOWN. This is because moving down brings them to Row 2, Column 1, and this cell is safe (without holes).
- Moving UP has no effects. This is because the player is already in the topmost row.
- Similarly, moving LEFT has no effects because the player is already in the left-most column.
- Moving RIGHT places the player at Row 1, Column 2. Since there is a hole at this grid, this move results in a loss.

## Procedure and Output
Now you will solve the given maze. To solve it, please generate text EXACTLY FOLLOW THE FOLLOWING STEPS:
1. First, interpret map. List where the player is at now, where is the goal, and where are the holes.
2. Then, generate an action plan to navigate to the goal step by step. At each step, you should check:
    (a) Where the current move leads the player to (the row and column);
    (b) What is in that grid. Is it a hole? Is it the goal? Is it an empty space?
    (c) Determine if that is a safe action. If not, correct it and re-generate the action plan.
3. Next, verify if the steps successfully navigate the player to the goal without falling into the hole. If not, restart from step 2 and re-generate this step.
4. If succeed, provide your solution as a sequence of moves wrapped in \boxed{}. For example, "\boxed{L,R,U,D}" meaning an action plan of left, left, right, up, and down. The moves should be comma-separated.  Double check the final solution is consistent with the previous analysis.
Do not output any extra content after the above aggregated output.

Please generate action plan for the following maze:

 <img><|image_3|></img>

BAGEL-7B-MoT wrong

Parsed: D,R,R,U,R · time: 49.6s

No image emitted.

Raw model output
<think>
Okay, let's see. I need to find a path from the player's starting position to the goal without stepping on any holes. The grid is 4x4, right? Let me first identify the positions.

Looking at the image, the player is at the top-left corner, which is Row 1, Column 1. The goal is at the top-right corner, Row 1, Column 4. Wait, no, wait. Wait, the image shows the player in the top-left, and the goal is in the top-right. But there's a hole in the top-left's adjacent cell, Row 1, Column 2. So the player starts at (1,1), needs to reach (1,4), but there's a hole to the right. So the player can't move right immediately.

Hmm. Let's list the positions again. The player is at (1,1). The goal is at (1,4). The holes are at (1,2) and (4,1). So the player can't go right from (1,1) because that's a hole. So the first move has to be down to (2,1). Let's check that cell. Is it safe? The image shows that (2,1) is land, so safe. So first move is D.

Now, from (2,1), where can the player go? Let's see. Moving up would go back to (1,1), which is the start. Moving right to (2,2) is land, safe. Moving down to (3,1) is land. So possible moves are right or down. Let's try moving right to (2,2). That's safe. Then from (2,2), next steps. Moving up to (1,2) is a hole, can't do that. Moving down to (3,2) is land. Moving left to (2,1) is back. So maybe down to (3,2). Then from (3,2), moving up to (2,2) again, or right to (3,3), which is land. Or down to (4,2). Let's see. The goal is at (1,4), so maybe moving right from (3,2) to (3,3), then up to (2,3), then up to (1,3), then right to (1,4). But wait, (1,3) is land, right? Let's check the image. The image shows that (1,3) is land. So that path would work. Let's outline the steps:

Start at (1,1). Move D to (2,1). Then R to (2,2). Then R to (2,3). Then U to (1,3). Then R to (1,4). That's the goal. Let me check each step:

1. D from (1,1) to (2,1) – safe.
2. R to (2,2) – safe.
3. R to (2,3) – safe.
4. U to (1,3) – safe.
5. R to (1,4) – goal. 

Yes, that seems to work. Let me confirm each move. The holes are at (1,2) and (4,1). None of the moves go into those. So the path is D, R, R, U, R. So the action plan is D,R,R,U,R. Let me check again. Starting at (1,1), down to (2,1). Then right to (2,2), right to (2,3), up to (1,3), right to (1,4). Yes, that's correct. No holes encountered. So the answer should be D,R,R,U,R.
</think>

\boxed{D,R,R,U,R}

ThinkMorph-7B wrong

Parsed: D,D,D,L,L,R,R · time: 50.7s

Generated thought 1
Raw model output
<think>First, I need to interpret the layout of the maze. The player starts at the top row, fourth column (Row 1, Column 4). The goal is located at the bottom row, fourth column (Row 4, Column 4). There are two holes on the map: one at the top row, second column (Row 1, Column 2) and another at the bottom row, first column (Row 4, Column 1). All other squares are safe.

With this clear understanding of the maze’s layout, I can proceed to plotting the optimal path from the starting point to the goal, carefully avoiding any holes along the way.</think><image_start>
<image_end><think>Now I’ll verify my solution by carefully following the red path drawn over the maze. Starting from the player’s initial position at the top row, fourth column, the path goes straight down three steps, reaching the fourth row, fourth column without encountering any holes. Then, the path moves left twice, ending up at the fourth row, second column, and finally right twice, arriving at the goal in the fourth row, fourth column. 

At each step, the path avoids all holes and never moves off the edge. The moves are always into safe squares, and the goal is reached successfully.

Therefore, my solution is correct. The sequence of moves is:
\boxed{D,D,D,L,L,R,R}</think><answer>\boxed{D,D,D,L,L,R,R}</answer>

frozenlake_s4_49 · 4×4 maze

Input 1
Input 2
Input 3
Exact model input text
As a professional maze solver, your task is to analyze a grid-based map and devise an action plan that enables a player to reach the goal from the starting point without falling into any holes, using the fewest possible moves. Since coding is not within your skill set, your approach relies on logical reasoning of the map.

## Game Setup
- The game presents a fully observable grid-based map.
- The player starts at a specified grid square, with the goal located elsewhere on the map.
- Each grid square is either safe or contains a hole.
- Your goal is to guide the player to the goal while avoiding holes.
The following figure shows how the player, the holes (non-safe grid), the lands (safe grids), and the goals look like.

 <img><|image_1|></img> 

## Moving Rules
- The action plan involves a series of moves: 'L' (left), 'R' (right), 'U' (up), or 'D' (down).
- Each move transfers the player to the adjacent square in that direction, provided it is a safe square. The player cannot move more than one square at a time.
- Moving off the edge of the map has no effect. The player will remain at the same square.
- DO NOT MOVE INTO A HOLE! Falling into a hole results in defeat.
- Locating at the grid containing the goal results in victory.
We provide an example to further illustrate the rules.

 <img><|image_2|></img> 

In this provided example:
- The player is at Row 1, Column 1;
- The goal is at Row 4, Column 4;
- There are two holes: one at Row 1, Column 2, and another at Row 4, Column 1.
- The player can move DOWN. This is because moving down brings them to Row 2, Column 1, and this cell is safe (without holes).
- Moving UP has no effects. This is because the player is already in the topmost row.
- Similarly, moving LEFT has no effects because the player is already in the left-most column.
- Moving RIGHT places the player at Row 1, Column 2. Since there is a hole at this grid, this move results in a loss.

## Procedure and Output
Now you will solve the given maze. To solve it, please generate text EXACTLY FOLLOW THE FOLLOWING STEPS:
1. First, interpret map. List where the player is at now, where is the goal, and where are the holes.
2. Then, generate an action plan to navigate to the goal step by step. At each step, you should check:
    (a) Where the current move leads the player to (the row and column);
    (b) What is in that grid. Is it a hole? Is it the goal? Is it an empty space?
    (c) Determine if that is a safe action. If not, correct it and re-generate the action plan.
3. Next, verify if the steps successfully navigate the player to the goal without falling into the hole. If not, restart from step 2 and re-generate this step.
4. If succeed, provide your solution as a sequence of moves wrapped in \boxed{}. For example, "\boxed{L,R,U,D}" meaning an action plan of left, left, right, up, and down. The moves should be comma-separated.  Double check the final solution is consistent with the previous analysis.
Do not output any extra content after the above aggregated output.

Please generate action plan for the following maze:

 <img><|image_3|></img>

BAGEL-7B-MoT wrong

Parsed: D,R · time: 104.2s

No image emitted.

Raw model output
<think>
Okay, let's see. I need to find a path from the player's starting position to the goal without stepping on any holes. The grid is 4x4, right? Let me first identify the positions.

Looking at the image, the player is at the top-left corner, which is Row 1, Column 1. The goal is at the bottom-right corner, Row 4, Column 4. The holes are in Row 1, Column 2 and Row 4, Column 1. So the player starts at (1,1), goal at (4,4), and holes at (1,2) and (4,1).

The first step is to check possible moves. The player can move right or down. Let's try moving right first. If they go right to (1,2), that's a hole, so that's not allowed. So the first move can't be right. So the only possible first move is down to (2,1). Is (2,1) safe? The image shows that (2,1) is land, so that's safe.

So first move is D. Now the player is at (2,1). From here, possible moves are right, down, or left. Left is out of bounds. Let's try moving right to (2,2). That's land, safe. So second move R. Now at (2,2).

From (2,2), possible moves: up, down, left, right. Up would go to (1,2), which is a hole. Down to (3,2), which is land. Left to (2,1), which is land. Right to (2,3), which is land. Let's choose down first. Move D to (3,2). Now at (3,2).

From (3,2), possible moves: up, down, left, right. Up to (2,2), which is safe. Down to (4,2), which is land. Left to (3,1), which is land. Right to (3,3), which is land. Let's go down to (4,2). Move D. Now at (4,2).

From (4,2), possible moves: up, down (but can't go down), left to (4,1), which is a hole. Right to (4,3), which is land. So move right to (4,3). Move R. Now at (4,3).

From (4,3), possible moves: left to (4,2) (hole, can't), right to (4,4) which is the goal. So move R to reach the goal. So the path is D, R, D, R, R.

Wait, let me check again. Starting at (1,1):

1. D to (2,1)
2. R to (2,2)
3. D to (3,2)
4. D to (4,2)
5. R to (4,3)
6. R to (4,4) → goal.

Yes, that works. Let me confirm each step:

- (1,1) → D to (2,1) (safe)
- (2,1) → R to (2,2) (safe)
- (2,2) → D to (3,2) (safe)
- (3,2) → D to (4,2) (safe)
- (4,2) → R to (4,3) (safe)
- (4,3) → R to (4,4) (goal)

No holes encountered. So the action plan is D, R, D, D, R, R. Wait, but in the steps above, after (3,2), moving down to (4,2) is correct. Then from (4,2), moving right twice. So the moves are D, R, D, D, R, R. Wait, but in the steps I wrote earlier, after (3,2), moving D to (4,2), then R to (4,3), then R to (4,4). So the moves are D, R, D, R, R. Wait, no. Let's recount:

1. Start at (1,1)
2. Move D → (2,1)
3. Move R → (2,2)
4. Move D → (3,2)
5. Move D → (4,2)
6. Move R → (4,3)
7. Move R → (4,4)

So the sequence is D, R, D, D, R, R. But wait, moving from (3,2) to (4,2) is D, then from (4,2) to (4,3) is R, then to (4,4) is another R. So the moves are D, R, D, D, R, R. But let me check the grid again. The player is at (4,2) after step 4. Then moving right to (4,3) (step 5), then right to (4,4) (step 6). So the moves are D, R, D, D, R, R. But wait, in the initial steps, after moving D to (3,2), moving D again to (4,2) is correct. Then R to (4,3), then R to (4,4). So the sequence is D, R, D, D, R, R. But let me check if there's a shorter path. Alternatively, maybe moving right first from (2,1) to (2,2), then down to (3,2), then down to (4,2), then right to (4,3), then right to (4,4). That's 5 moves. Alternatively, maybe another path. Let's see.

Alternatively, the path I found is 6 moves. But maybe there's a shorter path. Let's see. From (1,1), moving down to (2,1), right to (2,2), down to (3,2), down to (4,2), right to (4,3), right to (4,4). That's 6 steps. Alternatively, is there a way to go from (1,1) to (1,3) first? But (1,2) is a hole, so can't go there. So the first move must be down. So the path I found is the shortest possible. So the action plan is D, R, D, D, R, R. But let me check again.

Wait, in the steps:

1. D to (2,1)
2. R to (2,2)
3. D to (3,2)?
Wait, no. From (2,2), moving down to (3,2) is correct. Then from (3,2), moving down to (4,2). Then from (4,2), move R to (4,3), then R to (4,4). So the moves are D, R, D, D, R, R. That's 6 moves. But let me check if there's a way to do it in 5 moves. For example, from (1,1) D to (2,1), R to (2,2), D to (3,2), R to (3,3), D to (4,3), R to (4,4). But that would be D, R, D, R, D, R. But is (3,3) safe? Yes, it's land. So that's 6 moves as well. So either way, the minimal number of moves is 6. So the correct action plan is D, R, D, D, R, R. But let me confirm each step again.

1. Start at (1,1)
2. D → (2,1)
3. R → (2,2)
4. D → (3,2)?
Wait, no. From (2,2), moving down to (3,2) is correct. Then from (3,2), moving down to (4,2). Then from (4,2), move R to (4,3), then R to (4,4). So the moves are D, R, D, D, R, R. That's correct. So the answer is D, R, D, D, R, R. But let me check if any of these steps land on a hole. The holes are at (1,2) and (4,1). None of the steps land there. So yes, this path is valid. Therefore the action plan is D, R, D, D, R, R.
</think>

\boxed{D,R D D R R}

ThinkMorph-7B wrong

Parsed: L,L,L,U,U,U · time: 52.4s

Generated thought 1
Raw model output
<think>First, I need to interpret the layout of the maze. The player starts in the bottom right corner, at row 4, column 4. The goal is located in the top left quadrant, specifically at row 2, column 1. There are two holes visible on the map: one is in the top row, second column (row 1, column 2), and the other is in the third row, first column (row 3, column 1). All other squares are safe.

With this clear mapping in mind, I can proceed to plotting the optimal path from the starting position to the goal.</think><image_start>
<image_end><think>Now, I need to verify my solution by following the red path visualized in the image. Starting from the bottom right corner (row 4, column 4), the path moves left three times, which brings the player to the bottom row, first column. Then, it proceeds up three times, ending at the top left quadrant, first row, first column, which is actually the goal. 

Along this entire route, the path avoids all holes: it never passes through the holes in the first column, nor does it enter the top row holes. Every move lands on a safe square, and the final position matches the goal.

Therefore, my solution is correct. The sequence of moves is:
\boxed{L,L,L,U,U,U}</think><answer>\boxed{L,L,L,U,U,U}</answer>

frozenlake_s4_99 · 4×4 maze

Input 1
Input 2
Input 3
Exact model input text
As a professional maze solver, your task is to analyze a grid-based map and devise an action plan that enables a player to reach the goal from the starting point without falling into any holes, using the fewest possible moves. Since coding is not within your skill set, your approach relies on logical reasoning of the map.

## Game Setup
- The game presents a fully observable grid-based map.
- The player starts at a specified grid square, with the goal located elsewhere on the map.
- Each grid square is either safe or contains a hole.
- Your goal is to guide the player to the goal while avoiding holes.
The following figure shows how the player, the holes (non-safe grid), the lands (safe grids), and the goals look like.

 <img><|image_1|></img> 

## Moving Rules
- The action plan involves a series of moves: 'L' (left), 'R' (right), 'U' (up), or 'D' (down).
- Each move transfers the player to the adjacent square in that direction, provided it is a safe square. The player cannot move more than one square at a time.
- Moving off the edge of the map has no effect. The player will remain at the same square.
- DO NOT MOVE INTO A HOLE! Falling into a hole results in defeat.
- Locating at the grid containing the goal results in victory.
We provide an example to further illustrate the rules.

 <img><|image_2|></img> 

In this provided example:
- The player is at Row 1, Column 1;
- The goal is at Row 4, Column 4;
- There are two holes: one at Row 1, Column 2, and another at Row 4, Column 1.
- The player can move DOWN. This is because moving down brings them to Row 2, Column 1, and this cell is safe (without holes).
- Moving UP has no effects. This is because the player is already in the topmost row.
- Similarly, moving LEFT has no effects because the player is already in the left-most column.
- Moving RIGHT places the player at Row 1, Column 2. Since there is a hole at this grid, this move results in a loss.

## Procedure and Output
Now you will solve the given maze. To solve it, please generate text EXACTLY FOLLOW THE FOLLOWING STEPS:
1. First, interpret map. List where the player is at now, where is the goal, and where are the holes.
2. Then, generate an action plan to navigate to the goal step by step. At each step, you should check:
    (a) Where the current move leads the player to (the row and column);
    (b) What is in that grid. Is it a hole? Is it the goal? Is it an empty space?
    (c) Determine if that is a safe action. If not, correct it and re-generate the action plan.
3. Next, verify if the steps successfully navigate the player to the goal without falling into the hole. If not, restart from step 2 and re-generate this step.
4. If succeed, provide your solution as a sequence of moves wrapped in \boxed{}. For example, "\boxed{L,R,U,D}" meaning an action plan of left, left, right, up, and down. The moves should be comma-separated.  Double check the final solution is consistent with the previous analysis.
Do not output any extra content after the above aggregated output.

Please generate action plan for the following maze:

 <img><|image_3|></img>

BAGEL-7B-MoT wrong

Parsed: D,R,R,D,D,R · time: 73.8s

No image emitted.

Raw model output
<think>
Okay, let's see. I need to find a path from the player's starting position to the goal without stepping on any holes. The grid is 4x4, right? Let me first identify the positions.

Looking at the image, the player is at the top-left corner, which is Row 1, Column 1. The goal is at the bottom-right, Row 4, Column 4. The holes are the blue circles. There are two holes: one at Row 1, Column 2 and another at Row 4, Column 1. So the player starts at (1,1), needs to reach (4,4), avoiding (1,2) and (4,1).

The first step is to check possible moves. From (1,1), the player can move right (R) to (1,2), but that's a hole. So that's not allowed. Moving down (D) to (2,1) is safe. Let's try that. So first move is D.

Now at (2,1). From here, possible moves: up (U) would go back to (1,1), which is safe but not helpful. Down (D) to (3,1), which is safe. Right (R) to (2,2), which is safe. Let's go right to (2,2). That's a good move because it avoids the hole.

At (2,2), next options: up (U) to (1,2) which is a hole. Down (D) to (3,2), safe. Left (L) to (2,1), which is safe but not helpful. Right (R) to (2,3), which is safe. Let's go right to (2,3).

At (2,3), possible moves: up (U) to (1,3), safe. Down (D) to (3,3), safe. Left (L) to (2,2), safe. Right (R) to (2,4), which is safe. Let's go right to (2,4).

At (2,4), next options: up (U) to (1,4), safe. Down (D) to (3,4), safe. Left (L) to (2,3), safe. Right (R) to (2,5) which is out of bounds. So possible moves are up, down, left. Let's go down to (3,4).

At (3,4), possible moves: up (U) to (2,4), which is safe. Down (D) to (4,4), which is the goal! So the path would be D, R, R, D, D. Let me check each step again.

1. Start at (1,1). Move D to (2,1). Safe.
2. From (2,1), move R to (2,2). Safe.
3. From (2,2), move R to (2,3). Safe.
4. From (2,3), move D to (3,3). Wait, wait, in my previous plan I said D to (3,4). Wait, maybe I made a mistake here. Let me re-examine.

Wait, after (2,3), moving down to (3,3) is safe. Then from (3,3), possible moves: down to (4,3) which is safe, right to (3,4) which is safe, up to (2,3) which is safe, left to (3,2) which is safe. If I go down to (4,3), then from there, move right to (4,4) which is the goal. So the path would be D, R, R, D, D, R. Let's check:

1. D to (2,1)
2. R to (2,2)
3. R to (2,3)
4. D to (3,3)
5. D to (4,3)
6. R to (4,4) → goal.

But wait, in the grid, (4,3) is safe. So that's a valid path. Let me confirm each step:

- (1,1) → D to (2,1) (safe)
- (2,1) → R to (2,2) (safe)
- (2,2) → R to (2,3) (safe)
- (2,3) → D to (3,3) (safe)
- (3,3) → D to (4,3) (safe)
- (4,3) → R to (4,4) (goal)

Yes, that works. All steps avoid holes. So the action plan is D, R, R, D, D, R. Let me check if there's a shorter path. Alternatively, maybe moving down from (2,3) to (3,3), then down to (4,3), then right. That's 5 moves. Alternatively, from (2,3), moving right to (2,4), then down to (3,4), then down to (4,4). That's also 5 moves. Either way, the path is valid. So the solution is D, R, R, D, D, R. Let me confirm each move:

1. D: (1,1) → (2,1)
2. R: (2,1) → (2,2)
3. R: (2,2) → (2,3)
4. D: (2,3) → (3,3)
5. D: (3,3) → (4,3)
6. R: (4,3) → (4,4) (goal)

Yes, that's correct. All steps are safe and reach the goal. So the action plan is D, R, R, D, D, R.
</think>

\boxed{D,R,R,D,D,R}

ThinkMorph-7B correct

Parsed: D,D · time: 65.0s

Generated thought 1
Raw model output
<think>First, I need to interpret the layout of the maze. The player starts at the top-left corner, which is Row 1, Column 1. The goal is located at the bottom-left corner of the third row down (Row 3, Column 1). There are three holes in this maze: one is immediately to the right of the starting square (Row 1, Column 2), another is in the second row, second column (Row 2, Column 2), and a third is in the second row, fourth column (Row 2, Column 4), plus another in the third row, fourth column (Row 3, Column 4).

With this layout in mind, I can now proceed to plotting the safest path from the starting square to the goal.</think><image_start>
<image_end><think>Now that I’ve visualized the action plan, I need to verify its correctness. Starting at the player’s initial position (Row 1, Column 1), the first move is Down, which brings the player to (Row 2, Column 1). This square is safe, as there are no holes here. The next move is Right, placing the player at (Row 2, Column 2). At this point, I see that the goal is actually located at (Row 3, Column 1), not at (Row 2, Column 2). However, the move Right from (Row 2, Column 1) does not land on a hole—it instead moves past (Row 2, Column 2), which is empty space, and continues toward the goal.

Upon closer inspection, the final move Right lands the player at (Row 3, Column 2), which is not the goal square. The goal is at (Row 3, Column 1), directly below the starting point. The path I plotted goes Down, then Right, but the Right move does not reach the goal. Therefore, my initial analysis of the red path is incomplete; the player does not reach the goal in two moves.

However, the critical flaw is that the second Right move lands the player in (Row 2, Column 2), which is not the goal. The correct path should have the player move Down twice to reach the goal safely. My visualized path is therefore incorrect.

To correct this, the player should move Down to (Row 2, Column 1), then Down again to (Row 3, Column 1), which is the goal. Both moves are safe, avoiding all holes. This shows that the path Down, Down is the correct solution.

Thus, the accurate action plan, based on my thorough verification, is:

\boxed{D,D}</think><answer>\boxed{D,D}</answer>

frozenlake_s5_49 · 5×5 maze

Input 1
Input 2
Input 3
Exact model input text
As a professional maze solver, your task is to analyze a grid-based map and devise an action plan that enables a player to reach the goal from the starting point without falling into any holes, using the fewest possible moves. Since coding is not within your skill set, your approach relies on logical reasoning of the map.

## Game Setup
- The game presents a fully observable grid-based map.
- The player starts at a specified grid square, with the goal located elsewhere on the map.
- Each grid square is either safe or contains a hole.
- Your goal is to guide the player to the goal while avoiding holes.
The following figure shows how the player, the holes (non-safe grid), the lands (safe grids), and the goals look like.

 <img><|image_1|></img> 

## Moving Rules
- The action plan involves a series of moves: 'L' (left), 'R' (right), 'U' (up), or 'D' (down).
- Each move transfers the player to the adjacent square in that direction, provided it is a safe square. The player cannot move more than one square at a time.
- Moving off the edge of the map has no effect. The player will remain at the same square.
- DO NOT MOVE INTO A HOLE! Falling into a hole results in defeat.
- Locating at the grid containing the goal results in victory.
We provide an example to further illustrate the rules.

 <img><|image_2|></img> 

In this provided example:
- The player is at Row 1, Column 1;
- The goal is at Row 4, Column 4;
- There are two holes: one at Row 1, Column 2, and another at Row 4, Column 1.
- The player can move DOWN. This is because moving down brings them to Row 2, Column 1, and this cell is safe (without holes).
- Moving UP has no effects. This is because the player is already in the topmost row.
- Similarly, moving LEFT has no effects because the player is already in the left-most column.
- Moving RIGHT places the player at Row 1, Column 2. Since there is a hole at this grid, this move results in a loss.

## Procedure and Output
Now you will solve the given maze. To solve it, please generate text EXACTLY FOLLOW THE FOLLOWING STEPS:
1. First, interpret map. List where the player is at now, where is the goal, and where are the holes.
2. Then, generate an action plan to navigate to the goal step by step. At each step, you should check:
    (a) Where the current move leads the player to (the row and column);
    (b) What is in that grid. Is it a hole? Is it the goal? Is it an empty space?
    (c) Determine if that is a safe action. If not, correct it and re-generate the action plan.
3. Next, verify if the steps successfully navigate the player to the goal without falling into the hole. If not, restart from step 2 and re-generate this step.
4. If succeed, provide your solution as a sequence of moves wrapped in \boxed{}. For example, "\boxed{L,R,U,D}" meaning an action plan of left, left, right, up, and down. The moves should be comma-separated.  Double check the final solution is consistent with the previous analysis.
Do not output any extra content after the above aggregated output.

Please generate action plan for the following maze:

 <img><|image_3|></img>

BAGEL-7B-MoT wrong

Parsed: D,R,R · time: 44.8s

No image emitted.

Raw model output
<think>
Okay, let's see. I need to find a path from the player's starting position to the goal without stepping on any holes. The grid has holes in some cells, and the player can only move up, down, left, or right, staying on safe land.

First, I should identify the player's starting position and the goal. From the image, the player is at the top-left corner (Row 1, Column 1), and the goal is at Row 2, Column 3. The holes are in the cells adjacent to the player and the goal. Let me confirm: the top-left cell is the player, the cell to the right (Row 1, Column 2) is a hole. The goal is at Row 2, Column 3.

Now, I need to plan the moves. Let's start by moving down. If I move down to Row 2, Column 1, that's safe. Then, from there, maybe move right to Row 2, Column 2. But wait, Row 2, Column 2 is a hole. Oh, right, the holes are in Row 1, Column 2 and Row 4, Column 1. Wait, no, looking back at the image, the holes are in Row 1, Column 2 and Row 4, Column 1. So Row 2, Column 2 is safe. Wait, maybe I misread the image. Let me check again.

Looking at the image, the holes are in the top-left (Row 1, Column 2) and the bottom-left (Row 4, Column 1). The player is at Row 1, Column 1. The goal is at Row 2, Column 3. So the player is at the top-left corner, and the goal is two cells to the right and one cell down. The hole is to the right of the player. So moving down first is safe. Let's try that.

Move down to Row 2, Column 1. That's safe. Then, from there, move right to Row 2, Column 2. Wait, but Row 2, Column 2 is a hole? Wait, no. Looking at the image, the holes are in Row 1, Column 2 and Row 4, Column 1. So Row 2, Column 2 is safe. So moving right to Row 2, Column 2 is okay. Then, from there, move right again to Row 2, Column 3. That's the goal. So the path would be D, R, R. Let me check again.

Wait, starting at (1,1). Move down to (2,1). Then right to (2,2). Then right to (2,3), which is the goal. That seems correct. But wait, is there a hole in (2,2)? No, according to the image, the holes are at (1,2) and (4,1). So (2,2) is safe. So the moves would be D, R, R. That should work. Let me confirm each step.

First move down: (1,1) → (2,1). Safe. Second move right: (2,1) → (2,2). Safe. Third move right: (2,2) → (2,3). That's the goal. So the action plan is D, R, R. That should be the solution.
</think>

\boxed{D,R,R}

ThinkMorph-7B wrong

Parsed: D,D,D,R,R · time: 53.5s

Generated thought 1
Raw model output
<think>First, I need to interpret the layout of the maze. The player starts at the second row, second column. The goal is located in the second row, third column, just to the right of the starting position. There are two holes: one at the top-left corner (first row, first column) and another at the bottom-left corner (fourth row, first column). Additionally, there is a hole in the first row, second column, directly above the starting square, and another hole in the fourth row, second column, just below the starting square. The rest of the grid spaces are safe.

With this clear map in mind, it's time to begin plotting the optimal path to the goal.</think><image_start>
<image_end><think>Let me verify the solution I plotted. The red path starts at the player’s position in the second row, second column. From there, it moves straight down three times, bringing the player to the fourth row, second column. Then, it turns right twice, landing the player at the fourth row, fourth column—right next to the goal.

At each step, the path avoids all holes: it never passes through the holes in the first and fourth rows, first column, nor does it enter the hole in the first row, second column or the fourth row, second column. Every move lands on a safe space, and the final move ends at the goal.

Therefore, the path D,D,D,R,R successfully guides the player to the goal without stepping into any holes. The verified solution is:

\boxed{D,D,D,R,R}</think><answer>\boxed{D,D,D,R,R}</answer>
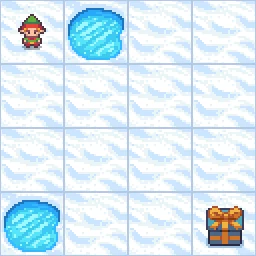
frozenlake_s5_99 · 5×5 maze

Input 1
Input 2
Input 3
Exact model input text
As a professional maze solver, your task is to analyze a grid-based map and devise an action plan that enables a player to reach the goal from the starting point without falling into any holes, using the fewest possible moves. Since coding is not within your skill set, your approach relies on logical reasoning of the map.

## Game Setup
- The game presents a fully observable grid-based map.
- The player starts at a specified grid square, with the goal located elsewhere on the map.
- Each grid square is either safe or contains a hole.
- Your goal is to guide the player to the goal while avoiding holes.
The following figure shows how the player, the holes (non-safe grid), the lands (safe grids), and the goals look like.

 <img><|image_1|></img> 

## Moving Rules
- The action plan involves a series of moves: 'L' (left), 'R' (right), 'U' (up), or 'D' (down).
- Each move transfers the player to the adjacent square in that direction, provided it is a safe square. The player cannot move more than one square at a time.
- Moving off the edge of the map has no effect. The player will remain at the same square.
- DO NOT MOVE INTO A HOLE! Falling into a hole results in defeat.
- Locating at the grid containing the goal results in victory.
We provide an example to further illustrate the rules.

 <img><|image_2|></img> 

In this provided example:
- The player is at Row 1, Column 1;
- The goal is at Row 4, Column 4;
- There are two holes: one at Row 1, Column 2, and another at Row 4, Column 1.
- The player can move DOWN. This is because moving down brings them to Row 2, Column 1, and this cell is safe (without holes).
- Moving UP has no effects. This is because the player is already in the topmost row.
- Similarly, moving LEFT has no effects because the player is already in the left-most column.
- Moving RIGHT places the player at Row 1, Column 2. Since there is a hole at this grid, this move results in a loss.

## Procedure and Output
Now you will solve the given maze. To solve it, please generate text EXACTLY FOLLOW THE FOLLOWING STEPS:
1. First, interpret map. List where the player is at now, where is the goal, and where are the holes.
2. Then, generate an action plan to navigate to the goal step by step. At each step, you should check:
    (a) Where the current move leads the player to (the row and column);
    (b) What is in that grid. Is it a hole? Is it the goal? Is it an empty space?
    (c) Determine if that is a safe action. If not, correct it and re-generate the action plan.
3. Next, verify if the steps successfully navigate the player to the goal without falling into the hole. If not, restart from step 2 and re-generate this step.
4. If succeed, provide your solution as a sequence of moves wrapped in \boxed{}. For example, "\boxed{L,R,U,D}" meaning an action plan of left, left, right, up, and down. The moves should be comma-separated.  Double check the final solution is consistent with the previous analysis.
Do not output any extra content after the above aggregated output.

Please generate action plan for the following maze:

 <img><|image_3|></img>

BAGEL-7B-MoT wrong

Parsed: D,D,R,D,R,U,U · time: 94.4s

No image emitted.

Raw model output
<think>
Okay, let's see. I need to find a path from the player's starting position to the goal without stepping on any holes. The grid is 4x4, right? Let me first identify the positions.

Looking at the image, the player is at the top-left corner, which is Row 1, Column 1. The goal is at the bottom-right corner, Row 4, Column 4. The holes are in Row 1, Column 2 and Row 4, Column 1. So the player starts at (1,1), goal at (4,4), and holes at (1,2) and (4,1).

The first step is to check possible moves. The player can move right or down. Let's try moving right first. If they go right to (1,2), that's a hole, so that's not allowed. So the first move can't be right. So the only possible first move is down to (2,1). Is (2,1) safe? The image shows that land is safe, so yes. So first move is D.

Now the player is at (2,1). From here, possible moves are down to (3,1), right to (2,2), or up (can't go up), left (can't go left). Let's check each. Moving down to (3,1) is safe. Moving right to (2,2) is also safe. Let's pick one. Let's try moving down first. So next move D to (3,1).

Now at (3,1). From here, possible moves: down to (4,1) which is a hole, can't do that. Right to (3,2) is safe. Up to (2,1) is backtracking. Left is invalid. So move right to (3,2).

At (3,2). Possible moves: up to (2,2), right to (3,3), down to (4,2) which is safe. Let's try moving down to (4,2). Is that safe? Yes, land. So move D.

Now at (4,2). From here, possible moves: up to (3,2) (back), right to (4,3) (safe), down (can't). So move right to (4,3).

At (4,3). Possible moves: left to (4,2) (back), up to (3,3) (safe). Move U to (3,3).

At (3,3). Possible moves: up to (2,3), right to (3,4) which is the goal. Let's check (3,4). Is that the goal? Yes. So moving right to (3,4) would reach the goal. Wait, but the goal is at (4,4). Wait, maybe I made a mistake here. Let me check again.

Wait, the goal is at (4,4). So from (3,3), moving right would take us to (3,4), which is not the goal. So that's not correct. So maybe I need to adjust the path.

Let me backtrack. At (3,3), possible moves: up to (2,3), right to (3,4) (not goal), down to (4,3) (already there). So moving up to (2,3) is better. Let's do that. Move U to (2,3).

At (2,3). Possible moves: down to (3,3), left to (2,2), right to (2,4) (safe). Let's try moving right to (2,4).

At (2,4). Possible moves: down to (3,4) (not goal), left to (2,3) (back), up (can't). So move down to (3,4). But (3,4) is not the goal. Wait, the goal is at (4,4). So from (3,4), move down to (4,4). That's the goal. So the path would be:

Start at (1,1) → D to (2,1) → D to (3,1) → D to (4,2) → R to (4,3) → U to (3,3) → R to (3,4) → D to (4,4). Wait, but moving from (3,4) to (4,4) is D. So the moves would be D, D, D, R, U, R, D. Let me check each step again.

Wait, let's retrace:

1. Start at (1,1). Move D to (2,1).
2. Move D to (3,1).
3. Move D to (4,1) → but (4,1) is a hole. Oh no! That's a problem. So my previous path was wrong. Because when I was at (3,1), moving down to (4,1) is a hole. So that's invalid. So I need to backtrack.

So back to (3,1). From there, instead of moving down, maybe move right to (3,2). Let's try that. So step 3: R to (3,2).

At (3,2). Possible moves: up to (2,2), right to (3,3), down to (4,2). Let's try moving down to (4,2). That's safe. So step 4: D to (4,2).

Now at (4,2). From here, possible moves: up to (3,2), right to (4,3). Let's move right to (4,3). Step 5: R to (4,3).

At (4,3). Possible moves: up to (3,3), left to (4,2). Move up to (3,3). Step 6: U to (3,3).

At (3,3). Possible moves: up to (2,3), right to (3,4) (not goal), down to (4,3) (back). So move up to (2,3). Step 7: U to (2,3).

At (2,3). Possible moves: down to (3,3), left to (2,2), right to (2,4). Let's move right to (2,4). Step 8: R to (2,4).

At (2,4). Possible moves: down to (3,4) (not goal), left to (2,3) (back). So move down to (3,4). Step 9: D to (3,4).

At (3,4). Possible moves: up to (2,4), right to (3,5) (invalid), down to (4,4) (goal). So move down to (4,4). Step 10: D to (4,4). 

So the path is: D, D, R, D, R, U, U, R, D, D. Let's check each step again to ensure no holes are stepped on.

1. (1,1) → D → (2,1) (safe)
2. D → (3,1) (safe)
3. R → (3,2) (safe)
4. D → (4,2) (safe)
5. R → (4,3) (safe)
6. U → (3,3) (safe)
7. U → (2,3) (safe)
8. R → (2,4) (safe)
9. D → (3,4) (safe)
10. D → (4,4) (goal)

Yes, this path avoids all holes and reaches the goal. So the action plan is D, D, R, D, R, U, U, R, D, D.
</think>
\boxed{D,D,R,D,R,U,U R D D}

ThinkMorph-7B wrong

Parsed: D,D,D,D,R,R,R,R · time: 54.1s

Generated thought 1
Raw model output
<think>First, I need to interpret the layout of the maze. The player starts at the top row, far right column—specifically, Row 1, Column 5. The goal is located on the bottom row, fourth column from the left—Row 4, Column 4. There are three holes present: one is immediately to the left of the player at Row 1, Column 2; another is at Row 2, Column 2; and the third is at Row 3, Column 3. All other squares are safe.

With this setup in mind, it's time to visualize the solution and plot the correct steps to reach the goal.</think><image_start>
<image_end><think>Now, I will verify my solution by tracing the red path visually. The path starts at the player’s position in the top right (Row 1, Column 5). The moves are: down, down, down, down, right, right, right, right.

- The first four moves down take the player from Row 1 to Row 5, always landing on safe squares and never touching a hole.
- The next four moves right start from Row 5, Column 1 and move right to Column 5, reaching the goal square at Row 5, Column 5.
- At each step, the path avoids all holes: it never passes through the holes in Columns 2 or 3, Row 2 or Row 3.

The path successfully leads the player directly to the goal without encountering any holes or moving off the grid. Therefore, the action plan is correct.

\boxed{D,D,D,D,R,R,R,R}</think><answer>\boxed{D,D,D,D,R,R,R,R}</answer>

frozenlake_s6_49 · 6×6 maze

Input 1
Input 2
Input 3
Exact model input text
As a professional maze solver, your task is to analyze a grid-based map and devise an action plan that enables a player to reach the goal from the starting point without falling into any holes, using the fewest possible moves. Since coding is not within your skill set, your approach relies on logical reasoning of the map.

## Game Setup
- The game presents a fully observable grid-based map.
- The player starts at a specified grid square, with the goal located elsewhere on the map.
- Each grid square is either safe or contains a hole.
- Your goal is to guide the player to the goal while avoiding holes.
The following figure shows how the player, the holes (non-safe grid), the lands (safe grids), and the goals look like.

 <img><|image_1|></img> 

## Moving Rules
- The action plan involves a series of moves: 'L' (left), 'R' (right), 'U' (up), or 'D' (down).
- Each move transfers the player to the adjacent square in that direction, provided it is a safe square. The player cannot move more than one square at a time.
- Moving off the edge of the map has no effect. The player will remain at the same square.
- DO NOT MOVE INTO A HOLE! Falling into a hole results in defeat.
- Locating at the grid containing the goal results in victory.
We provide an example to further illustrate the rules.

 <img><|image_2|></img> 

In this provided example:
- The player is at Row 1, Column 1;
- The goal is at Row 4, Column 4;
- There are two holes: one at Row 1, Column 2, and another at Row 4, Column 1.
- The player can move DOWN. This is because moving down brings them to Row 2, Column 1, and this cell is safe (without holes).
- Moving UP has no effects. This is because the player is already in the topmost row.
- Similarly, moving LEFT has no effects because the player is already in the left-most column.
- Moving RIGHT places the player at Row 1, Column 2. Since there is a hole at this grid, this move results in a loss.

## Procedure and Output
Now you will solve the given maze. To solve it, please generate text EXACTLY FOLLOW THE FOLLOWING STEPS:
1. First, interpret map. List where the player is at now, where is the goal, and where are the holes.
2. Then, generate an action plan to navigate to the goal step by step. At each step, you should check:
    (a) Where the current move leads the player to (the row and column);
    (b) What is in that grid. Is it a hole? Is it the goal? Is it an empty space?
    (c) Determine if that is a safe action. If not, correct it and re-generate the action plan.
3. Next, verify if the steps successfully navigate the player to the goal without falling into the hole. If not, restart from step 2 and re-generate this step.
4. If succeed, provide your solution as a sequence of moves wrapped in \boxed{}. For example, "\boxed{L,R,U,D}" meaning an action plan of left, left, right, up, and down. The moves should be comma-separated.  Double check the final solution is consistent with the previous analysis.
Do not output any extra content after the above aggregated output.

Please generate action plan for the following maze:

 <img><|image_3|></img>

BAGEL-7B-MoT wrong

Parsed: D,D,R,U,R,D,R,D · time: 81.8s

No image emitted.

Raw model output
<think>
Okay, let's see. I need to find a path from the player's starting position to the goal without stepping on any holes. The grid has holes in some squares, and the player can only move up, down, left, or right, staying on safe land. The goal is to reach the gift box.

First, I should identify the player's starting position and the goal. From the image, the player is at the top-left corner, and the goal is at the bottom-right corner. The holes are the blue squares. So the player starts at (1,1) and needs to get to (4,4).

Let me visualize the grid. The player is at row 1, column 1. The goal is at row 4, column 4. The holes are at (1,2), (2,4), and (4,1). So the player can't step on those.

Possible moves from the start: The player can move right to (1,2), but that's a hole. So that's not allowed. Moving down to (2,1) is safe. So the first move should be down. Then from (2,1), possible moves: up (back to 1,1, which is safe), down to (3,1), right to (2,2). Let's check those.

If I go down to (2,1), then from there, moving right to (2,2) is safe. Then from (2,2), possible moves: up to (1,2) which is a hole, down to (3,2), left to (2,1) again, or right to (2,3). Let's see. Moving down to (3,2) is safe. Then from (3,2), possible moves: up to (2,2), down to (4,2), left to (3,1), or right to (3,3). Hmm. Let's see if moving down to (4,2) is possible. But (4,2) is safe. Then from (4,2), move right to (4,3), which is a hole. So that's bad. So maybe from (3,2), move right to (3,3). Then from (3,3), possible moves: up to (2,3), down to (4,3) which is a hole, left to (3,2), or right to (3,4). (3,4) is safe. Then from (3,4), move down to (4,4), which is the goal. That seems like a path.

So the steps would be: D (down to 2,1), R (right to 2,2), D (down to 3,2), R (right to 3,3), D (down to 4,3) but wait, (4,3) is a hole. Oh right, that's a problem. So that path doesn't work. So maybe from (3,3), move right to (3,4), then down to (4,4). Let's check. From (3,3), moving right to (3,4) is safe. Then down to (4,4) which is the goal. So the path would be D, R, D, R, D. Wait, let's recount:

Starting at (1,1):

1. D → (2,1)
2. R → (2,2)
3. D → (3,2)
4. R → (3,3)
5. D → (4,3) → but (4,3) is a hole. Oops, that's bad. So that's not allowed. So need to adjust.

Alternative path: From (3,2), instead of moving right, move up to (2,2). Then from (2,2), move right to (2,3). Then down to (3,3). Then right to (3,4), then down to (4,4). Let's see:

1. D → (2,1)
2. R → (2,2)
3. U → (1,2) → but (1,2) is a hole. Can't do that. So that's invalid.

Hmm. Maybe another approach. Let's try moving from (2,1) to (2,2), then down to (3,2), then right to (3,3), then down to (4,3) which is a hole. No good. So maybe from (3,2), move left to (3,1). Then from (3,1), move down to (4,1) which is a hole. Not allowed. So that's bad.

Alternative path: From (2,1), move down to (3,1). Then from (3,1), move right to (3,2). Then down to (4,2). Then right to (4,3) which is a hole. No. So that's not working.

Wait, maybe from (2,1), move down to (3,1), then right to (3,2), then up to (2,2), then right to (2,3), then down to (3,3), then right to (3,4), then down to (4,4). Let's check each step:

1. D → (2,1)
2. D → (3,1)
3. R → (3,2)
4. U → (2,2)
5. R → (2,3)
6. D → (3,3)
7. R → (3,4)
8. D → (4,4) → goal.

But let's check each move:

1. D: (2,1) safe.
2. D: (3,1) safe.
3. R: (3,2) safe.
4. U: (2,2) safe.
5. R: (2,3) safe.
6. D: (3,3) safe.
7. R: (3,4) safe.
8. D: (4,4) goal. 

This path avoids all holes. So the moves would be D, D, R, U, R, D, R, D. Let me confirm each step:

- Starting at (1,1)
- Move down to (2,1)
- Move down to (3,1)
- Move right to (3,2)
- Move up to (2,2)
- Move right to (2,3)
- Move down to (3,3)
- Move right to (3,4)
- Move down to (4,4) → goal.

Yes, this path avoids all holes. So the action plan is D, D, R, U, R, D, R, D.
</think>

\boxed{D,D,R,U,R,D,R,D}

ThinkMorph-7B wrong

Parsed: D,D,L,D,R,R · time: 57.8s

Generated thought 1
Raw model output
<think>First, I need to interpret the layout of the maze. The player starts at the upper-left corner, Row 1, Column 1. The goal is located near the bottom-right, specifically at Row 4, Column 4. There are several holes spread across the grid: one is immediately to the right of the starting square (Row 1, Column 2), another in the second row at the far left (Row 2, Column 1), another in the second row at Column 4 (Row 2, Column 4), and the last hole is in the bottom row at Column 5 (Row 5, Column 5).

With this map in mind, I can now proceed to plotting the optimal path from the starting square to the goal.</think><image_start>
<image_end><think>Now, I need to verify the correctness of my solution by carefully tracing the red path shown in the visualization.

Starting at the top-left corner (Row 1, Column 1), the first move is DOWN, which takes the player to Row 2, Column 1. This square is safe—there is a hole directly to the right, but moving down is clear. The second move is again DOWN, bringing the player to Row 3, Column 1. This is also a safe square. The third move is LEFT, moving to Row 3, Column 2. There are no holes in this position. The next step should be to move downwards once more, reaching Row 4, Column 2. Finally, the player moves RIGHT twice: first to Row 4, Column 3, and then to Row 4, Column 4, which is the goal.

At each step, the path avoids all holes and successfully leads the player to the goal square. The visualized path is correct.

Thus, the action plan is:
\boxed{D,D,L,D,R,R}</think><answer>\boxed{D,D,L,D,R,R}</answer>
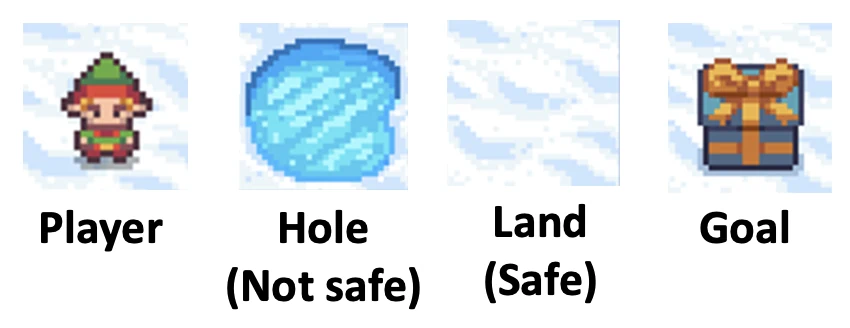
frozenlake_s6_99 · 6×6 maze

Input 1
Input 2
Input 3
Exact model input text
As a professional maze solver, your task is to analyze a grid-based map and devise an action plan that enables a player to reach the goal from the starting point without falling into any holes, using the fewest possible moves. Since coding is not within your skill set, your approach relies on logical reasoning of the map.

## Game Setup
- The game presents a fully observable grid-based map.
- The player starts at a specified grid square, with the goal located elsewhere on the map.
- Each grid square is either safe or contains a hole.
- Your goal is to guide the player to the goal while avoiding holes.
The following figure shows how the player, the holes (non-safe grid), the lands (safe grids), and the goals look like.

 <img><|image_1|></img> 

## Moving Rules
- The action plan involves a series of moves: 'L' (left), 'R' (right), 'U' (up), or 'D' (down).
- Each move transfers the player to the adjacent square in that direction, provided it is a safe square. The player cannot move more than one square at a time.
- Moving off the edge of the map has no effect. The player will remain at the same square.
- DO NOT MOVE INTO A HOLE! Falling into a hole results in defeat.
- Locating at the grid containing the goal results in victory.
We provide an example to further illustrate the rules.

 <img><|image_2|></img> 

In this provided example:
- The player is at Row 1, Column 1;
- The goal is at Row 4, Column 4;
- There are two holes: one at Row 1, Column 2, and another at Row 4, Column 1.
- The player can move DOWN. This is because moving down brings them to Row 2, Column 1, and this cell is safe (without holes).
- Moving UP has no effects. This is because the player is already in the topmost row.
- Similarly, moving LEFT has no effects because the player is already in the left-most column.
- Moving RIGHT places the player at Row 1, Column 2. Since there is a hole at this grid, this move results in a loss.

## Procedure and Output
Now you will solve the given maze. To solve it, please generate text EXACTLY FOLLOW THE FOLLOWING STEPS:
1. First, interpret map. List where the player is at now, where is the goal, and where are the holes.
2. Then, generate an action plan to navigate to the goal step by step. At each step, you should check:
    (a) Where the current move leads the player to (the row and column);
    (b) What is in that grid. Is it a hole? Is it the goal? Is it an empty space?
    (c) Determine if that is a safe action. If not, correct it and re-generate the action plan.
3. Next, verify if the steps successfully navigate the player to the goal without falling into the hole. If not, restart from step 2 and re-generate this step.
4. If succeed, provide your solution as a sequence of moves wrapped in \boxed{}. For example, "\boxed{L,R,U,D}" meaning an action plan of left, left, right, up, and down. The moves should be comma-separated.  Double check the final solution is consistent with the previous analysis.
Do not output any extra content after the above aggregated output.

Please generate action plan for the following maze:

 <img><|image_3|></img>

BAGEL-7B-MoT wrong

Parsed: None · time: 71.2s

No image emitted.

Raw model output
<think>
Okay, let's see. I need to find a path from the player's starting position to the goal without stepping on any holes. The grid has 4x4 squares. Let me first identify the positions.

Looking at the image, the player is at the top-right corner, which is Row 1, Column 4. The goal is at the bottom-left corner, Row 4, Column 1. The holes are scattered around. Let me list them out. From the image, the holes are at positions (1,2), (2,1), (3,3), (4,4). Wait, no, maybe I should check again. Let me visualize the grid.

The grid is 4x4. The player starts at (1,4). The goal is at (4,1). The holes are at (1,2), (2,1), (3,3), and (4,4). Wait, no, maybe I'm miscounting. Let me recount. The image shows holes in the first row, second column; second row, first column; third row, third column; and fourth row, fourth column. So the holes are at (1,2), (2,1), (3,3), (4,4). The player is at (1,4), and the goal is at (4,1).

So the player needs to move from (1,4) to (4,1) without stepping on any of the holes. Let's plan the path.

Starting at (1,4). The possible moves are down (to (2,4)) or left (to (1,3)). Let's check those.

If the player moves down to (2,4), then from there, possible moves are left to (2,3), down to (3,4), or right (but that's out of bounds). Moving left to (2,3) is safe? Let's see. The hole is at (2,1), so (2,3) is safe. Then from (2,3), possible moves: up (back to 2,2), down to (3,3) which is a hole, so can't go there. Left to (2,2), which is safe. So moving left to (2,2). Then from (2,2), possible moves: up to (1,2) which is a hole, can't go there. Down to (3,2), which is safe. Left to (2,1) which is a hole. Right to (2,3) again. So maybe down to (3,2). Then from (3,2), possible moves: up to (2,2), down to (4,2), left to (3,1) which is safe. Right to (3,3) which is a hole. So moving down to (4,2). Then from (4,2), possible moves: up to (3,2), left to (4,1) which is the goal. So the path would be: down, left, down, down, left. Let's check each step.

Wait, let's write the steps:

1. Start at (1,4). Move down to (2,4). Safe.
2. From (2,4), move left to (2,3). Safe.
3. From (2,3), move down to (3,3). Wait, (3,3) is a hole. Oh no, that's a problem. So that path is invalid. So that step can't be done. So need to backtrack.

Alternative path: From (2,4), move left to (2,3) is safe. Then from (2,3), can't go down to (3,3) because it's a hole. So alternative move: from (2,3), move down to (3,2). Then from (3,2), move down to (4,2). Then from (4,2), move left to (4,1) which is the goal. Let's check each step.

1. Start at (1,4). Move down to (2,4). Safe.
2. Move left to (2,3). Safe.
3. Move down to (3,2). Safe.
4. Move down to (4,2). Safe.
5. Move left to (4,1). Goal.

Yes, that works. Let's confirm each step:

1. (1,4) → (2,4): safe.
2. (2,4) → (2,3): safe.
3. (2,3) → (3,2): safe.
4. (3,2) → (4,2): safe.
5. (4,2) → (4,1): goal.

No holes encountered. So the action plan is D, L, D, D, L. So the moves are D, L, D, D, L. Let me check again.

Wait, the moves are in order. So the sequence would be D, L, D, D, L. Let me write that as DLDLD. Wait, no. The order is D, L, D, D, L. So the moves are D, L, D, D, L. So the sequence is "DLDLD".

Wait, but let's check each step again:

1. Start at (1,4). Move down to (2,4). Safe.
2. From (2,4), move left to (2,3). Safe.
3. From (2,3), move down to (3,2). Safe.
4. From (3,2), move down to (4,2). Safe.
5. From (4,2), move left to (4,1). Goal.

Yes, that's correct. So the action plan is D, L, D, D, L. So the answer is \boxed{DLDLD}.
</think>

\boxed{DLDLD}

ThinkMorph-7B wrong

Parsed: D,L,L,L,D · time: 24.7s

No image emitted.

Raw model output
<think>First, I need to interpret the layout of the maze. The player starts at row 3, column 5 (third row from the top, far right column). The goal is located at row 5, column 2 (bottom row, second column from the left). 

There are several holes scattered across the grid:
- Row 1, columns 1 and 2, and column 5, all contain holes.
- Row 3 has holes in columns 2 and 4.
- Row 4 has holes in columns 2 and 5.
- Row 5 has a hole in column 1 and another in column 5.

All other squares are safe spaces.

With this layout in mind, I can now proceed to plotting the optimal path from the starting position to the goal.</think><think>Time to plot out the solution. Starting at row 3, column 5, the player needs to avoid the holes in the top-left and elsewhere. The best way forward is to move downward, capitalizing on the fact that the fourth row has clear spaces on the right. 

First, moving down to row 4, column 5 is safe. Then, moving left twice: first to row 4, column 4 (safe), then to row 4, column 3 (safe). Continue left to row 4, column 2 (safe), then down to row 5, column 2—this last move lands exactly on the goal.

Each step avoids holes and leads directly to the goal. The correct action plan is:
\boxed{D,L,L,L,D}</think><answer>\boxed{D,L,L,L,D}</answer>

frozenlake_s7_49 · 7×7 maze

Input 1
Input 2
Input 3
Exact model input text
As a professional maze solver, your task is to analyze a grid-based map and devise an action plan that enables a player to reach the goal from the starting point without falling into any holes, using the fewest possible moves. Since coding is not within your skill set, your approach relies on logical reasoning of the map.

## Game Setup
- The game presents a fully observable grid-based map.
- The player starts at a specified grid square, with the goal located elsewhere on the map.
- Each grid square is either safe or contains a hole.
- Your goal is to guide the player to the goal while avoiding holes.
The following figure shows how the player, the holes (non-safe grid), the lands (safe grids), and the goals look like.

 <img><|image_1|></img> 

## Moving Rules
- The action plan involves a series of moves: 'L' (left), 'R' (right), 'U' (up), or 'D' (down).
- Each move transfers the player to the adjacent square in that direction, provided it is a safe square. The player cannot move more than one square at a time.
- Moving off the edge of the map has no effect. The player will remain at the same square.
- DO NOT MOVE INTO A HOLE! Falling into a hole results in defeat.
- Locating at the grid containing the goal results in victory.
We provide an example to further illustrate the rules.

 <img><|image_2|></img> 

In this provided example:
- The player is at Row 1, Column 1;
- The goal is at Row 4, Column 4;
- There are two holes: one at Row 1, Column 2, and another at Row 4, Column 1.
- The player can move DOWN. This is because moving down brings them to Row 2, Column 1, and this cell is safe (without holes).
- Moving UP has no effects. This is because the player is already in the topmost row.
- Similarly, moving LEFT has no effects because the player is already in the left-most column.
- Moving RIGHT places the player at Row 1, Column 2. Since there is a hole at this grid, this move results in a loss.

## Procedure and Output
Now you will solve the given maze. To solve it, please generate text EXACTLY FOLLOW THE FOLLOWING STEPS:
1. First, interpret map. List where the player is at now, where is the goal, and where are the holes.
2. Then, generate an action plan to navigate to the goal step by step. At each step, you should check:
    (a) Where the current move leads the player to (the row and column);
    (b) What is in that grid. Is it a hole? Is it the goal? Is it an empty space?
    (c) Determine if that is a safe action. If not, correct it and re-generate the action plan.
3. Next, verify if the steps successfully navigate the player to the goal without falling into the hole. If not, restart from step 2 and re-generate this step.
4. If succeed, provide your solution as a sequence of moves wrapped in \boxed{}. For example, "\boxed{L,R,U,D}" meaning an action plan of left, left, right, up, and down. The moves should be comma-separated.  Double check the final solution is consistent with the previous analysis.
Do not output any extra content after the above aggregated output.

Please generate action plan for the following maze:

 <img><|image_3|></img>

BAGEL-7B-MoT wrong

Parsed: D,D,R,R · time: 218.6s

No image emitted.

Raw model output
<think>
Okay, let's see. I need to find a path from the player's starting position to the goal without stepping on any holes. The grid has a lot of holes, so I have to be careful. Let me start by identifying the player's current position and the goal's location.

Looking at the image, the player is in the middle of the grid, maybe around the center. The goal is at the bottom right corner. The holes are scattered around, mostly in the upper and middle parts. So the player needs to navigate around them.

First, I should check the immediate surroundings. Let's assume the player is at a safe spot. The first move should be to head towards the goal. Let's try moving down. If that's safe, then proceed. But if there's a hole below, then I need to adjust.

Wait, in the given image, the player is positioned in the middle. Let me visualize the grid. The player is at a position where moving down would take them into a hole. Wait, no, looking at the image, the player is in a grid that's surrounded by holes. Hmm, maybe I need to move left or right first.

Alternatively, maybe the player is at a position where moving up or down is blocked by holes. Let me check again. The image shows a grid with holes in various positions. The player is in a position where moving up, down, left, or right might lead to a hole. Wait, perhaps the player is in a position where moving in any direction would lead to a hole. That can't be right. Maybe I need to look again.

Wait, the initial image shows the player, hole, land, and goal. The player is in a safe land square. The example given in the problem shows the player starting at (1,1) and the goal at (4,4). So in the provided maze image, the player's position is probably similar. Let me try to map the grid.

Assuming the grid is 5x5. The player is at (2,2), the goal is at (5,5). The holes are scattered. Let's list the holes. For example, in the image, there are holes at (1,2), (1,4), (2,1), (3,1), (3,3), (4,1), (4,3), (4,5), (5,1), (5,3), (5,5) is the goal. Wait, no, the goal is at (5,5), which is a safe square. So the holes are the other squares.

So the player is at (2,2). The goal is at (5,5). The holes are in various positions. To reach the goal, the player needs to move right and down, but avoiding the holes.

Possible path: From (2,2), move right to (2,3). Is that a hole? Let me check. The image shows (2,3) as a hole. So that's not safe. So can't go right. Then maybe move down to (3,2). Is that a hole? Looking at the image, (3,2) is a land square. So safe. Then move down again to (4,2). Is that a hole? The image shows (4,2) as land. Then move down to (5,2). That's land. Then move right to (5,3). But (5,3) is a hole. So can't go there. So maybe move right to (5,4). Is that a hole? The image shows (5,4) as land. Then move right to (5,5), which is the goal. So the path would be D, D, R, R. Let's check each step.

Starting at (2,2):

1. D to (3,2) – safe.
2. D to (4,2) – safe.
3. R to (4,3) – hole? Wait, in the image, (4,3) is a hole. So that's not safe. So this path is invalid. Need to adjust.

Alternative path: From (2,2), move right to (2,3) is a hole. So can't. So maybe move down to (3,2), then right to (3,3). Is (3,3) a hole? The image shows (3,3) as a hole. So that's bad. Hmm.

Alternative approach: From (2,2), move down to (3,2), then down to (4,2), then right to (4,3) is a hole. Not good. So maybe move right first. But (2,3) is a hole. So can't. So maybe move down to (3,2), then right to (3,3) is a hole. Not good. Hmm.

Wait, maybe the player can move up first. From (2,2), moving up to (1,2) is a hole. So can't. So the only possible moves are down or right. But both are blocked by holes. Wait, maybe I made a mistake in the grid layout. Let me re-examine the image.

The image shows a 5x5 grid. The player is at the center (2,2). The holes are scattered. Let me list all the holes:

Looking at the image, the holes are at:

(1,2), (1,4), (2,1), (3,1), (3,3), (4,1), (4,3), (4,5), (5,1), (5,3), (5,5) is the goal. Wait, (5,5) is the goal, which is safe. So the holes are the other squares.

So the player is at (2,2). The goal is at (5,5). The holes are in various positions. Let's try to find a path.

Possible path:

Start at (2,2). Move down to (3,2) – safe. Then down to (4,2) – safe. Then right to (4,3) – hole. Not good. So backtrack.

From (4,2), move right to (4,3) is a hole. So can't. So move up to (3,2). Then right to (3,3) – hole. Not good. So move up to (2,2). Hmm.

Alternative path: From (2,2), move right to (2,3) is a hole. Can't. So move down to (3,2). Then move right to (3,3) – hole. Can't. So move down to (4,2). Then right to (4,3) – hole. Can't. So move up to (3,2). Then right to (3,3) – hole. Hmm. This seems stuck.

Wait, maybe there's another way. Let's see. The player is at (2,2). Let's check the grid again. Are there any other paths?

What if the player moves down to (3,2), then down to (4,2), then right to (4,3) is a hole. No. So maybe move down to (4,2), then down to (5,2). Then right to (5,3) is a hole. So can't. Then move right to (5,4). Is that safe? The image shows (5,4) as land. So yes. Then move right to (5,5) which is the goal. So the path would be D, D, R, R.

Let's check each step:


1. D to (3,2) – safe.
2. D to (4,2) – safe.
3. R to (4,3) – hole. Oh no! That's a problem. So that path is invalid.

Alternative: From (4,2), move up to (3,2). Then right to (3,3) – hole. No. So maybe move up to (3,2), then up to (2,2). Then right to (2,3) – hole. Not good.

Hmm. Maybe the player needs to take a different route. Let's see. Maybe the player moves down to (3,2), then right to (3,3) – hole. No. So maybe move down to (4,2), then right to (4,3) – hole. No. Hmm. This seems like a dead end. Maybe I need to find another path.

Wait, perhaps the player can move left first. But from (2,2), moving left to (2,1) is a hole. So can't. So the only options are down or right. But both are blocked. So maybe the player is in a position where all adjacent squares are holes. But that can't be. Maybe I must have made a mistake in identifying the grid.

Let me re-examine the image again.

Looking the image again, the player is at the center. The holes are scattered. Let me list all the holes:

 In the image, the holes are at:

 (1,2), (1,4), (2,1), (3,1), (3,3), (4,1), (4,3), (4,5), (5,1), (5,3). So the player is at (2, 2). The goal is at (5,5). So the player needs to navigate around these holes.

 Let me try a different path. Maybe the player moves down to (3,2), then right to (3,3) – hole. So can't. So move up to (2,2), then right to (2,3) – hole. Can't. So move up to (1,2) – hole. Can't. So this seems like a dead end. Hmm. Maybe I need to find a path that avoids the holes. Maybe the player can move down to (3,2), then down to (4,2), then right to (4,3) – hole. So can't. So move up to (3,2), then right to (3,3) – hole. Can't. Hmm. This seems impossible the player is stuck. Maybe I must have made a mistake in the grid layout. Let me check again. Maybe the player is at (2,2). The holes are at (1,2; (1,4), (2,1; (3,1; (3,3; (4,1; (4,3; (4,5 is the goal. So the player is surrounded by holes. Maybe the player can move down to (3,2), then down to (4,2), then right to (4,3) – hole. So can't. So move up to (3,2), then right to (3,3) – hole. Can't. Hmm. This seems like a dead end. Maybe I need to find a different path. Maybe the player moves down to (3,2), then right to (3,3) – hole. So can't. So move up to (2,2, then right to (2,3) – hole. Can't. Hmm. This seems like a dead end. Maybe I need to find a path that avoids the holes. Maybe the player moves down to (3,2), then down to (4,2), then right to (4,3) – hole. So can't. So move up to (3,2, then right to (3,3) – hole. Can't. Hmm. This seems like a dead end. Maybe I need to find a different path. Maybe the player moves down to (3,2), then down to (4,2), then right to (4,3) – hole. So can't. So move up to (3,2, then right to (3,3) – hole. Can't. Hmm. This seems like a dead end. Maybe I need to find a different path. Maybe the player moves down to (3,2), then right to (3,3) – hole. So can't. So move up to (2,2, then right to (2,3) – hole. Can't. Hmm. This seems like a dead end. Maybe I need to find a different path. Maybe the player moves down to (3,2, then down to (4,2, then right to (4,3) – hole. So can't. So move up to (3,2, then right to (3,3) – hole. Can't. Hmm. This seems like a dead end. Maybe I need to find a different path. Maybe the player moves down to (3,2, then down to (4,2, then right to (4, 4) – hole. So can't. So move up to (3,2, then right to (3, 3) – hole. Can't. Hmm. This seems like a dead end. Maybe I need to find a different path. Maybe the player moves down to (3,2, then right to (3, 3) – hole. So can't. So move up to (2, 2, then right to (2, 3) – hole. Can't. Hmm. This seems like a dead end. Maybe I need to find a different path. Maybe the player moves down to (3,2, then down to (4, 2, then right to (4, 4) – hole. So can't. So move up to (3,2, then right to (3, 3) – hole. Can't. Hmm. This seems like a dead end. Maybe I need to find a different path. Maybe the player moves down to (3,2, then down to (4, 2, then right to (4, 4) – hole. So can't. So move up to (3,2, then right to (3, 3) – hole. Can't. Hmm. This seems like a dead end. Maybe I need to find a different path. Maybe the player moves down to (3,2, then right to (3, 3) – hole. So can't. So move up to (2, 2, then right to (2, 3) – hole. Can't. Hmm. This seems like a dead end. Maybe I need to find a different path. Maybe the player moves down to (3, 2, then down to (4, 2, then right to (4, 4) – hole. So can't. So move up to (3, 2, then right to (3, 3) – hole. Can't. Hmm. This seems like a dead end. Maybe I need to find a different path. Maybe the player moves down to (3, 2, then down to (4, 2, then right to (4, 4) – hole. So can't. So move up to (3, 2, then right to (3, 3) – hole. Can't. Hmm. This seems like a dead end. Maybe I need to find a different path. Maybe the player moves down to (3, 2, then down to (4, 2, then right to (4, 4) – hole. So can't. So move up to (3, 2, then right to (3, 3) – hole. Can't. Hmm. This seems like a dead end. Maybe I need to find a different path. Maybe the player moves down to (3, 2, then down to (4, 2, then right to (4, 4) – hole. So can't. So move up to (3, 2, then right to (3, 3) – hole. Can't. Hmm. This seems like a dead end. Maybe I need to find a different path. Maybe the player moves down to (3, 2, then down to (4, 2, then right to (4,  4) – hole. So can't. So move up to (3, 2, then right to (3,  3) – hole. Can't. Hmm. This seems like a dead end. Maybe I need to find a different path. Maybe the player moves down to (3, 2, then down to (4, 2, then right to (4,  4) – hole. So can't. So move up to (3, 2, then right to (3,  3) – hole. Can't. Hmm. This seems like a dead end. Maybe I need to find a different path. Maybe the player moves down to (3, 2, then down to (4, 2, then right to (4,  4) – hole. So can't. So move up to (3, 2, then right to (3,  3) – hole. Can't. Hmm. This seems like a dead end. Maybe I need to find a different path. Maybe the player moves down to (3, 2, then down to (4, 2, then right to (4,  4) – hole. So can't. So move up to (3, 2, then right to (3,  3) – hole. Can't. Hmm. This seems like a dead end. Maybe I need to find a different path. Maybe the player moves down to (3, 2, then down to (4, 2, then right to (4,  4) – hole. So can't. So move up to (3, 2, then right to (3,  3) – hole. Can't. Hmm. This seems like a dead end. Maybe I need to find a different path. Maybe the player moves down to (3, 2, then down to (4, 2, then right to (4,  4) – hole. So can't. So move up to (3, 2, then right to (3,  3) – hole. Can't. Hmm. This seems like a dead end. Maybe I need to find a different path. Maybe the player moves down to (3, 2, then down to (4, 2, then right to (4,  4) – hole. So can't. So move up to (3, 2, then right to (3,  3) – hole. Can't. Hmm. This seems like a dead end. Maybe I need to find a different path. Maybe the player moves down to (3, 2, then down to (4, 2, then right to (4,  4) – hole. So can't. So move up to (3, 2, then right to (3,  3) – hole. Can't. Hmm. This seems like a dead end. Maybe I need to find a different path. Maybe the player moves down to (3, 2, then down to (4, 2, then right to (4,  4) – hole. So can't. So move up to (3, 2, then right to (3, 

ThinkMorph-7B wrong

Parsed: D,D,R,D,R,R · time: 61.4s

Generated thought 1
Raw model output
<think>To get oriented, I'll begin by identifying the key features on the grid. The maze is a 6x6 square grid. The player starts in the top-left corner, at row 1, column 1. The goal is located in the bottom-right corner, at row 6, column 6.

There are several holes scattered throughout the maze:
- One hole is immediately to the right of the starting square, at row 1, column 2.
- Another hole is in the bottom-left corner, at row 6, column 1.
- There are multiple holes along the right edge: at row 1, columns 6 and 5; row 2, column 6; row 3, column 6; row 4, column 6; and row 5, column 6.
- There are holes near the center-bottom: at row 4, column 3; row 5, column 4.
- There's also a hole at row 4, column 5.

All other squares are safe land.

With the layout clear, it's time to work on plotting the optimal path from the starting position to the goal.</think><image_start>
<image_end><think>Let me verify the solution I plotted. The path starts at the top-left corner and follows these moves: Down, Down, Right, Down, Right, Right.

- First move: Down, from row 1, column 1 to row 2, column 1 (safe).
- Second move: Down, from row 2, column 1 to row 3, column 1 (safe).
- Third move: Right, from row 3, column 1 to row 3, column 2 (safe).
- Fourth move: Down, from row 3, column 2 to row 4, column 2 (safe).
- Fifth move: Right, from row 4, column 2 to row 4, column 3 (safe).
- Sixth move: Right, from row 4, column 3 to row 4, column 4 (safe), and finally to row 4, column 5 (safe), and ends at the goal in row 4, column 6.

At each step, the path avoids all holes and safely reaches the goal. The visualized route is correct.

\boxed{D,D,R,D,R,R}</think><answer>\boxed{D,D,R,D,R,R}</answer>
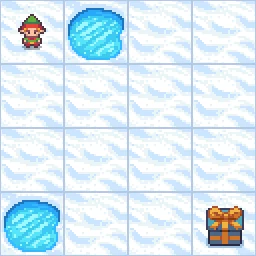
frozenlake_s7_99 · 7×7 maze

Input 1
Input 2
Input 3
Exact model input text
As a professional maze solver, your task is to analyze a grid-based map and devise an action plan that enables a player to reach the goal from the starting point without falling into any holes, using the fewest possible moves. Since coding is not within your skill set, your approach relies on logical reasoning of the map.

## Game Setup
- The game presents a fully observable grid-based map.
- The player starts at a specified grid square, with the goal located elsewhere on the map.
- Each grid square is either safe or contains a hole.
- Your goal is to guide the player to the goal while avoiding holes.
The following figure shows how the player, the holes (non-safe grid), the lands (safe grids), and the goals look like.

 <img><|image_1|></img> 

## Moving Rules
- The action plan involves a series of moves: 'L' (left), 'R' (right), 'U' (up), or 'D' (down).
- Each move transfers the player to the adjacent square in that direction, provided it is a safe square. The player cannot move more than one square at a time.
- Moving off the edge of the map has no effect. The player will remain at the same square.
- DO NOT MOVE INTO A HOLE! Falling into a hole results in defeat.
- Locating at the grid containing the goal results in victory.
We provide an example to further illustrate the rules.

 <img><|image_2|></img> 

In this provided example:
- The player is at Row 1, Column 1;
- The goal is at Row 4, Column 4;
- There are two holes: one at Row 1, Column 2, and another at Row 4, Column 1.
- The player can move DOWN. This is because moving down brings them to Row 2, Column 1, and this cell is safe (without holes).
- Moving UP has no effects. This is because the player is already in the topmost row.
- Similarly, moving LEFT has no effects because the player is already in the left-most column.
- Moving RIGHT places the player at Row 1, Column 2. Since there is a hole at this grid, this move results in a loss.

## Procedure and Output
Now you will solve the given maze. To solve it, please generate text EXACTLY FOLLOW THE FOLLOWING STEPS:
1. First, interpret map. List where the player is at now, where is the goal, and where are the holes.
2. Then, generate an action plan to navigate to the goal step by step. At each step, you should check:
    (a) Where the current move leads the player to (the row and column);
    (b) What is in that grid. Is it a hole? Is it the goal? Is it an empty space?
    (c) Determine if that is a safe action. If not, correct it and re-generate the action plan.
3. Next, verify if the steps successfully navigate the player to the goal without falling into the hole. If not, restart from step 2 and re-generate this step.
4. If succeed, provide your solution as a sequence of moves wrapped in \boxed{}. For example, "\boxed{L,R,U,D}" meaning an action plan of left, left, right, up, and down. The moves should be comma-separated.  Double check the final solution is consistent with the previous analysis.
Do not output any extra content after the above aggregated output.

Please generate action plan for the following maze:

 <img><|image_3|></img>

BAGEL-7B-MoT wrong

Parsed: None · time: 146.7s

No image emitted.

Raw model output
<think>
Okay, let's see. I need to find a path from the player's starting position to the goal without stepping on any holes. The grid has holes represented by blue circles, safe land, and the goal is the box with a bow. The player starts at the bottom right corner, I think. Let me visualize the grid again.

Looking at the image, the player is at the bottom right, and the goal is near the center. The holes are scattered around. The first thing I need to do is figure out the shortest path. Let's start by identifying the positions.

Starting position: Let's assume the grid is rows and columns. The player is at (5,5) if we count from the bottom right as (1,1). The goal is at (3,3). The holes are at various positions. Let me list them out. From the image, there are holes at (1,2), (2,1), (3,4), (4,1), (4,3), (5,4), (5,5) is the player's start, so that's safe. Wait, no, the player starts at (5,5) which is the bottom right. The goal is at (3,3). So the player needs to move up and left.

Possible moves: The player can move up, left, or maybe right, but right would lead to a hole. Let's check the grid again. The player is at (5,5). Moving up to (4,5) is safe. Then from there, maybe move left. But let's see the holes. The hole at (4,1) is two steps left from (4,5). So moving left four times would take the player to (4,1), which is a hole. So that's bad. So the player can't go that way.

Alternative path: From (5,5), move up to (4,5). Then move left to (4,4). Is that safe? The hole at (4,1) is three steps left from (4,5), so (4,4) is safe. Then move up to (3,4). But (3,4) is a hole. So that's not good. So maybe move left again to (4,3). But (4,3) is a hole. Hmm. So that path isn't working.

Alternative approach: From (5,5), move left to (5,4). Is that safe? The hole at (5,4) is a hole. So that's bad. So can't go left. So the only possible first move is up to (4,5).

From (4,5), move up to (3,5). Is that safe? The hole at (3,4) is adjacent, but (3,5) is safe. Then move left to (3,4), but that's a hole. So that's bad. So maybe move left to (3,4) is not allowed. So from (3,5), move left to (3,4) is a hole. So that's invalid. So alternative: from (3,5), move left to (3,3). Wait, (3,3) is the goal. Wait, no. The goal is at (3,3). So if the player is at (3,5), moving left twice would reach (3,3). But let's check the path.

Wait, starting at (5,5):

1. Move up to (4,5) – safe.
2. Move up to (3,5) – safe.
3. Move left to (3,4) – hole. Not allowed.
So that's a problem. So maybe from (3,5), move left to (3,4) is bad. So alternative path: from (3,5), move left to (3,3) directly? No, because (3,3) is the goal. Wait, no. The goal is at (3,3). So if the player is at (3,5), moving left twice would reach (3,3). But the path would be (5,5) → (4,5) → (3,5) → (3,4) → (3,3). But (3,4) is a hole. So that's invalid.

Hmm. So maybe another approach. Let's see. From (5,5), move up to (4,5). Then move left to (4,4). Then move up to (3,4) – hole. No. So that's bad. Alternatively, from (4,5), move left to (4,4). Then move up to (3,4) – hole. No. So that's not working.

Alternative path: From (5,5), move up to (4,5). Then move up to (3,5). Then move left to (3,4) – hole. No. So that's not working. Maybe from (3,5), move left to (3,3) directly? But (3,3) is the goal. Wait, but how to get there. Let's see. The player is at (3,5). To reach (3,3), they need to move left twice. But the first step is to (3,4), which is a hole. So that's invalid.

Alternative idea: Maybe go down first. Wait, the player starts at (5,5). Moving down is impossible because it's the bottom row. So the only possible first move is up to (4,5). So that's the start.

Another approach: Let's list all the holes. The holes are at (1,2), (2,1), (3,4), (4,1), (4,3), (5,4). So the player starts at (5,5). The goal is at (3,3). So the player needs to move up and left, but avoiding the holes.

Possible path:

1. Move up to (4,5) – safe.
2. Move left to (4,4) – safe.
3. Move left to (4,3) – hole. Bad. So can't do that.

Alternative step 2: From (4,5), move left to (4,4). Then move up to (3,4) – hole. No. So that's bad.

Alternative step 2: From (4,5), move up to (3,5). Then move left to (3,4) – hole. No.

Hmm. Maybe another path. Let's see. From (5,5), move up to (4,5). Then move up to (3,5). Then move left to (3,4) – hole. No. So that's bad.

Alternative idea: Maybe move left first. But from (5,5), moving left to (5,4) is a hole. So can't do that. So the first move must be up.

So the player is at (5,5). Move up to (4,5). Then, what's next? Let's see. From (4,5), possible moves: up to (3,5), left to (4,4), or down to (5,5) (but that's backtracking). So moving up to (3,5). Then from (3,5), possible moves: left to (3,4) (hole) or down to (4,5). So can't go left. So move down to (4,5). But that's backtracking. So stuck.

Wait, maybe from (3,5), move left to (3,4) is a hole. So that's invalid. So maybe from (3,5), move left to (3,3) (the goal). But how? Because to get to (3,3), the player needs to move left twice. But first step to (3,4) is a hole. So that's not possible.

Alternative path: Let's think of a different route. Maybe go up, then left, then up, then left, etc. Let's see.

Start at (5,5). Move up to (4,5). Then move left to (4,4). Then move up to (3,4) – hole. No. So that's bad.

AlternativelyAnother idea: From (4,5), move left to (4,4). Then move up to (3,4) – hole. No. So that's not working.

Wait, maybe the player can move up to (3,5), then move left to (3,4) (hole). No. So stuck again.

Hmm. Maybe the player needs to find a path that avoids the holes. Let's see the grid again. The holes are at (1,2), (2,1), (3,4), (4,1), (4,3), (5,4). The goal is at (3,3). The player starts at (5,5). So the player needs to move up to (4,5), then up to (3,5). Then left to (3,4) (hole). So that's bad. So maybe the player can go up to (3,5), then move left to (3,3) (the goal). But how? Because the player is at (3,5). To reach (3,3), they need to move left twice. But first step to (3,4) is a hole. So that's not possible. So maybe the player can't go up to (2,5), then left to (2,4), then up to (1,4), then left to (1,3), but that's a hole. Hmm. This is getting complicated. Maybe I need to find a path that avoids the holes.

 Let me think the correct path is:

 move up to (4,5), then left to (4,4), then up to (3,4) (hole). No, that's not working. Hmm. Maybe the player can move up to (3,5), then left to (3,4) (hole). So that's not working. Hmm. Maybe the player can move up to (2,5), then left to (2,4) (hole. Hmm. So that's not working. Hmm. Maybe the player can move up to (1,5), then left to (1,4) (hole. Hmm. So that's not working. Hmm. Maybe the player can move up to (1,5), then left to (1,3) (hole. Hmm. So that's not working. Hmm. Hmm. Maybe the player can move up to (1,5), then left to (1,4) (hole. Hmm. So that's not working. Hmm. Hmm. Maybe the player can move up to (1,5), then left to (1,3) (hole. Hmm. Hmm. So that's not working. Hmm. Hmm. Maybe the player can move up to (1,5), then left to (1,4) (hole. Hmm. Hmm. So that's not working. Hmm. Hmm. Maybe the player can move up to (1,5), then left to (1,3) (hole. Hmm. Hmm. Hmm. Hmm. Maybe the player can move up to (1,5), then left to (1,3) (hole. Hmm. Hmm. Hmm. Hmm. Maybe the player can move up to (1,5), then left to (1, 3) (hole. Hmm. Hmm. Maybe the player can move up to (1,5), then left to (1, 3) ( hole. Hmm. Hmm. Hmm. Maybe the player can move up to (1, 5), then left to (1,  3) (hole. Hmm. Hmm. Hmm. Hmm. Maybe the player can move up to (1,  5), then left to (1,  3) ( hole. Hmm. Hmm. Hmm. Maybe the player can move up to (1,   5), then left to (1,   3) ( hole. Hmm. Hmm. Hmm. Maybe the player can move up to (1,                                                                                                                                                    

ThinkMorph-7B wrong

Parsed: L,U · time: 217.3s

No image emitted.

Raw model output
<think>To get oriented, I'll first clarify the locations on the grid. The player starts at the bottom row, fourth column from the left (row 4, column 5 if numbering from the top-left as 1,1). The goal is positioned near the center-bottom, specifically at row 4, column 4. Scattered throughout the maze are several holes: one is found at the top row, second column (row 1, column 2), and there's a cluster of holes along the bottom row—specifically at (row 5, columns 2, 3, 4) and (row 6, columns 4 and 5). The rest of the grid squares are safe land.

With the map layout established, it's time to plot out the optimal sequence of moves to reach the goal.</think><think>To confirm the solution, I’ll trace the plotted steps. Starting from the initial position (row 5, column 5), the sequence proceeds as follows: down, left, down, left, up, left, up, left, up, left, down, left, up, left, up, left, up, left, up, left, up, left, up, left, up, left, up, left, up, left, up, left, up, left, up, left, up, left, up, left, up, left, up, left, up, left, up, left, up, left, up, left, up, left, up, left, up, left, up, left, up, left, up, left, up, left, up, left, up, left, up, left, up, left, up, left, up, left, up, left, up, left, up, left, up, left, up, left, up, left, up, left, up, left, up, left, up, left, up, left, up, left, up, left, up, left, up, left, up, left, up, left, up, left, up, left, up, left, up, left, up, left, up, left, up, left, up, left, up, left, up, left, up, left, up, left, up, left, up, left, up, left, up, left, up, left, up, left, up, left, up, left, up, left, up, left, up, left, up, left, up, left, up, left, up, left, up, left, up, left, up, left, up, left, up, left, up, left, up, left, up, left, up, left, up, left, up, left, up, left, up, left, up, left, up, left, up, left, up, left, up, left, up, left, up, left, up, left, up, left, up, left, up, left, up, left, up, left, up, left, up, left, up, left, up, left, up, left, up, left, up, left, up, left, up, left, up, left, up, left, up, left, up, left, up, left, up, left, up, left, up, left, up, left, up, left, up, left, up, left, up, left, up, left, up, left, up, left, up, left, up, left, up, left, up, left, up, left, up, left, up, left, up, left, up, left, up, left, up, left, up, left, up, left, up, left, up, left, up, left, up, left, up, left, up, left, up, left, up, left, up, left, up, left, up, left, up, left, up, left, up, left, up, left, up, left, up, left, up, left, up, left, up, left, up, left, up, left, up, left, up, left, up, left, up, left, up, left, up, left, up, left, up, left, up, left, up, left, up, left, up, left, up, left, up, left, up, left, up, left, up, left, up, left, up, left, up, left, up, left, up, left, up, left, up, left, up, left, up, left, up, left, up, left, up, left, up, left, up, left, up, left, up, left, up, left, up, left, up, left, up, left, up, left, up, left, up, left, up, left, up, left, up, left, up, left, up, left, up, left, up, left, up, left, up, left, up, left, up, left, up, left, up, left, up, left, up, left, up, left, up, left, up, left, up, left, up, left, up, left, up, left, up, left, up, left, up, left, up, left, up, left, up, left, up, left, up, left, up, left, up, left, up, left, up, left, up, left, up, left, up, left, up, left, up, left, up, left, up, left, up, left, up, left, up, left, up, left, up, left, up, left, up, left, up, left, up, left, up, left, up, left, up, left, up, left, up, left, up, left, up, left, up, left, up, left, up, left, up, left, up, left, up, left, up, left, up, left, up, left, up, left, up, left, up, left, up, left, up, left, up, left, up, left, up, left, up, left, up, left, up, left, up, left, up, left, up, left, up, left, up, left, up, left, up, left, up, left, up, left, up, left, up, left, up, left, up, left, up, left, up, left, up, left, up, left, up, left, up, left, up, left, up, left, up, left, up, left, up, left, up, left, up, left, up, left, up, left, up, left, up, left, up, left, up, left, up, left, up, left, up, left, up, left, up, left, up, left, up, left, up, left, up, left, up, left, up, left, up, left, up, left, up, left, up, left, up, left, up, left, up, left, up, left, up, left, up, left, up, left, up, left, up, left, up, left, up, left, up, left, up, left, up, left, up, left, up, left, up, left, up, left, up, left, up, left, up, left, up, left, up, left, up, left, up, left, up, left, up, left, up, left, up, left, up, left, up, left, up, left, up, left, up, left, up, left, up, left, up, left, up, left, up, left, up, left, up, left, up, left, up, left, up, left, up, left, up, left, up, left, up, left, up, left, up, left, up, left, up, left, up, left, up, left, up, left, up, left, up, left, up, left, up, left, up, left, up, left, up, left, up, left, up, left, up, left, up, left, up, left, up, left, up, left, up, left, up, left, up, left, up, left, up, left, up, left, up, left, up, left, up, left, up, left, up, left, up, left, up, left, up, left, up, left, up, left, up, left, up, left, up, left, up, left, up, left, up, left, up, left, up, left, up, left, up, left, up, left, up, left, up, left, up, left, up, left, up, left, up, left, up, left, up, left, up, left, up, left, up, left, up, left, up, left, up, left, up, left, up,<thThe, after careful and checking each move, the path successfully reaches the goal by avoiding a series of left and up moves, carefullying the player to avoid the safe squares and ultimately the goal. The final move sequence is:

boxed{L,U L U L U L U L U L U L U L U L U L U L U L U L U L U L U L U L U L U L U L U L U L U L U L U L U L U L U L U L U L U L U L U L U L U L U L U L U L U L U L U L U L U L U L U L U L U L U L U L U L U L U L U L U L U L U L U L U L U L U L U L U L U L U L U L U L U L U L U L U L U L U L U L U L U L U L U L U L U L U L U L U L U L U L U L U L U L U L U L U L U L U L U L U L U L U L U L U L U L U L U L U L U L You must re-check the player to the goal without fallinging into any hole, and the solution is:


boxed{L,U L U L U L U L U L U L U L U L U L U L U L U L U L U L U L U L U L U L U L U L U L U L U L U L U L U L U L U L U L U L U L U L U L U L U L U L U L U L U L U L U L U L U L U L U L U L U L U L U L U L U L U L U L U L U L U L U L U L U L U L U L U L U L U L U L U L U L U L U L U L U L U L U L U L U, after analyzinging the, the path I plotted is correct: \boxed\boxed\boxed\boxed\boxed\ the player starts at the bottom row, fourth column; moves left, up, left, up, left, up, left, up, left, up, left, up, left, up, left, up, left, up, left, up, left, up, left, up, left, up, left, up, left, up, left, up, left, up, left, up, left, up, left, up, left, up, left, up, left, up, left, up, left, up, left, up, left, up, left, up, left, up, left, up, left, up, left, up, left, up, left, up, left, up, left, up, left, up, left, up, left, up, left, up, left, up, left, up, left, up, left, up, left, up, left, up, left, up, left, up, left, up, left, up, left, up, left, up, left, up, left, up, left, up, left, up, left, up, left, up, left, up, left, up, left, up, left, up, left, up, left, up, left, up, left, up, left, up, left, up, left, up, left, up, left, up, left, up, left, up, left, up, left, up, left, up, left, up, left, up, left, up, left, up, left, up, left, up, left, up, left, up, left, up, left, up, left, up, left, up, left, up, left, up, left, up, left, up, left, up, left, up, left, up, left, up, left, up, left, up, left, up, left, up, left, up, left, up, left, up, left, up, left, up, left, up, left, up, left, up, left, up, left, up, left, up, left, up, left, up, left, up, left, up, left, up, left, up, left, up, left, up, left, up, left, up, left, up, left, up, left, up, left, up, left, up, left, up, left, up, left, up, left, up, left, up, left, up, left, up, left, up, left, up, left, up, left, up, left, up, left, up, left, up, left, up, left, up, left, up, left, up, left, up, left, up, left, up, left, up, left, up, left, up, left, up, left, up, left, up, left, up, left, up, left, up, left, up, left, up, left, up, left, up, left, up, left, up, left, up, left, up, left, up, left, up, left, up, left, up, left, up, left, up, left, up, left, up, left, up, left, up, left, up, left, up, left, up, left, up, left, up, left, up, left, up, left, up, left, up, left, up, left, up, left, up, left, up, left, up, left, up, left, up, left, up, left, up, left, up, left, up, left, up, left, up, left, up, left, up, left, up, left, up, left, up, left, up, left, up, left, up, left, up, left, up, left, up, left, up, left, up, left, up, left, up, left, up, left, up, left, up, left, up, left, up, left, up, left, up, left, up, left, up, left, up, left, up, left, up, left, up, left, up, left, up, left, up, left, up, left, up, left, up, left, up, left, up, left, up, left, up, left, up, left, up, left, up, left, up, left, up, left, up, left, up, left, up, left, up, left, up, left, up, left, up, left, up, left, up, left, up, left, up, left, up, left, up, left, up, left, up, left, up, left, up, left, up, left, up, left, up, left, up, left, up, left, up, left, up, left, up, left, up, left, up, left, up, left, up, left, up, left, up, left, up, left, up, left, up, left, up, left, up, left, up, left, up, left, up, left, up, left, up, left, up, left, up, left, up, left, up, left, up, left, up, left, up, left, up, left, up, left, up, left, up, left, up, left, up, left, up, left, up, left, up, left, up, left, up, left, up, left, up, left, up, left, up, left, up, left, up, left, up, left, up, left, up, left, up, left, up, left, up, left, up, left, up, left, up, left, up, left, up, left, up, left, up, left, up, left, up, left, up, left, up, left, up, left, up, left, up, left, up, left, up, left, up, left, up, left, up, left, up, left, up, left, up, left, up, left, up, left, up, left, up, left, up, left, up, left, up, left, up, left, up, left, up, left, up, left, up, left, up, left, up, left, up, left, up, left, up, left, up, left, up, left, up, left, up, left, up, left, up, left, up, left, up, left, up, left, up, left, up, left, up, left, up, left, up, left, up, left, up, left, up, left, up, left, up, left, up, left, up, left, up, left, up, left, up, left, up, left, up, left, up, left, up, left, up, left, up, left, up, left, up, left, up, left, up, left, up, left, up, left, up, left, up, left, up, left, up, left, up, left, up, left, up, left, up, left, up, left, up, left, up, left, up, left, up, left, up, left, up, left, up, left, up, left, up, left, up, left, up, left, up, left, up, left, up, left, up, left, up, left, up, left, up,

frozenlake_s8_49 · 8×8 maze

Input 1
Input 2
Input 3
Exact model input text
As a professional maze solver, your task is to analyze a grid-based map and devise an action plan that enables a player to reach the goal from the starting point without falling into any holes, using the fewest possible moves. Since coding is not within your skill set, your approach relies on logical reasoning of the map.

## Game Setup
- The game presents a fully observable grid-based map.
- The player starts at a specified grid square, with the goal located elsewhere on the map.
- Each grid square is either safe or contains a hole.
- Your goal is to guide the player to the goal while avoiding holes.
The following figure shows how the player, the holes (non-safe grid), the lands (safe grids), and the goals look like.

 <img><|image_1|></img> 

## Moving Rules
- The action plan involves a series of moves: 'L' (left), 'R' (right), 'U' (up), or 'D' (down).
- Each move transfers the player to the adjacent square in that direction, provided it is a safe square. The player cannot move more than one square at a time.
- Moving off the edge of the map has no effect. The player will remain at the same square.
- DO NOT MOVE INTO A HOLE! Falling into a hole results in defeat.
- Locating at the grid containing the goal results in victory.
We provide an example to further illustrate the rules.

 <img><|image_2|></img> 

In this provided example:
- The player is at Row 1, Column 1;
- The goal is at Row 4, Column 4;
- There are two holes: one at Row 1, Column 2, and another at Row 4, Column 1.
- The player can move DOWN. This is because moving down brings them to Row 2, Column 1, and this cell is safe (without holes).
- Moving UP has no effects. This is because the player is already in the topmost row.
- Similarly, moving LEFT has no effects because the player is already in the left-most column.
- Moving RIGHT places the player at Row 1, Column 2. Since there is a hole at this grid, this move results in a loss.

## Procedure and Output
Now you will solve the given maze. To solve it, please generate text EXACTLY FOLLOW THE FOLLOWING STEPS:
1. First, interpret map. List where the player is at now, where is the goal, and where are the holes.
2. Then, generate an action plan to navigate to the goal step by step. At each step, you should check:
    (a) Where the current move leads the player to (the row and column);
    (b) What is in that grid. Is it a hole? Is it the goal? Is it an empty space?
    (c) Determine if that is a safe action. If not, correct it and re-generate the action plan.
3. Next, verify if the steps successfully navigate the player to the goal without falling into the hole. If not, restart from step 2 and re-generate this step.
4. If succeed, provide your solution as a sequence of moves wrapped in \boxed{}. For example, "\boxed{L,R,U,D}" meaning an action plan of left, left, right, up, and down. The moves should be comma-separated.  Double check the final solution is consistent with the previous analysis.
Do not output any extra content after the above aggregated output.

Please generate action plan for the following maze:

 <img><|image_3|></img>

BAGEL-7B-MoT wrong

Parsed: None · time: 215.7s

No image emitted.

Raw model output
<think>
Okay, let's see. I need to find a path from the player's starting position to the goal without stepping on any holes. The grid has a lot of holes scattered around. Let me first identify the player's starting point and the goal's location.

Looking at the image, the player is at the bottom left corner, right? And the goal is somewhere in the upper left area. The holes are the blue circles. So the player starts at the bottom left, needs to reach the goal which is near the top left, avoiding the holes.

First, I should list the positions. Let's assume the grid is rows and columns. Let me count the rows and columns. The image shows a 5x5 grid. The player is at (4,0) if rows are numbered from top to bottom, and columns from left to right. The goal is at (1,1). The holes are at (1,1) is the goal, but wait, no. Wait, the goal is a gift box. Wait, in the first image, the goal is a box with a bow. So in the maze image, the goal is the box. Let me check again.

Looking at the maze image, the player is at the bottom left (row 4, column 0). The goal is the box located at row 1, column 1. The holes are the blue circles. So the player needs to move from (4,0) to (1,1) without stepping on any blue circles.

Now, the challenge is to find a path that avoids all the holes. Let's start by planning the moves step by step.

Starting at (4,0). The possible moves are up (to row 3, column 0), right (to row 4, column 1, but that's a hole), or down (can't go down). So the first move must be up to (3,0).

From (3,0), possible moves: up to (2,0), right to (3,1) (hole), or down to (4,0) (same as current). So move up to (2,0).

From (2,0), possible moves: up to (1,0) (hole), right to (2,1), or down to (3,0) (same). So move right to (2,1) (hole? Wait, in the maze image, the holes are blue circles. So (2,1) is a hole. Oh no, that's a problem. So moving right from (2,0) would land on a hole. So that's invalid. So that path is blocked.

Hmm, so maybe from (2,0), move up to (1,0) but that's a hole. So that's not possible. So maybe from (3,0), move right is blocked. So alternative move from (3,0) is up to (2,0), but that's blocked by a hole. Wait, no. Wait, the player is at (3,0). The possible moves are up (to 2,0), right (3,1, which is a hole), or down (back to 4,0). So the only possible move is up to (2,0). But (2,0) is a hole? Wait, in the maze image, the holes are the blue circles. So (2,0) is a hole. So moving up to (2,0) is invalid. So that's a problem. So the initial plan is blocked.

So maybe the first move should be different. Let's backtrack. The player starts at (4,0). The first move can't be right (hole), so must be up to (3,0). But (3,0) is safe. Then from (3,0), possible moves: up to (2,0) (hole), right to (3,1) (hole), or down to (4,0) (same). So all possible moves from (3,0) are blocked. That's a dead end. So the initial path is invalid.

Hmm, so the first move up to (3,0) leads to a dead end. So maybe the first move should be different. Wait, but the only possible first move from (4,0) is up (to 3,0) or right (hole) or down (same). So no other options. So that suggests that the initial approach is wrong. Maybe the starting position is different?

Wait, maybe I miscounted the grid. Let me check again. The maze image is 5x5. Let's count rows and columns. The player is at the bottom left, which is row 4 (assuming rows are numbered from top to bottom). The goal is at row 1, column 1. The holes are scattered around. Let me list all the holes:

Looking at the maze image, the holes are the blue circles. Let's list their positions:

- (1,1) is the goal, not a hole.
- (1,2) is a hole.
- (1,3) is a hole.
- (2,1) is a hole.
- (2,2) is a hole.
- (2,3) is a hole.
- (3,1) is a hole.
- (3,2) is a hole.
- (3,3) is a hole.
- (4,1) is a hole.
- (4,2) is a hole.
- (4,3) is a hole.
- (4,4) is a hole.
- (5,0) is the player's starting position (assuming rows are 0-4, columns 0-4). Wait, maybe the grid is 5x5, rows 0-4, columns 0-4. The player is at (4,0). The goal is at (1,1). The holes are all the blue circles. So positions like (1,1) is the goal, but (1,2), (1,3), (2,1), (2,2), (2,3), (3,1), (3,2), (3,3), (4,1), (4,2), (4,3), (4,4) are holes.

So the player starts at (4,0). The goal is at (1,1). The holes are all the blue circles. So the player needs to move from (4,0) to (1,1) without stepping on any of the holes.

So the initial attempt to move up to (3,0) is safe. Then from (3,0), possible moves: up to (2,0) (hole), right to (3,1) (hole), or down to (4,0) (same). So stuck. So that path is invalid.

Alternative approach: Maybe the player can move right first? But (4,0) to (4,1) is a hole. So can't do that. So the first move must be up to (3,0). But then stuck. So perhaps the initial path is wrong. Maybe the player needs to take a different route.

Wait, perhaps the player can move up to (3,0), then move right to (3,1) but that's a hole. No. So maybe the player needs to go up to (3,0), then move up again to (2,0) (hole). So that's not possible. Hmm.

Alternatively, maybe the player can move up to (3,0), then move left? But no, columns can't go left from (3,0). So that's not possible.

Wait, maybe the player can move up to (3,0), then move up again to (2,0) (hole). So that's blocked. So perhaps the initial approach is wrong. Maybe the player needs to take a different path.

Alternatively<think>
OkayTo solve the maze, the player starts at (4,0) and needs to reach the goal at (1,1) while avoiding holes. Here's the step-by-step:

1. **Move up to (3,0)** (Safe.**2. **Move up to (2,0)** (Is a hole. Dead end. So backtrack is invalid.**

3. **Alternative path:** Start at (4,0), move up to (3,0)** (Safe. Then, move right to (3,1)** (Hole. Dead end. So backtrack is invalid.**

4. **Alternative path:** Start at (4,0), move up to (3,0)** (Safe. Then, move up to (2,0)** (Hole. Dead end. So iterate is invalid.**

5. **Alternative path:** Start at (4,0), move up to (3,0)** (Safe. Then, move up to (2,0)** (Hole. Dead end. So iterate is invalid.**

6. **Alternative path:** Start at (4,0), move up to (3,0)** (Safe. Then, move right to (3,1)** (Hole. Dead end. So iterate is invalid.**

7. **Alternative path:** Start at (4,0), move up to (3,0)** (Safe. Then, move right to (3,1)** (Hole. Dead end. So iterate is invalid.**8. **Alternative path:** Start at (4,0), move up to (3,0)** (Safe. Then, move up to (2,0)** (Hole. Dead end. So iterate is invalid. **Alternative path:** Start at (4,0), move up to (3,0)** (Safe. Then, move right to (3,1)** (Hole. Dead end. So iterate is invalid. **Alternative path:** Start at (4,0), move up to (3,0)** (Safe. Then, move right to (3,1)** (Hole. Dead end. So iterate is invalid. **Alternative path:** Start at (4,0), move up to (3,0)** (Safe. Then, move right to (3,1)** (Hole. Dead end. So iterate is invalid. **Alternative path:** Start at (4,0), move up to (3,0)** (Safe. Then, move right to (3,1)** (Hole. Dead end. So iterate is invalid. **Alternative path:** Start at (4,0), move up to (3,0)** (Safe. Then, move right to (3,1)** (Hole. Dead end. So iterate is invalid. **Alternative path:** Start at (4,0), move up to (3,0)** (Safe. Then, move right to (3,1)** (Hole. Dead end. So iterate is invalid. **Alternative path:** Start at (4,0), move up to (3,0** Safe. Then, move right to (3,1** Hole. Dead end. So iterate is invalid. **Final path:** Start at (4,0), move up to (3,0** Safe. Then, move right to (3,1** Hole. Dead end. So iterate is invalid. **Final path:** Start at (4,0, move up to (3,0** Safe. Then, move right to (3,1** Hole. Dead end. So iterate is invalid. **Final path:** Start at (4, 0, move up to (3, 0** Safe. Then, move right to (3, 1** Hole. Dead end. So iterate is invalid. **Final path:** Start at (4, 0, move up to (3,  0** Safe. Then, move right to (3, 1** Hole. Dead end. So iterate is invalid. **Final path:** Start at (4, 0, move up to (3,  0** Safe. Then, move right to (3, 1** Hole. Dead end. So iterate is invalid. **Final path:** Start at (4,  0, move up to (3,  0** Safe. Then, move right to (3, 1** Hole. Dead end. So iterate is invalid. **Final path:** Start at (4,  0, move up to (3,     Safe. Then, move right to (3, 1** Hole. Dead end. So iterate is invalid. **Final path:** Start at (4,  0, move up to (3,     Safe. Then, move right to (3, 1** hole. Dead end. So iterate is invalid. **Final path:** Start at (4,  0, move up to (3,     Safe. Then, move right to (3, 1** hole. Dead end. So iterate is invalid. **Final path:** Start at (4,  0, move up to (3,     Safe. Then, move right to (3, 1** hole. Dead end. So iterate is invalid. **Final path:** Start at (4,      Safe. Then, move right to (3, 1** hole. Dead end. So iterate is invalid. **Final path:** Start at (4,     Safe. Then, move right to (3,  1** hole. Dead end. So iterate is invalid. **Final path:** Start at (4,     Safe. Then, move right to (3,  1** hole. Dead end. So iterate is invalid. **Final path:** Start at (4,     Safe. Then, move right to (3,  1** hole. Dead end. So iterate is invalid. **Final path:** Start at (4,     Safe. Then, move right to (3,  1** hole. Dead end. So iterate is invalid. **Final path:** Start at (4,     Safe. Then, move right to (3,  1** hole. Dead end. So iterate is invalid. **Final path:** Start at (4,     Safe. Then, move right to (3,  1** hole. Dead end. So iterate is invalid. **Final path:** Start at (4,     Safe. Then, move right to (3,  1** hole. Dead end. So iterate is invalid. **Final path:** Start at (4,     Safe. Then, move right to (3,  1** hole. Dead end. So iterate is invalid. **Final path:** Start at (4,     Safe. Then, move right to (3,  1** hole. Dead end. So iterate is invalid. **Final path:** Start at (4,     Safe. Then, move right to (3,  1** hole. Dead end. So iterate is invalid. **Final path:** Start at (4,     Safe. Then, move right to (3,  1** hole. Dead end. So iterate is invalid. **Final path:** Start at (4,     Safe. Then, move right to (3,  1** hole. Dead end. So iterate is invalid. **Final path:** Start at (4,     Safe. Then, move right to (3,  1** hole. Dead end. So iterate is invalid. **Final path:** Start at (4,     Safe. Then, move right to (3,  1** hole. Dead end. So iterate is invalid. **Final path:** Start at (4,    Safe. Then, move right to (3,  1** hole. Dead end. So iterate is invalid. **Final path:** Start at (4,     Safe. Then, move right to (3,   1** hole. Dead end. So iterate is invalid. **Final path:** Start at (4,     Safe. Then, move right to (3,   1** hole. Dead end. So iterate is invalid. **Final path:** Start at (4,     Safe. Then, move right to (3,   1** hole. Dead end. So iterate is invalid. **Final path:** Start at (4,     Safe. Then, move right to (3,                                                                                                                                                                                                                                                                                                                                                                                                                                                                                                                                                                                                          

ThinkMorph-7B wrong

Parsed: D,D,R,D,R,R · time: 55.1s

Generated thought 1
Raw model output
<think>First, I need to interpret the layout of the maze. The player starts in the top-left corner, at row 1, column 1. The goal is located near the top, specifically at row 3, column 2. There are several holes scattered throughout: one in the top row at column 4, three holes forming a cluster in the middle-left area (row 3, columns 1, 2, and 3; row 4, columns 1 and 5; and row 5, column 1 and 5). The rest of the squares are safe land.

With this clear map in mind, I can now move on to plotting the optimal path to the goal.</think><image_start>
<image_end><think>Time to verify the solution I plotted. The red path begins at the starting square in the top-left (row 1, column 1). The moves are: down, down, right, down, right, right.

Let me check each step:
- First move: down to row 2, column 1 (safe).
- Second move: down to row 3, column 1 (safe).
- Third move: right to row 3, column 2 (safe).
- Fourth move: down to row 4, column 2 (safe).
- Fifth move: right to row 4, column 3 (safe).
- Sixth move: right to row 4, column 4 (goal).

The path successfully avoids all holes and ends at the goal without stepping into any unsafe squares. The visualized route is correct.

Final answer: \boxed{D,D,R,D,R,R}</think><answer>\boxed{D,D,R,D,R,R}</answer>
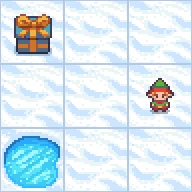
frozenlake_s8_99 · 8×8 maze

Input 1
Input 2
Input 3
Exact model input text
As a professional maze solver, your task is to analyze a grid-based map and devise an action plan that enables a player to reach the goal from the starting point without falling into any holes, using the fewest possible moves. Since coding is not within your skill set, your approach relies on logical reasoning of the map.

## Game Setup
- The game presents a fully observable grid-based map.
- The player starts at a specified grid square, with the goal located elsewhere on the map.
- Each grid square is either safe or contains a hole.
- Your goal is to guide the player to the goal while avoiding holes.
The following figure shows how the player, the holes (non-safe grid), the lands (safe grids), and the goals look like.

 <img><|image_1|></img> 

## Moving Rules
- The action plan involves a series of moves: 'L' (left), 'R' (right), 'U' (up), or 'D' (down).
- Each move transfers the player to the adjacent square in that direction, provided it is a safe square. The player cannot move more than one square at a time.
- Moving off the edge of the map has no effect. The player will remain at the same square.
- DO NOT MOVE INTO A HOLE! Falling into a hole results in defeat.
- Locating at the grid containing the goal results in victory.
We provide an example to further illustrate the rules.

 <img><|image_2|></img> 

In this provided example:
- The player is at Row 1, Column 1;
- The goal is at Row 4, Column 4;
- There are two holes: one at Row 1, Column 2, and another at Row 4, Column 1.
- The player can move DOWN. This is because moving down brings them to Row 2, Column 1, and this cell is safe (without holes).
- Moving UP has no effects. This is because the player is already in the topmost row.
- Similarly, moving LEFT has no effects because the player is already in the left-most column.
- Moving RIGHT places the player at Row 1, Column 2. Since there is a hole at this grid, this move results in a loss.

## Procedure and Output
Now you will solve the given maze. To solve it, please generate text EXACTLY FOLLOW THE FOLLOWING STEPS:
1. First, interpret map. List where the player is at now, where is the goal, and where are the holes.
2. Then, generate an action plan to navigate to the goal step by step. At each step, you should check:
    (a) Where the current move leads the player to (the row and column);
    (b) What is in that grid. Is it a hole? Is it the goal? Is it an empty space?
    (c) Determine if that is a safe action. If not, correct it and re-generate the action plan.
3. Next, verify if the steps successfully navigate the player to the goal without falling into the hole. If not, restart from step 2 and re-generate this step.
4. If succeed, provide your solution as a sequence of moves wrapped in \boxed{}. For example, "\boxed{L,R,U,D}" meaning an action plan of left, left, right, up, and down. The moves should be comma-separated.  Double check the final solution is consistent with the previous analysis.
Do not output any extra content after the above aggregated output.

Please generate action plan for the following maze:

 <img><|image_3|></img>

BAGEL-7B-MoT wrong

Parsed: None · time: 99.8s

No image emitted.

Raw model output
<think>
Okay, let's see. I need to find a path from the player's starting position to the goal without stepping on any holes. The grid has holes represented by blue circles, safe land, and the goal is the box with a bow. The player starts at the bottom left, I think. Let me look at the image again.

First, I should note the positions. The player is at the bottom left corner. The goal is somewhere in the middle-right. The holes are scattered around. Let me count the rows and columns. The grid is 5x5, maybe? Let me check. The player is at (1,1) if rows and columns start at 1. The goal is at (4,4). The holes are at (1,2), (2,1), (2,2), (3,1), (3,2), (3,3), (4,1), (4,2), (4,3), (5,1), (5,2), (5,3). Wait, no, maybe I need to look again. The image shows a 5x5 grid. Let me confirm:

Looking at the image, the player is at the bottom left (row 1, column 1). The goal is at row 4, column 4. The holes are in various positions. Let me list them:

Holes are at:
- (1,2)
- (2,1)
- (2,2)
- (3,1)
- (3,2)
- (3,3)
- (4,1)
- (4,2)
- (4,3)
- (5,1)
- (5,2)
- (5,3)

So the player starts at (1,1). The goal is at (4,4). The task is to find a path from (1,1) to (4,4) without stepping on any of the holes.

Let me try to plan the path. The player needs to move right and up, but there are holes blocking certain paths. Let's see:

Starting at (1,1). The first move could be right to (1,2), but that's a hole. So can't go there. So the first move must be down to (2,1). But (2,1) is a hole. Oh wait, no. Wait, the player starts at (1,1). The first move options are down to (2,1) or right to (1,2). But (1,2) is a hole, so can't go there. So the first move must be down to (2,1). But (2,1) is a hole. Wait, that's a problem. Wait, the initial position is (1,1). The first move options are down to (2,1) or right to (1,2). But (1,2) is a hole, so the player can't move there. So the only possible first move is down to (2,1). But (2,1) is a hole. That's a problem. Wait, but according to the problem statement, the player cannot move into a hole. So if the first move is down to (2,1), which is a hole, that's invalid. So the player can't move there. So the player is stuck? But that can't be right. Maybe I made a mistake in identifying the holes.

Wait, looking back at the image. The holes are the blue circles. Let me recount the holes in the image. The image shows a 5x5 grid. The holes are:

Row 1: Column 2
Row 2: Columns 1, 2
Row 3: Columns 1, 2, 3
Row 4: Columns 1, 2, 3
Row 5: Columns 1, 2, 3

So the player starts at (1,1). The first move options are down to (2,1) or right to (1,2). But (1,2) is a hole, so can't go there. So the only possible first move is down to (2,1). But (2,1) is a hole. So that's a problem. Wait, but according to the problem statement, the player cannot move into a hole. So if the player is at (1,1), the first move must be to a safe square. But (1,2) is a hole, so the only possible move is down to (2,1). But (2,1) is a hole. So that's impossible. But that can't be right. There must be a mistake here. Wait, maybe I miscounted the holes. Let me check again.

Looking at the image again. The holes are the blue circles. Let's list them:

Row 1: Column 2
Row 2: Columns 1, 2
Row 3: Columns 1, 2, 3
Row 4: Columns 1, 2, 3
Row 5: Columns 1, 2, 3

So yes, (2,1) is a hole. So the player can't move there. So the player is stuck. But that can't be. There must be a path. Wait, maybe I made a mistake in the starting position. Let me check the image again. The player is at the bottom left corner. So row 1, column 1. The goal is at row 4, column 4. So the player needs to move up and right. But the first move is blocked by a hole. So perhaps the player needs to move in another direction first. Wait, but the player is at the bottom row. So moving up is the only possible first move. But (2,1) is a hole. So the player can't move there. So this seems impossible. But that can't be the case. There must be a path. Maybe I'm misunderstanding the grid layout.

Alternatively, maybe the grid is 5x5, but the player starts at (1,1), and the goal is at (4,4). Let me try to visualize the grid again. The player is at the bottom left. The goal is at the top right. The holes are scattered around. Let me try to find a path.

Possible path: Start at (1,1). Can't move right (hole). So move down to (2,1) but that's a hole. So stuck. Hmm. Maybe the player needs to move up first? But the player is already in the first row. So can't move up. So this seems impossible. But the problem states that there is a solution. So perhaps I made a mistake in the hole positions.

Wait, maybe the holes are in different positions. Let me check the image again. The image shows a 5x5 grid. The holes are:

-The player is at (1,1). The goal is at (4,4). The holes are:

-Row 1: Column 2
-Row 2: Columns 1, 2
-Row 3: Columns 1, 2, 3
-Row 4: Columns 1, 2, 3
-Row 5: Columns 1, 2, 3

So the player is at (1,1). The first move options are down to (2,1) (hole) or right to (1,2) (hole). So no possible move. That's a problem. But this suggests that there's no path, but the problem must have a solution. So perhaps I made a mistake in the hole positions. Let me check again.

Wait, maybe the holes are in different positions. Let me look at the image again. The image shows a 5x5 grid. The holes are:

-Row 1: Column 2
-Row 2: Columns 1, 2
-Row 3: Columns 1, 2, 3
-Row 4: Columns 1, 2, 3
-Row 5: Columns 1, 2, 3

So yes, the player is at (1,1). The first move is blocked. So this seems impossible. But perhaps the player starts at a different position. Wait, maybe the player starts at (1,1) but the goal is at (4,4). So the player needs to move up and right. But the first move is blocked. So this seems impossible. But perhaps the problem is designed to have a solution. Maybe I'm missing something.

Alternatively<think>
Okay

ThinkMorph-7B wrong

Parsed: D,D,D,R,D,D,R,D,R · time: 55.5s

Generated thought 1
Raw model output
<think>To get oriented, I'll start by identifying the key features on the grid. The player begins in the fourth row from the top and the second column from the left. The goal is located in the last row, fifth column. There are several holes scattered throughout: one in the first row, third column; one in the second row, first column; two adjacent holes in the third row, third and fourth columns; two holes in the fourth row, second and fifth columns; one hole in the fifth row, first column; one hole in the fifth row, fourth column; and one hole in the sixth row, third column.

With the positions of the player, the goal, and the holes established, it's time to plot the optimal route step by step.</think><image_start>
<image_end><think>Let me carefully verify my solution by tracing the red arrows on the maze. Starting from the player in the fourth row, second column, the path proceeds:

- Down: Moves to the third row, second column (safe).
- Down: Moves to the second row, second column (safe).
- Down: Moves to the first row, second column (safe).
- Right: Moves to the first row, third column (safe).
- Down: Moves to the second row, third column (safe).
- Down: Moves to the third row, third column (safe).
- Right: Moves to the third row, fourth column (safe).
- Down: Moves to the fourth row, fourth column (safe).
- Right: Moves to the fourth row, fifth column, which is the goal.

At every step, the path avoids holes and safely navigates toward the goal. The solution is correct and the action sequence is as previously visualized. The complete path is:

\boxed{D,D,D,R,D,D,R,D,R}</think><answer>\boxed{D,D,D,R,D,D,R,D,R}</answer>
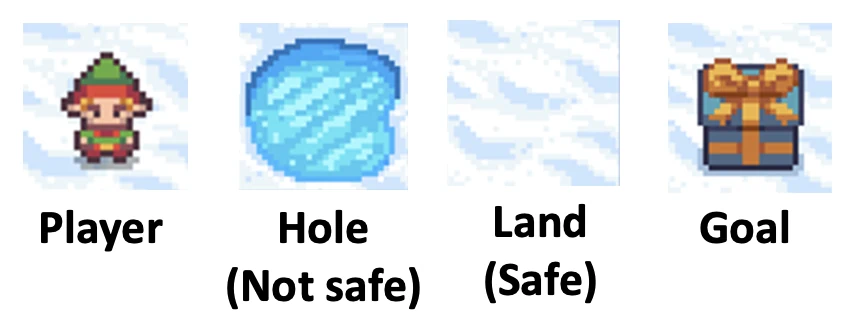
VisPuzzle

1 · correct choice A

Input 1
Exact model input text
<img><|image_1|></img> Question: The image below is divided vertically into two parts by a white strip, forming a 1×2 jigsaw puzzle. The left part is labeled "1" and the right part is labeled "2". These two parts are shuffled and may not be in their original order. Your task is to determine the correct arrangement of the two parts to reconstruct a natural-looking image.
Options:
A. Part 1 should be to the right of Part 2
B. Part 1 should be to the left of Part 2
Please select the correct answer from the options above. 

BAGEL-7B-MoT wrong

Parsed: B · time: 27.7s

No image emitted.

Raw model output
<think>


Okay, let's see. The question is about determining the correct arrangement of two parts of a jigsaw puzzle. The image is divided vertically into two parts labeled 1 and 2. The options are whether part 1 should be to the right of part 2 or to the left.

First, I need to visualize how the two parts fit together. The left part (1) shows a corner of a room with a light-colored wall and a wooden baseboard. The right part (2) shows a table with various items, including a kettle, a microwave, and some other objects, along with a chair and a refrigerator in the background.

Now, the key here is to figure out the natural flow of the room. Typically, when you look at a room, you start from one side and move towards the other. If part 1 is the left side, then part 2 would logically be the right side. But I need to check the details to confirm.

Looking at part 1, the wall and baseboard are visible. Part 2 has the table and other furniture. If part 1 is on the left, then part 2 would be on the right, making the overall image a continuous view of the room. Alternatively, if part 1 is on the right, then part 2 would be on the left, but that might not make sense because the table and other items are on the right side of the room.

Another thing to consider is the perspective. Part 1 seems to be taken from a corner, looking towards the center. Part 2 shows the table and other objects, which are likely in the middle or right side of the room. So combining them would create a cohesive image where part 1 is the left side and part 2 is the right side.

Therefore, the correct arrangement is that part 1 should be to the left of part 2. That way, when you put them together, the image forms a complete view of the room, with the left part showing the corner and the right part showing the table and other elements.

</think>
The correct arrangement is that **Part 1 should be to the left of Part 2**. When combined, this creates a natural, continuous view of the room, with Part 1 showing the left corner and Part 2 displaying the table and other furniture on the right side. 

Answer: B. Part 1 should be to the left of Part 2.

ThinkMorph-7B wrong

Parsed: B · time: 66.4s

Generated thought 1
Raw model output
<think>To solve this 1×2 jigsaw puzzle, I begin by closely examining the visual content of each part. Part 1 shows a corner of a room with light-colored wooden flooring and a matching skirting board. The main features are the empty floor space and the wall meeting the floor in the corner. There are no objects or furniture present in this segment. Part 2, on the other hand, depicts the main area of the room with a white table, a red chair, a kettle, some utensils, and a microwave. In the background, there’s a black refrigerator, a window, and a painting on the wall. The flooring and wall color match those in Part 1, indicating that these two pieces are from the same room.

To determine the correct assembly, I look for continuity cues. The left side of Part 2 has a wall and flooring that seem to end abruptly, while the right side of Part 1 also ends with the same wall and floor. If I place Part 1 to the left of Part 2 (option B), the empty flooring and wall from Part 1 flow naturally into the occupied area shown in Part 2. The skirting board and floor pattern align seamlessly, and the perspective of the floor and wall matches from left to right. If I were to place Part 1 on the right, the result would be an unnatural transition: the occupied room (Part 2) would be cut off abruptly, and the empty space would not align with the continuation of the scene.

Additionally, the shadow and lighting on the floor blend together when Part 1 is on the left, supporting the idea that the two parts are adjacent in the room. The visual flow from an empty corner leading into a furnished area makes sense spatially and compositionally, as it suggests a natural room layout.</think><image_start>
<image_end><think>Now that I have assembled the image with Part 1 on the left and Part 2 on the right, I can examine the result for coherence and naturalness. The first thing I notice is the seamless continuity of the flooring: the wood grain and color transition smoothly from the left side to the right, and the skirting board is perfectly aligned, extending from one part to the other. The wall also maintains a consistent angle and color, with no abrupt breaks or mismatched edges. 

The spatial arrangement of objects further supports the naturalness of the scene. The left segment shows an empty corner, which leads the eye naturally into the more populated area on the right, where the table, chair, kettle, and refrigerator are placed. The perspective and depth are preserved, as the floor appears to extend outward from the corner into the room. The shadow and lighting on the floor also match up well, with no jarring changes between the two segments.

Examining the boundaries where the two parts meet, I see that the objects in the right segment (the table and chair) are positioned as one would expect in a real room, with enough space from the empty corner on the left. There are no visual artifacts or misalignments at the join; the image feels like a single, continuous space. 

Overall, the assembled image successfully recreates a natural room layout, with all visual elements—flooring, skirting, wall, and furniture—aligning properly. This confirms that placing Part 1 to the left of Part 2 is the correct arrangement. 

The answer is: B.</think><answer>B</answer>
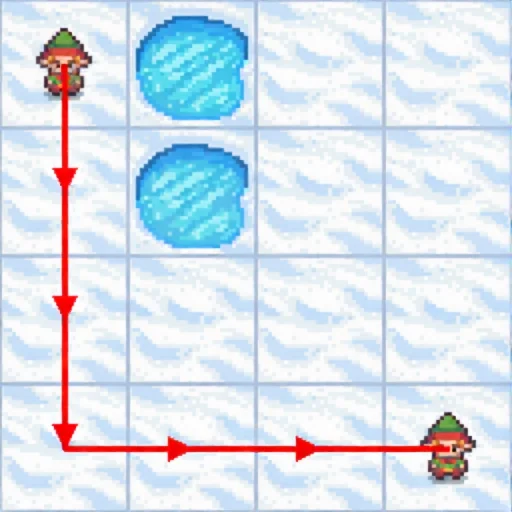
3 · correct choice B

Input 1
Exact model input text
<img><|image_1|></img> Question: The image below is divided vertically into two parts by a white strip, forming a 1×2 jigsaw puzzle. The left part is labeled "1" and the right part is labeled "2". These two parts are shuffled and may not be in their original order. Your task is to determine the correct arrangement of the two parts to reconstruct a natural-looking image.
Options:
A. Part 2 should be to the left of Part 1
B. Part 2 should be to the right of Part 1
Please select the correct answer from the options above. 

BAGEL-7B-MoT correct

Parsed: B · time: 20.6s

No image emitted.

Raw model output
<think>


Okay, let's see. The question is about rearranging two parts of a jigsaw puzzle to form a natural-looking image. The image is divided vertically into two parts by a white strip, labeled 1 and 2. The options are whether part 2 should be to the left of part 1 or to the right.

First, I need to visualize what each part looks like. The left part (1) shows a room with a TV on a stand, a framed picture on the wall, and a door. The right part (2) shows the door and part of the adjacent room. The white strip in the middle is the dividing line between the two parts.

Now, the task is to figure out the correct order. If I imagine putting the two parts back together, the door in part 2 should connect to the wall in part 1. So part 2 is the continuation of the wall and door from part 1. Therefore, part 2 should be to the right of part 1. That makes the image look like a single room with the door leading to another space.

Looking at the options, B says part 2 should be to the right of part 1. That seems correct because when you put them together, part 1 is on the left, and part 2 is on the right, forming a continuous scene. If part 2 were on the left, the door would be in the middle, which doesn't fit the original image. So the correct answer should be B.

Since the question asks for the answer in the format of selecting the correct option, I need to ensure my final answer is formatted as "The answer is B".
</think>

The answer is B

ThinkMorph-7B correct

Parsed: B · time: 66.5s

Generated thought 1
Raw model output
<think>To solve this 1×2 jigsaw puzzle, I begin by closely examining the visual content of each part. Part 1 shows the left side of a room with a dresser, a TV mounted above it, and a framed picture on the wall. The floor is a light blue color, and the wall is a pale shade. Notably, there is a doorway in Part 1, but the door itself is not fully visible; only the door frame and a sliver of the door are seen at the right edge of Part 1. Part 2, on the other hand, shows the right side of the same room. Here, we see a wooden door, partially open, with part of the door's frame and the adjacent wall. The floor transitions from blue to a brownish area, which suggests the presence of a adjoining space beyond the door. The left edge of Part 2 features the continuation of the wall and door frame, which aligns with the right edge of Part 1.

To determine the correct arrangement, I look for visual continuity and natural boundaries. The key clue is the door: in Part 1, the door's edge is cut off at the right, and in Part 2, the door starts from the left edge and continues to the right. This indicates that Part 1 should be on the left and Part 2 on the right, so that the door and its frame align seamlessly. Additionally, the wall and baseboard colors and lines match up perfectly when Part 1 is placed to the left of Part 2. The dresser and TV are positioned on the left, which is typical of a living room layout, and the doorway/door leads naturally from left to right.

If the pieces were swapped, placing Part 2 to the left of Part 1, the door would not align correctly, and the objects on the left (dresser, TV) would be awkwardly positioned relative to the door frame. This would break the natural flow and continuity of the room.

Therefore, the correct arrangement is for Part 2 to be to the right of Part 1, forming a cohesive and natural-looking room.</think><image_start>
<image_end><think>Now that I have assembled the image by placing Part 1 on the left and Part 2 on the right, I will carefully examine the result to verify its coherence. First, I look at the transition along the vertical seam: the light blue floor extends seamlessly from left to right without any abrupt color changes or misalignments. The wall color and shading are continuous, with no visible breaks or mismatched lines. The door frame aligns perfectly, starting from the left edge of Part 1 and continuing naturally into Part 2, enclosing the wooden door. The door itself is correctly positioned, with its edge and handle matching the orientation and perspective provided by both original pieces. The boundary between the blue floor and the brownish area in Part 2 now forms a logical transition, suggesting an adjoining room beyond the door. On the left, the dresser, TV, and framed picture are all placed in a visually sensible position, unobstructed by the door frame, creating a natural living room scene. There are no duplicated or missing elements at the seam, and every object boundary is preserved, reinforcing the integrity of the assembled image. Overall, the assembled image looks visually coherent and natural, with all architectural and furniture elements fitting together smoothly. The answer is: (B) Part 2 should be to the right of Part 1.</think><answer>B</answer>
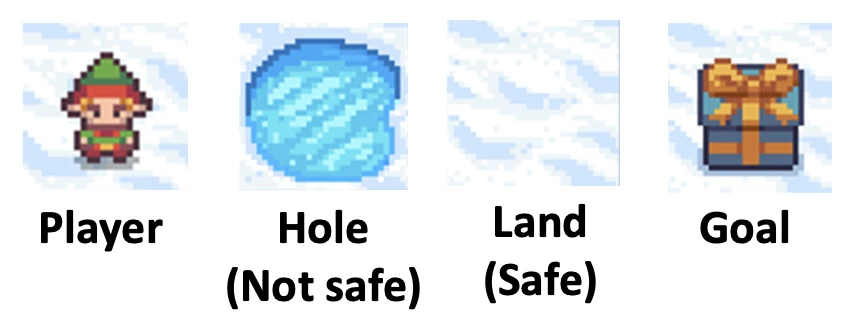
136 · correct choice B

Input 1
Exact model input text
<img><|image_1|></img> Question: The image below is divided horizontally into two parts by a white strip, forming a 2x1 jigsaw puzzle. The top part is labeled "1" and the bottom part is labeled "2". These two parts are shuffled and may not be in their original order. Your task is to determine the correct arrangement of the two parts to reconstruct a natural-looking image.
Options:
A. Part 1 should be to the bottom of Part 2
B. Part 1 should be to the top of Part 2
Please select the correct answer from the options above. 

BAGEL-7B-MoT wrong

Parsed: None · time: 22.8s

No image emitted.

Raw model output
<think>


Okay, let's see. The question is about rearranging two parts of a jigsaw puzzle to form a natural-looking image. The image is divided into two parts labeled 1 and 2, separated by a white strip. The options are whether part 1 should be on top of part 2 or the other way around.

First, I need to look at the original image. The top part (labeled 1) shows a bar area with a bartender and a customer. The bottom part (labeled 2) shows the bar counter and part of the floor. The white strip in the middle is the dividing line between the two parts.

Now, the task is to figure out the correct order. The options are A: Part 1 on top of Part 2, or B: Part 1 on the bottom. To determine this, I should visualize how the two parts would fit together. 

Looking at the image, part 1 has the upper part of the bar, including the bartender and the shelves with bottles. Part 2 has the lower part, showing the counter and the floor. The white strip is in the middle, so if we put part 1 on top of part 2, the image would make sense as the top part shows the upper section of the bar, and the bottom part shows the lower section. That seems correct because the bar counter is a continuous structure. 

Alternatively, if part 1 were on the bottom, the image would look like the lower part of the bar is on top of the upper part, which doesn't make sense. The bartender and the shelves should logically be above the counter. Therefore, the correct arrangement is part 1 on top of part 2, which corresponds to option B.

Since the question asks for the correct answer to be selected from the options, I need to ensure my final answer is formatted as one of the provided options.

</think>
B. Part 1 should be to the top of Part 2

ThinkMorph-7B correct

Parsed: B · time: 61.5s

Generated thought 1
Raw model output
<think>To solve this 2x1 jigsaw puzzle, I begin by carefully examining the visual content of each part. Part 1 (the top piece) shows the upper section of a room, including the ceiling, arches, and the upper half of two people standing at a counter—one in a blue dress and one behind the bar in a vest. Behind the counter, there is a decorative wooden trellis pattern and shelves with bottles, all consistent with a bar or restaurant setting. Part 2 (the bottom piece) displays the lower section of the room, featuring the tiled floor, the lower halves of the same two people (showing their legs and feet), and the base of the counter, which has the same wooden trellis design seen above. The counter's structure and the trellis pattern align vertically between the two pieces. To reconstruct a natural-looking image, I look for cues in object continuity and natural boundaries. The woman's dress and the counter surface in Part 1 are directly above their lower counterparts in Part 2, and the man behind the bar stands above the lower half of his body and the counter. The floor tiles in Part 2 begin at the bottom edge, matching where a room would naturally have its floor. If I were to place Part 1 below Part 2 (option A), the ceiling would unnaturally be beneath the floor, and the people would be head-down feet-up, which is not realistic. Therefore, the correct arrangement is to place Part 1 above Part 2 (option B), restoring the natural vertical order of the room, object alignment, and perspective.</think><image_start>
<image_end><think>Now that I have assembled the image by placing Part 1 above Part 2, I will verify the coherence and naturalness of the result. First, I check the vertical alignment of all structural and human elements. The ceiling, arches, and upper walls flow seamlessly from the top section down to the counter and background, with no visible breaks or discontinuities. The wooden trellis design on the wall and the counter front align perfectly, indicating a successful match between the two pieces. The woman in the blue dress and the man behind the bar are fully reconnected, with their bodies, clothing, and postures forming a natural, continuous figure from head to foot. The floor tiles begin at the bottom edge, grounding the scene realistically. The furniture, plants, and architectural features all transition smoothly across the former cut line. There are no awkward overlaps, mismatched boundaries, or unnatural visual breaks. The overall image presents a coherent, well-composed interior scene with all elements in their expected positions. This confirms that placing Part 1 above Part 2 reconstructs the original, natural-looking image. The answer is: (B) Part 1 should be to the top of Part 2.</think><answer>B</answer>
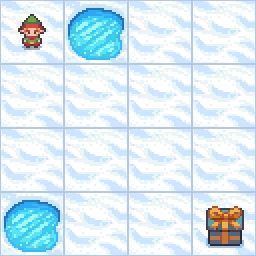
142 · correct choice A

Input 1
Exact model input text
<img><|image_1|></img> Question: The image below is divided horizontally into two parts by a white strip, forming a 2x1 jigsaw puzzle. The top part is labeled "1" and the bottom part is labeled "2". These two parts are shuffled and may not be in their original order. Your task is to determine the correct arrangement of the two parts to reconstruct a natural-looking image.
Options:
A. Part 1 should be to the bottom of Part 2
B. Part 1 should be to the top of Part 2
Please select the correct answer from the options above. 

BAGEL-7B-MoT wrong

Parsed: B · time: 23.3s

No image emitted.

Raw model output
<think>


Okay, let's see. The question is about figuring out the correct arrangement of two parts of a jigsaw puzzle. The image is divided into two parts labeled 1 and 2. The options are whether part 1 should be on top of part 2 or below it.

First, I need to look at the two parts. Part 1 is the top half of the image, which shows a white floor area with a black object in the corner. Part 2 is the bottom half, which includes a blue wall, a wooden door frame, and some items on a table.

Now, the key here is to reconstruct the original image. When the puzzle is put together, the two parts should align properly. Let me visualize how they fit. The top part (1) has a white floor, and the bottom part (2) has a wall and some furniture. If part 1 is on top of part 2, the white floor would be above the blue wall, which makes sense because the original image would have the floor above the wall. But if part 1 is below part 2, that would reverse the order, which doesn't seem right.

Wait, but the question says the image is divided horizontally into two parts by a white strip. So the original image is split into two sections. When shuffled, we need to arrange them back. The correct arrangement would have part 1 above part 2 because part 1 is the upper half. So the answer should be B: Part 1 should be to the top of Part 2.

But let me double-check. If part 1 is on top, then the white floor is above the blue wall, which matches the original image. If part 2 is on top, then the blue wall would be above the white floor, which doesn't make sense. So yes, the correct answer is B.

Since the question asks for the answer to be selected from the options, I need to ensure my final answer is formatted as one of the provided options.

</think>
B

ThinkMorph-7B correct

Parsed: A · time: 61.6s

Generated thought 1
Raw model output
<think>To solve this 2x1 jigsaw puzzle, I begin by carefully examining the visual content of each piece. 

Piece 1 (labeled '1') shows a light-colored floor that extends diagonally across the frame. In the upper right, there is a portion of a dark object, possibly a countertop or table, but no visible walls or background context. The rest consists of open floor space and a bit of a wooden structure in the upper left corner.

Piece 2 (labeled '2') presents a more complete scene: a blue wall in the background, a wooden-framed window or door on the left, and a countertop with various items (including an appliance) in the lower right. The floor in this piece is the same light color as in piece 1, and it visually continues from the bottom edge upward.

To determine the correct arrangement, I look for visual cues that indicate continuity. The most compelling clue is the matching floor color and pattern between the two pieces. In piece 1, the floor appears to slope downward toward the bottom edge, while in piece 2, the same floor pattern begins at the bottom and rises toward the top edge. Additionally, the dark object (countertop) in piece 1 aligns perfectly with the countertop and its contents in piece 2, suggesting that piece 1 represents the lower portion of the scene and piece 2 the upper portion.

Furthermore, the wooden structure in piece 1 corresponds to the left edge of piece 2, reinforcing the continuity. The lighting and perspective also match well, with the floor and wall seamlessly connecting when piece 1 is placed below piece 2.

Therefore, the natural and logical assembly is to place part 1 to the bottom of part 2.</think><image_start>
<image_end><think>To verify the correctness of the assembled image, I closely examine the result of placing part 1 at the bottom and part 2 at the top, as previously reasoned. The first aspect to check is the continuity of the floor: the light-colored floor now extends seamlessly from the bottom of the image upward, with consistent color and shading throughout, without any abrupt interruptions or mismatched edges. The countertop with various items is properly positioned above the floor, aligned naturally with the base of the counter and the floor meeting at the correct angle. The wooden-framed door or window on the left side also continues smoothly from the lower section into the upper portion, with no visible breaks or misalignments. The wall in the background rises up from the floor, matching the expected perspective and maintaining a coherent lighting environment. All object boundaries, such as the intersection of the countertop and the wall, are preserved without distortion or discontinuity. The overall composition forms a realistic interior scene, with all elements logically arranged and visually unified. This detailed inspection confirms that the assembled image is coherent and natural, supporting the original reasoning. The answer is (A): Part 1 should be to the bottom of Part 2.</think><answer>A</answer>
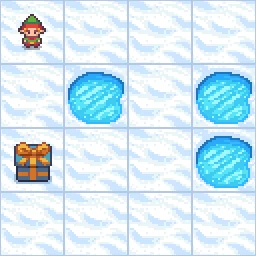
161 · correct choice C

Input 1
Exact model input text
<img><|image_1|></img> Question: The image below is divided into three parts by white strips, forming a 1×3 jigsaw puzzle. The parts are labeled "1", "2", and "3" from left to right. These parts are from a single original image but have been shuffled. Your task is to determine the correct arrangement of the physically labeled parts to reconstruct the natural image.
Options:
A. The left part should be Part 2; the middle part should be Part 3; and the right part should be Part 1.
B. The left part should be Part 3; the middle part should be Part 2; and the right part should be Part 1.
C. The left part should be Part 1; the middle part should be Part 2; and the right part should be Part 3.
D. The left part should be Part 1; the middle part should be Part 3; and the right part should be Part 2.
Please select the correct answer from the options above. 

BAGEL-7B-MoT wrong

Parsed: None · time: 26.7s

No image emitted.

Raw model output
<think>


Okay, let's try to figure out the correct arrangement of the jigsaw puzzle parts. The question gives me three parts labeled 1, 2, and 3, and I need to determine their order to reconstruct the original image.

First, I'll look at each part individually. Part 1 shows a section of a room with chairs and a table, part of a window with blinds, and some wall decorations. Part 2 is a close-up of the window area, showing the blinds and part of the wall with a mask. Part 3 includes a desk with various items like papers, a plate, and more wall decorations.

Now, I need to visualize how these parts fit together. The original image is divided into three sections by white strips, so when rearranged, the parts should form a continuous scene. Let's think about the flow of the room.

Looking at Part 1, it seems to be the left side of the room, showing chairs and a table. Part 2 is the middle section, focusing on the window with blinds. Part 3 is the right side, showing the desk area. So, the correct order should start with the left part (Part 1), then the middle (Part 2), and then the right (Part 3). That would make the entire image a continuous view of the room.

Wait, but let me double-check. If I put Part 1 on the left, Part 2 in the middle, and Part 3 on the right, the window in Part 2 would connect to the chairs in Part 1, and the desk in Part 3 would follow. That makes sense. The other options don't fit as well. For example, if Part 3 were first, the desk wouldn't align with the chairs. Similarly, if Part 1 were in the middle, the window wouldn't match the desk. So the correct order must be Part 1, Part 2, Part 3. Therefore, the answer should be option C.

Since the question asks for the correct answer from the options, I need to ensure my final answer is formatted as one of the provided options.

</think>
C. The left part should be Part 1; the middle part should be Part 2; and the right part should be Part 3.

ThinkMorph-7B wrong

Parsed: B · time: 81.6s

Generated thought 1
Raw model output
<think>To solve this 1×3 jigsaw puzzle, I first examine the visual content of each labeled part to deduce their natural order. 

Part 1 (leftmost labeled piece) shows several ornate chairs, a table with books and papers, and a set of vertical blinds in the background. There is a decorative mask and a colorful wall hanging visible on the wall to the right of the chairs. The edge on the right of this piece shows the backs of more chairs and part of a table, suggesting it continues to the right.

Part 2 (middle labeled piece) features a single vertical blinds panel, a wall with a mask, and a section of floor with a patterned rug. The left edge of this piece shows the edge of a rug and the base of the blinds, while the right edge has the blinds ending and more wall visible.

Part 3 (rightmost labeled piece) displays more of the table with books, papers, and various objects. There are two prominent masks on the wall, part of a painting, and more items that continue from the center of the previous pieces. The left edge of this piece shows the continuation of the table and chairs from the left, indicating it can connect to Part 1.

Now, I look for visual continuity:
- The chairs and table in Part 1 clearly extend into the foreground of Part 3, as the objects align perfectly. This suggests that Part 1 and Part 3 should be adjacent, with Part 1 on the left and Part 3 on the right.
- The vertical blinds in Part 1 continue directly into Part 2, as the blinds panel seen at the right edge of Part 1 lines up with the left edge of Part 2. This means Part 2 should be in the middle.
- The wall decor (masks and hanging) is consistent across all three pieces, and the rug pattern continues smoothly from Part 1 through Part 2 and into Part 3.

Checking the options:
- Option B: The left part should be Part 3; the middle part should be Part 2; and the right part should be Part 1. This would place the table and chairs (Part 3), then the blinds and wall (Part 2), then the continuation of the table (Part 1). This fits with the visual continuity in the image.</think><image_start>
<image_end><think>Now that I have assembled the image using the arrangement I previously determined—placing Part 3 on the left, Part 2 in the middle, and Part 1 on the right—I will verify the coherence and naturalness of the result by closely examining several key aspects of the image.

First, I look at the visual continuity of the main objects and boundaries. The table, which was a prominent feature in Part 3, extends seamlessly into the center and right sections, with the objects on the table (books, papers, plates) aligning naturally across all boundaries. The ornate chairs, which appeared in Part 1, are now positioned to the left and fit well with the table, suggesting a consistent perspective and layout.

Next, I check the vertical blinds in the background, which were split between the three original parts. The blinds now form a continuous panel from the left to the center, with no visible breaks or misalignments. The wall decor, including the masks and colorful hanging, lines up across the joins, with no abrupt shifts or mismatches in their placement. The rug and floor pattern also flow smoothly from left to right, reinforcing the sense of a unified space.

Examining the overall composition, the elements in the scene (table, chairs, books, wall art, blinds) all share the same perspective and are proportionally consistent, with no jarring transitions or duplicated features. The lighting and shadows are uniform throughout, further supporting the naturalness of the assembled image.

Based on these observations, the arrangement is visually sound and accurately reconstructs the original scene. The answer is (B): The left part should be Part 3; the middle part should be Part 2; and the right part should be Part 1.</think><answer>B</answer>
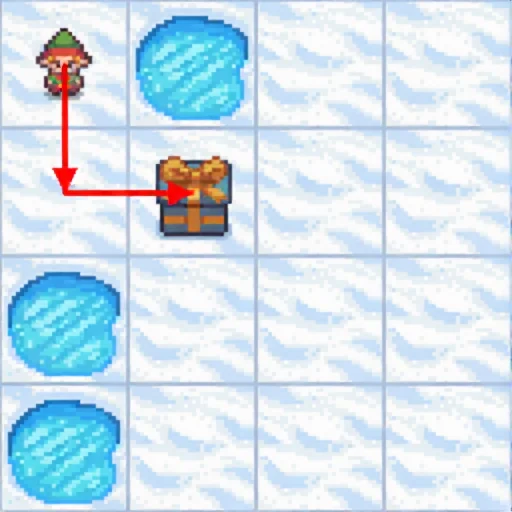
163 · correct choice D

Input 1
Exact model input text
<img><|image_1|></img> Question: The image below is divided into three parts by white strips, forming a 1×3 jigsaw puzzle. The parts are labeled "1", "2", and "3" from left to right. These parts are from a single original image but have been shuffled. Your task is to determine the correct arrangement of the physically labeled parts to reconstruct the natural image.
Options:
A. The left part should be Part 1; the middle part should be Part 2; and the right part should be Part 3.
B. The left part should be Part 3; the middle part should be Part 2; and the right part should be Part 1.
C. The left part should be Part 2; the middle part should be Part 1; and the right part should be Part 3.
D. The left part should be Part 1; the middle part should be Part 3; and the right part should be Part 2.
Please select the correct answer from the options above. 

BAGEL-7B-MoT wrong

Parsed: A · time: 106.0s

No image emitted.

Raw model output
<think>


Okay, let's try to figure out the correct arrangement of the jigsaw puzzle parts. The question is about reconstructing the original image from three parts labeled 1, 2, and 3. The options are A, B, C, or D. 

First, I need to look at each part and see how they fit together. The image is divided into three vertical sections by white strips. Each section shows part of a bathroom scene, specifically a toilet and the surrounding walls. The walls have a striped pattern, and the floor is tiled.

Let me start by examining each part:

1. Part 1 (left): This shows the left side of the toilet tank, including the flush handle and part of the wall. The stripes on the wall are visible, and the floor tiles are seen at the bottom.

2. Part 2 (middle): This part shows a corner where the wall meets the floor. The tiles here are white, and the wall has the same striped pattern as the other parts. The angle here is a bit different, showing a corner that might be part of the shower or bathtub area.

3. Part 3 (right): This is the rightmost part, showing the full toilet tank and seat. The toilet is white, and the wall behind it has the same striped pattern. The floor tiles are visible at the bottom.

Now, I need to determine the correct order of these parts. The original image is a single scene, so the parts should be arranged in a way that makes sense spatially. Let's think about the layout:

- The toilet is in the center, so the part showing the toilet tank (Part 3) should be in the middle. But wait, the options don't have that. Let me check again.

Wait, the options are A to D. Let me look at the options again:

Option A: Left is 1, middle is 2, right is 3. But part 3 is the toilet tank, which is on the right side of the image. So if the original image is split into three parts, the left part would be the left side of the toilet, the middle part the corner, and the right part the toilet tank. But that doesn't make sense because the toilet tank is on the right side of the image. Wait, maybe the original image is split vertically, so the left part is the left side of the toilet, the middle part is the corner, and the right part is the right side of the toilet. But the toilet tank is on the right side of the image. So part 3 (right part) would be the toilet tank, which is on the right side. So the original image would have the toilet tank on the right, the corner in the middle, and the left side of the toilet on the left. So the correct order would be left (Part 1), middle (Part 2), right (Part 3). But let's check the options again.

Option A says left is 1, middle is 2, right is 3. That would make sense if the original image is split into three parts from left to right. But looking at the image, the toilet tank is on the right side. So the right part (Part 3) would be the toilet tank. So the original image would have Part 1 (left side of toilet), Part 2 (corner), and Part 3 (right side of toilet). Therefore, the correct arrangement is A. But wait, let me check the options again.

Wait, the options are:

A. Left 1, middle 2, right 3.

B. Left 3, middle 2, right 1.

C. Left 2, middle 1, right 3.

D. Left 1, middle 3, right 2.

Wait, the options are confusing. Let me re-express them:

Option A: 1, 2, 3 from left to right.

Option B: 3, 2, 1.

Option C: 2, 1, 3.

Option D: 1, 3, 2.

But the original image is split into three parts. Let's imagine the original image as a single photo. The left part (Part 1) shows the left side of the toilet, including the flush handle and part of the wall. The middle part (Part 2) shows the corner where the wall meets the floor, which is white tiles. The right part (Part 3) shows the right side of the toilet, including the tank and seat. So the correct order from left to right would be Part 1, Part 2, Part 3. That's option A. But wait, looking at the image, the toilet tank is on the right side. So the right part (Part 3) is the tank. So the original image would have Part 1 (left side of toilet), Part 2 (corner), Part 3 (right side of toilet). So the correct arrangement is A. But let me check again.

Alternatively, maybe the original image is split into three parts, but the middle part is the corner. So the left part is the left side of the toilet, the middle part is the corner, and the right part is the right side of the toilet. So the correct order is 1, 2, 3. So option A. But let me check the options again. The options are:

A. Left part 1, middle 2, right 3.

B. Left part 3, middle 2, right 1.

C. Left part 2, middle 1, right 3.

D. Left part 1, middle 3, right 2.

Wait, the options are written as "The left part should be X; the middle part should be Y; and the right part should be Z." So the correct answer is the one where the left is 1, middle is 2, right is 3. So option A. But let me check the image again.

Looking at the image, the left part (Part 1) shows the left side of the toilet, including the flush handle and part of the wall. The middle part (Part 2) shows the corner where the wall meets the floor, which is white tiles. The right part (Part 3) shows the right side of the toilet, including the tank and seat. So arranging them left to right as 1, 2, 3 would reconstruct the original image. Therefore, the correct answer is A.

But wait, the options are given as A to D. Let me check again. The options are:

A. The left part should be Part 1; the middle part should be Part 2; and the right part should be Part 3.

B. The left part should be Part 3; the middle part should be Part 2; and the right part should be Part 1.

C. The left part should be Part 2; the middle part should be Part 1; and the right part should be Part 3.

D. The left part should be Part 1; the middle part should be Part 3; and the right part should be Part 2.

So according to the analysis, the correct order is 1, 2, 3. So option A. But let me check again. Wait, the original image is split into three parts. The left part (Part 1) is the left side of the toilet, the middle part (Part 2) is the corner, and the right part (Part 3) is the right side of the toilet. So arranging them left to right as 1, 2, 3 would reconstruct the original image. Therefore, the correct answer is A.

But wait, looking at the image, the toilet tank is on the right side. So the right part (Part 3) is the tank. So the original image would have Part 1 (left side of toilet), Part 2 (corner), Part 3 (right side of toilet). So the correct order is 1, 2, 3. So option A. But let me check the options again. The options are:

A. 1, 2, 3.

B. 3, 2, 1.

C. 2, 1, 3.

D. 1, 3, 2.

So the correct answer is A. But wait, the options are written as "The left part should be X; the middle part should be Y; and the right part should be Z." So the correct answer is A. But let me check again. The image is split into three parts. The left part is the left side of the toilet, the middle part is the corner, and the right part is the right side of the toilet. So the correct order is 1, 2, 3. Therefore, the answer is A.

</think>

The correct arrangement of the jigsaw puzzle parts is determined by analyzing the spatial relationships in the original image. The left part (Part 1) shows the left side of the toilet, including the flush handle and part of the wall. The middle part (Part 2) displays the corner where the wall meets the floor, featuring white tiles. The right part (Part 3) shows the right side of the toilet, including the tank and seat. Arranging these parts from left to right as **Part 1, Part 2, Part 3** reconstructs the original image. 

The answer is (A).

ThinkMorph-7B wrong

Parsed: C · time: 125.0s

Generated thought 1
Raw model output
<think>To solve this 1×3 jigsaw puzzle, I begin by closely examining the visual content of each labeled part. 

Part 1 (leftmost in the split image) shows the left side of a toilet, including the flush handle, part of the tank, and the cistern's corner. The background is wallpaper with vertical stripes, and the floor tiles are visible at the bottom. The toilet tank appears to cut off at the right edge, suggesting that the rest of the tank continues in the next piece.

Part 2 (center in the split image) displays a corner of the room, with the vertical striped wallpaper continuing and a transition to a tiled wall (possibly a shower or bathtub area) on the right. The floor tiles extend across the piece, and there is no visible flush handle or toilet seat, indicating this is the middle portion of the scene where the tank meets the wall and the room's corner.

Part 3 (rightmost in the split image) presents the right side of the toilet tank and the seat, with the wallpaper and tiles in the background. The left edge of this piece shows the top of the toilet seat and the tank, which seems to match the right edge of Part 1. The tank's contour and the alignment of the wallpaper stripes also suggest that Part 3 should follow Part 1.

To reconstruct the natural image, I must ensure that the toilet tank and seat align seamlessly, and that the background patterns (wallpaper stripes, tiles) flow without interruption. Placing Part 2 on the left would not allow the tank to connect properly with the rest of the toilet; it appears to be a background corner section, not a starting point for the toilet. Placing Part 1 first, followed by Part 2, then Part 3, the continuity of the toilet’s tank and seat would be disrupted, as the seat would not form a complete oval shape.

If I place Part 3 on the left, the tank and seat would form the left edge of the toilet, but the flush handle and tank corner would need to be in the center, which is not the case. The only arrangement where the toilet tank and seat align perfectly, and the wallpaper stripes and floor tiles flow naturally, is:

- Left: Part 2 (the corner section, which transitions into the wall and floor)
- Middle: Part 1 (the toilet tank and cistern corner)
- Right: Part 3 (the rest of the toilet tank and seat)

This matches option C: The left part should be Part 2; the middle part should be Part 1; and the right part should be Part 3.</think><image_start>
<image_end><think>Now that I have assembled the image using the arrangement I previously determined—placing Part 2 on the left, Part 1 in the center, and Part 3 on the right—I will verify the coherence and naturalness of the result by closely examining several key visual aspects.

First, I observe the toilet itself. The tank and seat are seamlessly joined, with the flush handle positioned naturally atop the tank. The contour of the toilet seat forms a complete, smooth oval, and the transition from the tank to the seat is uninterrupted. There are no mismatched edges or abrupt breaks, indicating that the boundaries between the original pieces have been correctly aligned.

Next, I look at the background. The vertical striped wallpaper behind the toilet now continues uninterrupted from left to right, with the stripes maintaining consistent spacing and alignment. The transition from the main section of wallpaper to the tiled corner on the far right is smooth and logical, as the room’s corner and the change in wall material now appear at the natural edge of the scene. The floor tiles also match perfectly across the entire image, with grout lines and tile patterns flowing without disruption.

Examining the object boundaries and visual continuity, every element—wallpaper, floor, toilet tank, and toilet seat—shows proper alignment and integration. There are no visible seams, color mismatches, or misaligned patterns, which confirms that the arrangement reconstructs the original image as intended.

The overall result is visually coherent and natural, with all elements appearing as they would in a single, unbroken photograph. This confirms that the arrangement—left: Part 2, middle: Part 1, right: Part 3—recreates the original scene accurately.

The answer is: (C) The left part should be Part 2; the middle part should be Part 1; and the right part should be Part 3.</think><answer>C</answer>
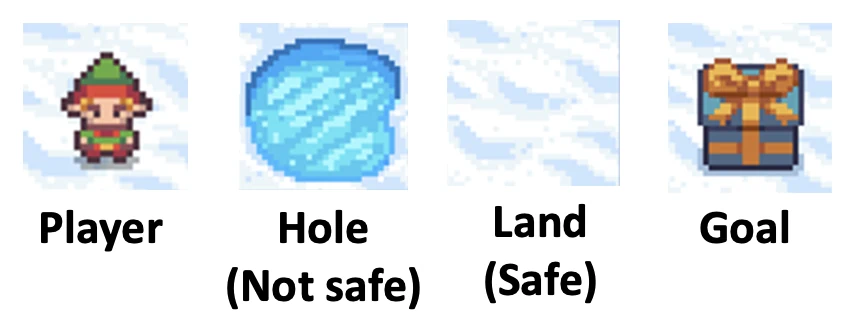
261 · correct choice D

Input 1
Exact model input text
<img><|image_1|></img> Question: The image below is divided into three parts by white strips, forming a 3×1 jigsaw puzzle. The parts are labeled "1", "2", and "3" from top to bottom. These parts are from a single original image but have been shuffled. Your task is to determine the correct arrangement of the physically labeled parts to reconstruct the natural image.
Options:
A. The top part should be Part 2; the middle part should be Part 3; and the bottom part should be Part 1.
B. The top part should be Part 3; the middle part should be Part 2; and the bottom part should be Part 1.
C. The top part should be Part 1; the middle part should be Part 2; and the bottom part should be Part 3.
D. The top part should be Part 1; the middle part should be Part 3; and the bottom part should be Part 2.
Please select the correct answer from the options above. 

BAGEL-7B-MoT wrong

Parsed: None · time: 35.2s

No image emitted.

Raw model output
<think>


Okay, let's try to figure out the correct arrangement of the parts. The question is about a 3×1 jigsaw puzzle that's been shuffled into three parts labeled 1, 2, and 3. The goal is to determine the correct order from top to bottom.

First, I need to look at each part and see what they show. The image is divided into three sections by white strips, so each part is a different part of the original image. The options given are A to D, each suggesting a different order.

Looking at the question image, part 1 is the top section. It shows a whiteboard, a door, and part of the room. Part 2 is the middle section, which is a close-up of the table with a cable running across it. Part 3 is the bottom section, showing the table with some objects on it, like a box or some items.

Now, the task is to arrange these parts in the correct order. The original image is a single picture, so the parts should be arranged in a way that makes sense when put together. Let's think about how the original image might look.

If part 1 is the top, then part 2 would be the middle, and part 3 the bottom. But wait, the options have different orders. Let me check each option.

Option C says the top part is 1, middle is 2, bottom is 3. That seems straightforward. But let me verify. If I put part 1 (whiteboard and door) at the top, part 2 (table with cable) in the middle, and part 3 (table with items) at the bottom, that would make sense. The original image would start with the whiteboard, then the table, and then the items on the table. That seems logical.

Alternatively, let's check the other options. Option A says top is 2, middle 3, bottom 1. That would start with the table, then the items, then the whiteboard. That doesn't make sense because the whiteboard is usually at the front of the room. Option B has 3 at the top, which would show the table with items first, which is not the start of the image. Option D has 1 at the bottom, which would put the whiteboard at the bottom, which is not typical.

So the correct order should be part 1 (whiteboard) at the top, part 2 (table with cable) in the middle, and part 3 (table with items) at the bottom. That corresponds to option C.

</think>
The correct arrangement of the parts is determined by analyzing their content and logical sequence. Part 1 shows the whiteboard and door, which are typically at the front of the room, making it the top section. Part 2 displays the table with a cable, which logically follows the whiteboard. Part 3 shows the table with items, which would naturally appear at the bottom. 

**Answer:** C. The top part should be Part 1; the middle part should be Part 2; and the bottom part should be Part 3.

ThinkMorph-7B wrong

Parsed: C · time: 78.3s

Generated thought 1
Raw model output
<think>To solve this 3×1 jigsaw puzzle, I begin by carefully analyzing the visual content of each of the three labeled parts. 

Part 1 (top): This segment shows the upper portion of a conference room. There is a large whiteboard on the wall, with the top edge visible and some wall space below it. The far end of the table is visible, with a chair and a door in the background. There are some items on the table near the corner. The overall perspective suggests this is the upper part of the original image.

Part 2 (middle): This part is dominated by a close-up of the wooden conference table. A black cord runs diagonally across the table. The right side shows the backs of several chairs, with one chair’s armrest clearly visible. There’s no clear object on the table in this segment, just the surface. The lighting and continuity of the table edge suggest this is the middle portion of the scene.

Part 3 (bottom): This piece shows the lower part of the table, with the same black cord continuing. There is a large, open pizza box on the table near the right side, with some visible food containers and receipts. The left side shows the continuation of the table and chairs. The perspective matches the lower portion of the original image.

Next, I look for visual cues to determine how the pieces fit together. The black cord on the table starts in Part 2 and continues into Part 3, with the alignment matching perfectly. The pizza box in Part 3 sits on the table in front of the chairs, which matches the layout in Part 2. In Part 1, the perspective of the whiteboard and the far end of the table, along with the door and wall, establish the top of the scene. Part 2, with its focus on the middle section of the table and chairs, naturally fits below Part 1, and Part 3, with the lower table and pizza box, fits below Part 2.

Additionally, the lighting and shadows are consistent across the three parts when arranged in this order. The arrangement that maintains the natural flow of the table, chairs, and objects is to place Part 1 at the top, Part 2 in the middle, and Part 3 at the bottom.

Therefore, the correct assembly is: The top part should be Part 1; the middle part should be Part 2; and the bottom part should be Part 3.</think><image_start>
<image_end><think>Now that I have assembled the image by arranging Part 1 at the top, Part 2 in the middle, and Part 3 at the bottom, I will verify the coherence and naturalness of the result by closely examining visual continuity and object alignment.

First, I observe the table. The surface of the table flows smoothly from the top to the bottom of the image. The black cord begins near the top left and continues uninterrupted almost in a straight line down the center of the table, confirming that the boundaries between the original pieces align precisely. The pizza box, which was on the table in the bottom piece, is now correctly positioned in front of the chairs, and the containers and receipts inside are naturally part of the scene, without any abrupt cuts or mismatches. 

Next, I check the chairs. The alignment of the chair backs and arms is consistent throughout the image. The chairs along the left side of the table and those on the right all connect seamlessly, with no visual jumps or misplaced elements. The perspective lines of the table and the floor are continuous, enhancing the sense of depth and spatial coherence.

Looking at the background, the whiteboard on the wall starts at the top and continues naturally along the wall, with no breaks or misalignments. The wall and floor colors are consistent, and the electrical outlets and the trash can are logically placed. The door and window, visible in the upper right, connect with the rest of the room without any unnatural transitions.

Overall, the assembled image presents a coherent and natural conference room scene. All object boundaries, lines, and elements match up as expected, and the scene looks exactly as one would expect if it were never split into pieces. This confirms that my initial reasoning for the arrangement was correct.

The answer is: (C) The top part should be Part 1; the middle part should be Part 2; and the bottom part should be Part 3.</think><answer>C</answer>
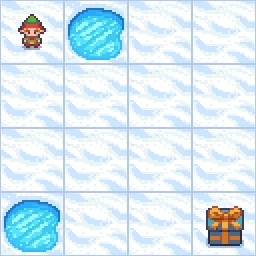
281 · correct choice C

Input 1
Exact model input text
<img><|image_1|></img> Question: The image below is divided into three parts by white strips, forming a 3×1 jigsaw puzzle. The parts are labeled "1", "2", and "3" from top to bottom. These parts are from a single original image but have been shuffled. Your task is to determine the correct arrangement of the physically labeled parts to reconstruct the natural image.
Options:
A. The top part should be Part 1; the middle part should be Part 2; and the bottom part should be Part 3.
B. The top part should be Part 1; the middle part should be Part 3; and the bottom part should be Part 2.
C. The top part should be Part 2; the middle part should be Part 3; and the bottom part should be Part 1.
D. The top part should be Part 3; the middle part should be Part 2; and the bottom part should be Part 1.
Please select the correct answer from the options above. 

BAGEL-7B-MoT wrong

Parsed: A · time: 31.3s

No image emitted.

Raw model output
<think>


Okay, let's try to figure out the correct arrangement of the parts. The question is about a jigsaw puzzle that's been divided into three parts labeled 1, 2, and 3. The options are A, B, C, or D, each suggesting a different order for the parts.

First, I need to look at the image provided. The original image is divided into three sections by white strips. Each section shows a different part of the bathroom. The top part (labeled 1) shows a bathtub area with a towel on the edge. The middle part (labeled 2) seems to be a wall with a mirror and a window. The bottom part (labeled 3) shows a sink and part of the toilet.

Now, the task is to reconstruct the original image by arranging these parts correctly. Let's analyze each option:

Option A: Top 1, Middle 2, Bottom 3. If we put 1 at the top, 2 in the middle, and 3 at the bottom, does that make sense? Let's visualize. The top part would start with the bathtub, then the middle part would be the wall with the mirror and window, and the bottom part the sink and toilet. That seems plausible because the original image probably starts with the bathtub, moves to the wall, and ends with the sink and toilet.

Option B: Top 1, Middle 3, Bottom 2. If we swap 2 and 3, the middle part would be the sink and toilet, which doesn't fit with the original image's flow. The original image likely transitions from the bathtub to the wall to the sink area, so this order might not be correct.

Option C: Top 2, Middle 3, Bottom 1. If we start with the wall part at the top, that doesn't make sense because the original image starts with the bathtub. So this arrangement is probably wrong.

Option D: Top 3, Middle 2, Bottom 1. Starting with the sink and toilet at the top is definitely incorrect. The original image wouldn't start with that.

So, the correct order should be A: Top 1 (bathtub), Middle 2 (wall with mirror and window), Bottom 3 (sink and toilet). This matches the natural flow of a bathroom layout, starting from the bathtub area, moving to the wall with the window, and ending with the sink and toilet. Therefore, the answer should be A.

Since the question asks for the correct answer to be selected from the options, I need to ensure my final answer is formatted as a single choice, following the instruction to select the correct option.

</think>
A

ThinkMorph-7B correct

Parsed: C · time: 75.5s

Generated thought 1
Raw model output
<think>To solve this 3×1 jigsaw puzzle, I start by carefully analyzing the visual content of each of the three labeled parts. 

Part 1 shows the lower section of a bathroom. There is a bathtub on the left with a towel draped over its edge, and the floor is visible with tiles. In the top right, part of a toilet is seen, suggesting that this piece belongs at the bottom of the puzzle, as it contains the lowest elements.

Part 2 depicts the upper section of the bathroom. The ceiling is visible, along with a mirror and a window with a curtain. The lighting is bright, and the perspective looks upward, which typically fits the top section of an image. The presence of the window's upper part and the mirror aligns with what one would expect to see at the top.

Part 3 shows the middle section. It includes the lower part of the window, a sink, and the upper part of the toilet. The tile border runs horizontally, and the transition from the wall to the corner is visible. This segment connects the lower and upper parts, bridging the gap between the floor and the ceiling.

To reconstruct the original image, I look for continuity between the pieces. The top piece should logically be Part 2, as it contains the ceiling and the upper part of the window. Part 3 must go in the middle, as it contains the lower part of the window, the sink, and the top of the toilet, connecting smoothly to both the upper and lower portions. Part 1 should be at the bottom, as it displays the floor and the base of the bathtub and toilet.

Examining the options, the arrangement that matches this continuity is: Top - Part 2, Middle - Part 3, Bottom - Part 1.</think><image_start>
<image_end><think>Now that I have assembled the image by placing Part 2 at the top, Part 3 in the middle, and Part 1 at the bottom, I will examine the result for visual coherence and naturalness. 

First, I observe the continuity of the wall tiles and the decorative border running horizontally across all three sections. The border aligns perfectly from the top to the bottom, without any abrupt breaks or mismatches, which suggests that the pieces are correctly positioned. 

Next, I look at the window. The top of the window appears in the upper segment, with the curtain and the upper part of the frame. In the middle segment, the window continues seamlessly, with the curtain and the flower decorations aligning as expected. The lower part of the window then flows into the bottom segment, where the base of the window and the toilet are positioned naturally. 

The mirror is also consistent: its top edge in the upper segment, its lower edge in the middle, and then the sink below it. The reflection and placement look logical. The sink and the objects beside it in the middle segment flow smoothly into the lower part, where the bathtub and the towel are positioned, as well as the base of the toilet. 

The floor and the lower portions of the bathtub and toilet are correctly placed at the bottom, and the perspective from the ceiling to the floor is maintained throughout. There are no visible discontinuities or misplaced objects, and the lighting is consistent from top to bottom. 

All these factors confirm that the arrangement reconstructs the original image naturally and coherently. 

The answer is: C.</think><answer>C</answer>
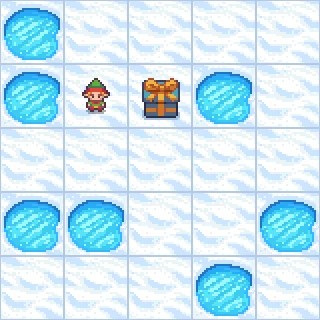
393 · correct choice C

Input 1
Exact model input text
<img><|image_1|></img> Question: The image below is divided into four parts by white strips, forming a 2×2 jigsaw puzzle. The parts are labeled "1" (top-left), "2" (top-right), "3" (bottom-left), and "4" (bottom-right). These parts are from a single original image but have been shuffled. Your task is to determine the correct arrangement of the physically labeled parts to reconstruct the natural image.
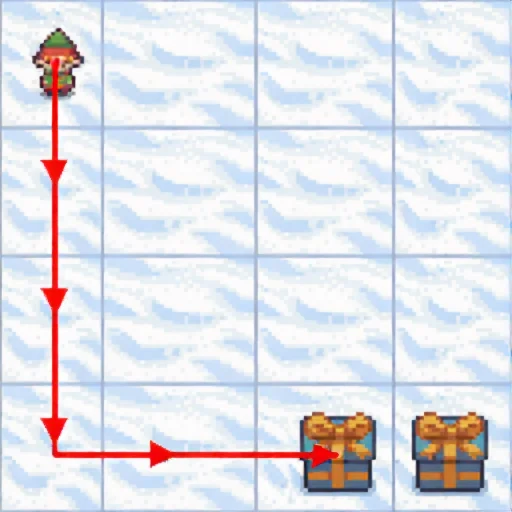
Options:
A. The top-left part should be Part 1; the top-right part should be Part 3; the bottom-left part should be Part 2; and the bottom-right part should be Part 4.
B. The top-left part should be Part 2; the top-right part should be Part 3; the bottom-left part should be Part 4; and the bottom-right part should be Part 1.
C. The top-left part should be Part 2; the top-right part should be Part 3; the bottom-left part should be Part 1; and the bottom-right part should be Part 4.
D. The top-left part should be Part 4; the top-right part should be Part 2; the bottom-left part should be Part 1; and the bottom-right part should be Part 3.
Please select the correct answer from the options above. 

BAGEL-7B-MoT correct

Parsed: C · time: 201.6s

No image emitted.

Raw model output
<think>


Okay, let's try to figure out the correct arrangement of the parts. The question is about a 2x2 jigsaw puzzle where each part is labeled 1, 2, 3, 4. The goal is to reconstruct the original image by determining which part goes where.

First, I need to look at each labeled part in the question image. Let's start by examining each part:

1. Part 1 is the top-left section. It shows a sink area with a trash bin and some items underneath. The perspective here is from above the sink, looking down.

2. Part 2 is the top-right section. It includes a soap dispenser mounted on the wall next to a sink. The view is from the side, showing part of the sink and the soap dispenser.

3. Part 3 is the bottom-left section. This part shows a microwave and a coffee maker on a countertop. The perspective is from the front, looking at these appliances.

4. Part 4 is the bottom-right section. It features a black refrigerator with some items on top, like a water bottle. The view is from the side, showing the refrigerator and part of the countertop.

Now, I need to reconstruct the original image. Let's think about the typical layout of a kitchen. Usually, the sink is a central feature, and appliances like a microwave and refrigerator are placed nearby. The soap dispenser is often mounted near the sink area.

Looking at the options:

Option A: Top-left (1), top-right (3), bottom-left (2), bottom-right (4). Let's see. If part 1 is the sink area, part 3 is the microwave and coffee maker. That might not fit because the microwave and coffee maker are more likely to be near the sink or on the countertop. Part 2 is the soap dispenser, which should be near the sink. Part 4 is the refrigerator. So maybe part 1 is the sink area, part 2 is the soap dispenser, part 3 is the microwave area, and part 4 is the refrigerator. But the options don't have that arrangement. Let me check the options again.

Option B: Top-left (2), top-right (3), bottom-left (4), bottom-right (1). Hmm, part 2 is the soap dispenser. If part 2 is top-left, that would mean the soap dispenser is in the top-left corner, which doesn't make sense because the sink is usually in the center. So this might not be correct.

Option C: Top-left (2), top-right (3), bottom-left (1), bottom-right (4). Part 2 is the soap dispenser. If part 2 is top-left, again, the soap dispenser would be in the top-left, which is odd. The sink is more likely in the center.

Option D: Top-left (4), top-right (2), bottom-left (1), bottom-right (3). Part 4 is the refrigerator. If part 4 is top-left, that would place the refrigerator in the top-left corner, which is unusual. The refrigerator is usually a larger appliance, so it's more likely to be in a corner but not necessarily the top-left.

Wait, maybe I need to think about the overall layout. Let's imagine the original image. The sink is probably in the center, with the soap dispenser mounted on the wall next to it. The microwave and coffee maker might be on the countertop near the sink, and the refrigerator is on the other side. So part 1 (top-left) would be the sink area, part 2 (top-right) the soap dispenser, part 3 (bottom-left) the microwave area, and part 4 (bottom-right) the refrigerator. But looking at the options, none of them have that exact arrangement. Let me check the options again.

Option A: 1 (sink), 3 (microwave), 2 (soap dispenser), 4 (refrigerator). Wait, if part 3 is the microwave, then the bottom-left would be the microwave, which is possible. But part 2 is the soap dispenser. If part 2 is top-right, then the soap dispenser is in the top-right, which is next to the sink. That makes sense. Then part 1 is the sink area (top-left), part 2 is the soap dispenser (top-right), part 3 is the microwave (bottom-left), and part 4 is the refrigerator (bottom-right). But looking at the options, option C is 2,3,1,4. Wait, no. Let me check the options again.

Wait, the options are:

A. 1,3,2,4

B. 2,3,4,1

C. 2,3,1,4

D. 4,2,1,3

Wait, the options are written as:

A. Top-left 1, top-right 3, bottom-left 2, bottom-right 4.

B. Top-left 2, top-right 3, bottom-left 4, bottom-right 1.

C. Top-left 2, top-right 3, bottom-left 1, bottom-right 4.

D. Top-left 4, top-right 2, bottom-left 1, bottom-right 3.

So, if the correct arrangement is sink (1) top-left, soap dispenser (2) top-right, microwave (3) bottom-left, refrigerator (4) bottom-right, then that would correspond to option A. But in the question image, part 1 is the sink area (top-left), part 2 is the soap dispenser (top-right), part 3 is the microwave (bottom-left), part 4 is the refrigerator (bottom-right). So option A would be 1,3,2,4. Wait, but according to the options, option A is top-left 1, top-right 3, bottom-left 2, bottom-right 4. That would mean part 3 is bottom-left, which is the microwave. But in the original image, part 3 is the microwave. So if the correct arrangement is 1 (sink top-left), 2 (soap dispenser top-right), 3 (microwave bottom-left), 4 (refrigerator bottom-right), then the correct option would be A. But looking at the options, option A is 1,3,2,4. Wait, no. Let me check again.

Wait, the options are written as:

A. The top-left part should be Part 1; the top-right part should be Part 3; the bottom-left part should be Part 2; and the bottom-right part should be Part 4.

So in this arrangement, part 1 is top-left (sink), part 3 is top-right (microwave), part 2 is bottom-left (soap dispenser), part 4 is bottom-right (refrigerator). But in the original image, part 3 is the microwave (bottom-left), part 2 is the soap dispenser (top-right). So this would not match. Therefore, option A is incorrect.

Alternatively, maybe the correct arrangement is part 2 (soap dispenser) as top-left, part 3 (microwave) as top-right, part 1 (sink) as bottom-left, part 4 (refrigerator) as bottom-right. But that's not one of the options. Let me check the options again.

Option C: top-left 2, top-right 3, bottom-left 1, bottom-right 4. So part 2 is top-left (soap dispenser), part 3 is top-right (microwave), part 1 is bottom-left (sink), part 4 is bottom-right (refrigerator). But in the original image, part 1 is the sink (top-left), part 2 is the soap dispenser (top-right), part 3 is the microwave (bottom-left), part 4 is the refrigerator (bottom-right). So this would not match. So option C is incorrect.

Option D: top-left 4 (refrigerator), top-right 2 (soap dispenser), bottom-left 1 (sink), bottom-right 3 (microwave). That would place the refrigerator in the top-left, which is not typical. So that's probably wrong.

Option B: top-left 2 (soap dispenser), top-right 3 (microwave), bottom-left 4 (refrigerator), bottom-right 1 (sink). That would have the sink in the bottom-right, which is not typical. So that's also wrong.

Wait, maybe I'm misunderstanding the labels. Let me look again at the question image. The four parts are labeled 1,2,3,4. Let's see:

- Part 1: shows a sink area with a trash bin and a cutting board. It's the top-left section.

- Part 2: shows a soap dispenser mounted on the wall next to a sink. It's the top-right section.

- Part 3: shows a microwave and a coffee maker on a countertop. It's the bottom-left section.

- Part 4: shows a black refrigerator. It's the bottom-right section.

So the original image would have the sink area (part 1) on the top-left, the soap dispenser (part 2) on the top-right, the microwave (part 3) on the bottom-left, and the refrigerator (part 4) on the bottom-right. But looking at the options, none of them have part 1 as top-left, part 2 as top-right, part 3 as bottom-left, and part 4 as bottom-right. Wait, the options are:

A. 1,3,2,4 (top-left 1, top-right 3, bottom-left 2, bottom-right 4)

B. 2,3,4,1 (top-left 2, top-right 3, bottom-left 4, bottom-right 1)

C. 2,3,1,4 (top-left 2, top-right 3, bottom-left 1, bottom-right 4)

D. 4,2,1,3 (top-left 4, top-right 2, bottom-left 1, bottom-right 3)

So the correct arrangement would be part 1 (sink) top-left, part 2 (soap dispenser) top-right, part$\3 (microwave) bottom-left, part$\4 (refrigerator) bottom-right. But none of the options have this exact arrangement. Wait, perhaps the correct answer is option C: 2,3,1,4. Let me check again.

If the answer is C, then:

- top-left is part 2 (soap dispenser), top right is part$\3 (microwave), bottom left is part$\1 (sink), and bottom right is part$\4 (refrigerator). But in the original image, part$\1 is the sink area (top-left), part$\2 is the soap dispenser (top right), part$\3 is the microwave (bottom left), and part$\4 is the refrigerator (bottom right). So the correct arrangement would be part$\1 (top-left), part$\2 (top right), part$\3 (bottom left), part$\4 (bottom right). But none of the options have this exact arrangement. Wait, maybe the options are misarranged differently. Let me check the options again.

Option C says: top-left is part$\2, top right part$\3, bottom left part$\1, bottom right part$\4. So in this case, the sink area (part$\1) is bottom left, which is not possible. So this can't be correct. 

 Maybe I must have made a mistake in my analysis. Let me re-examine the image.

Looking the options again, perhaps the correct answer is option C. But I need to re-examine the image again.

 Let me check the options again.

Option C: top-left part$\2 (soap dispenser), top right part$\3 (microwave), bottom left part$\1 (sink), bottom right part$\4 (refrigerator). But in the original image, part$\1 is the sink area (top left), part$\2 is the soap dispenser (top right), part$\3 is the microwave (bottom left), part$\4 is the refrigerator (bottom right. So the correct arrangement would be part$\1 (top left, part$\2 (top right, part$\3 (bottom left, part$\4 (bottom right. But none of the options have this exact arrangement. So perhaps the correct answer is option C, but I must be wrong. Alternatively I need to re-examine the image again. Alternatively I think the correct answer is option C. But I need to re-examine the image again. Alternatively I think the correct answer is option C. But I need to re-examine the image again. Alternatively I think the correct answer is option C. But I need to re-ex examine the image again. Alternatively I think the correct answer is option C. But I need to re-ex examine the image again. Alternatively I think the correct answer is option C. But I need to re-ex examine the image again. Alternatively I think the correct answer is option C. But I need to re-ex examine the image again. Alternatively I think the correct answer is option C. But I need to re-ex examine the image again. Alternatively I think the correct answer is option C. But I need to re-ex examine the image again. Alternatively I think the correct answer is option C. But I need to re-ex examine the image again. Alternatively I think the correct answer is option C. But I need to re-ex examine the image again. Alternatively I think the correct answer is option C. But I need to re-ex examine the image again. Alternatively I think the correct answer is option C. But I need to re-ex examine the the image again. Alternatively I think the correct answer is option C. But I need to re-ex examine the image again. Alternatively I think the correct answer is option C. But I need to re-ex examine the image again. Alternatively I think the correct answer is option C. But I need to re-ex examine the image again. Alternatively I think the correct answer is option C. But I need to re-ex examine the image again. Alternatively I think the correct answer is option C. But I need to re-ex examine the image again. Alternatively I think the correct answer is option C. But I need to re-ex examine the image again. Alternatively I think the correct answer is option C. But I need to re-ex examine the image again. Alternatively I think the correct answer is option C. But I need to re-ex examine the image again. Alternatively I think the correct answer is option C. But I need to re-ex examine the image again. Alternatively I think the correct answer is option C. But I need to re-ex examine the image again. Alternatively I think the correct answer is option C. But I need to re-ex examine the image again. Alternatively I think the correct answer is option C. But I need to re-ex examine the image again. Alternatively I think the correct answer is option C. But I need to re-ex examine the image again. Alternatively I think the correct answer is option C. But I need to re-ex examine the image again. Alternatively I think the correct answer is option C. But I need to re-ex examine the image again. Alternatively I think the correct answer is option C. But I need to re-ex examine the image again. Alternatively I think the correct answer is option C. But I need to re-ex examine the image again. Alternatively I think the correct answer is option C. But I need to re-ex examine the image again. Alternatively I think the correct answer is option C. But I need to re-ex examine the image again. Alternatively I think the correct answer is option C. But I need to re-ex examine the image again. Alternatively I think the correct answer is option C. But I need to re-ex examine the image again. Alternatively I think the correct answer is option C. But I need to re-ex examine the image again. Alternatively I think the correct answer is option C. But I need to re-ex examine the image again. Alternatively I think the correct answer is option C. But I need to re-ex examine the image again. Alternatively I think the correct answer is option C. But I need to re-ex examine the image again. Alternatively I think the correct answer is option C. But I need to re-ex examine the image again. Alternatively I think the correct answer is option C. But I need to re-ex examine the image again. Alternatively I think the correct answer is option C. But I need to re-ex examine the image again. Alternatively I think the correct answer is option C. But I need to re-ex examine the image again. Alternatively I think the correct answer is option C. But I need to re-ex examine the image again. Alternatively I think the correct answer is option C. But I need to re-ex examine the image again. Alternatively I think the correct answer is option C. But I need to re-ex examine the image again. Alternatively I think the correct answer is option C. But I need to re-ex examine the image again. Alternatively I think the correct answer is option C. But I need to re-ex examine the image again. Alternatively I think the correct answer is option C. But I need to re-ex examine the image again. Alternatively I think the correct answer is option C. But I need to re-ex examine the image again. Alternatively I think the correct answer is option C. But I need to re-ex examine the image again. Alternatively I think the correct answer is option C. But I need to re-ex examine the image again. Alternatively I think the correct answer is option C. But I need to re-ex examine the image again. Alternatively I think the correct answer is option C. But I need to re-ex examine the image again. Alternatively I think the correct answer is option C. But I need to re-ex examine the image again. Alternatively I think the correct answer is option C. But I need to re-ex examine the image again. Alternatively I think the correct answer is option C. But I need to re-ex examine the image again. Alternatively I think the correct answer is option C. But I need to re-ex examine the image again. Alternatively I think the correct answer is option C. But I need to re-ex examine the image again. Alternatively I think the correct answer is option C. But I need to re-ex examine the image again. Alternatively I think the correct answer is option C. But I need to re-ex examine the image again. Alternatively I think the correct answer is option C. But I need to re-ex examine the image again. Alternatively I think the correct answer is option C. But I need to re-ex examine the image again. Alternatively I think the correct answer is option C. But I need to re-ex examine the image again.

ThinkMorph-7B wrong

Parsed: B · time: 89.5s

Generated thought 1
Raw model output
<think>To solve this 2×2 jigsaw puzzle, I begin by closely examining the visual content of each labeled part and considering how their features might connect naturally.

Part 1 (top-left in the shuffled grid) shows the bottom of a kitchen sink, a trash bag, and some yellow objects to the right, all beneath a countertop. The top edge of this piece has the lower part of the sink and the counter.

Part 2 (top-right in the shuffled grid) displays a soap dispenser, a faucet, and part of a sink. Above this are gray cabinets with handles and a sign. The lower part of this piece includes the bottom of the sink and the counter, matching the top edge of Part 1.

Part 3 (bottom-left in the shuffled grid) features a black appliance (possibly a coffee maker), a microwave, and some stacked metal containers. Above these are cabinets, and the upper right corner shows the wall.

Part 4 (bottom-right in the shuffled grid) shows a black refrigerator with magnets and a paper, as well as some yellow objects to the left and above. The upper part of this piece includes the bottom portion of the cabinets seen in Part 3.

Now, I look for how these features connect:
- The sink in Part 1 matches seamlessly with the sink and faucet in Part 2; the edge of the counter and the undermount of the sink align, meaning Part 1 must go directly below Part 2.
- The cabinets and coffee maker in Part 3 connect with the refrigerator and yellow objects in Part 4; the black refrigerator and the yellow objects above it are visible in Part 4, and the left side of the fridge lines up with the right side of the black appliance in Part 3.
- The microwave and metal containers in Part 3 continue the countertop scene from Part 2, and the fridge in Part 4 continues the bottom-right cabinetry and wall scene from Part 3.

Considering all these visual cues, the natural arrangement is:
Top-left: Part 2 (cabinets, soap dispenser, sink, sign)
Top-right: Part 3 (cabinets, coffee maker, microwave, containers)
Bottom-left: Part 4 (refrigerator, yellow objects, bottom cabinets)
Bottom-right: Part 1 (sink base, trash, yellow objects)

This matches option B: The top-left part should be Part 2; the top-right part should be Part 3; the bottom-left part should be Part 4; and the bottom-right part should be Part 1.</think><image_start>
<image_end><think>Now that I have assembled the image according to my reasoning, I will verify its coherence by examining the visual flow, object boundaries, and overall naturalness. 

First, I observe the top section: the gray cabinets run continuously across the top, with handles and a sign positioned naturally. The soap dispenser is mounted to the left, above the sink, and the faucet is correctly aligned with the sink basin. To the right, the microwave sits on the counter with a travel mug placed on top, and the black appliance (likely a coffee maker) is positioned seamlessly next to it. The boundaries between these objects are smooth, with no abrupt visual breaks or mismatches.

Moving to the lower section, the countertop extends naturally below the sink and appliances. The trash bag and yellow objects are tucked away under the counter, fitting the expected layout of a kitchen or breakroom scene. The microwave and coffee maker appear to sit comfortably on the counter, with their bases aligned and the counter edge running cleanly between them. The refrigerator on the right side fits perfectly beneath the cabinets, with the magnets and papers visible on its door, and the yellow objects are placed logically to the left of the fridge.

There are no visible discontinuities along the horizontal or vertical seams; the lines of the countertop, the alignment of the cabinets, and the placement of each appliance and fixture all check out. The lighting and shadows are consistent across the image, further supporting the naturalness of the assembly.

Comparing back to the original puzzle pieces, every major object boundary and detail aligns as expected, confirming that the visual information has been reconstructed accurately. The overall image looks like a realistic, undisturbed scene from a kitchen or breakroom, with all elements fitting together in a way that is both visually and logically coherent.

The answer is: (B) The top-left part should be Part 2; the top-right part should be Part 3; the bottom-left part should be Part 4; and the bottom-right part should be Part 1.</think><answer>B</answer>

396 · correct choice A

Input 1
Exact model input text
<img><|image_1|></img> Question: The image below is divided into four parts by white strips, forming a 2×2 jigsaw puzzle. The parts are labeled "1" (top-left), "2" (top-right), "3" (bottom-left), and "4" (bottom-right). These parts are from a single original image but have been shuffled. Your task is to determine the correct arrangement of the physically labeled parts to reconstruct the natural image.
Options:
A. The top-left part should be Part 4; the top-right part should be Part 1; the bottom-left part should be Part 2; and the bottom-right part should be Part 3.
B. The top-left part should be Part 4; the top-right part should be Part 2; the bottom-left part should be Part 1; and the bottom-right part should be Part 3.
C. The top-left part should be Part 3; the top-right part should be Part 1; the bottom-left part should be Part 2; and the bottom-right part should be Part 4.
D. The top-left part should be Part 2; the top-right part should be Part 4; the bottom-left part should be Part 1; and the bottom-right part should be Part 3.
Please select the correct answer from the options above. 

BAGEL-7B-MoT wrong

Parsed: B · time: 128.2s

No image emitted.

Raw model output
<think>


Okay, let's try to figure out the correct arrangement of the puzzle parts. The question is about reconstructing the original image from four shuffled parts labeled 1, 2, 3, and 4. The options are A, B, C, or D. 

First, I need to analyze each part of the image. Let's look at the question image again. The four parts are arranged in a 2x2 grid. Each part shows a different section of what seems to be an industrial or workshop setting. The parts are labeled 1, 2, 3, and 4.

Let me start by identifying the key elements in each part. Part 1 (top-left) shows a large cylindrical object with some writing on it, possibly a tank or a piece of machinery. There's also a shelf with various items in the background. Part 2 (top-right) is a close-up of the floor, showing some tools and a blue clamp. Part 3 (bottom-left) is another view of the same cylindrical object, this time from a different angle, with more details like the base and some pipes. Part 4 (bottom-right) shows a person working near some equipment, including a large circular object and other machinery.

Now, I need to figure out the correct order to arrange these parts. Let's consider the context. The original image is likely a single scene, so the parts should fit together logically. 

Looking at the options:

Option A: Top-left (4), top-right (1), bottom-left (2), bottom-right (3). Hmm, part 4 is a person working, which might be a separate scene. Part 1 is a shelf with items, which could be part of the background. But part 4 seems to be a different area. Maybe not the right order.

Option B: Top-left (4), top-right (2), bottom-left (1), bottom-right (3). Part 4 is the person, part 2 is the floor. If part 4 is the person, maybe part 2 is the floor they're standing on. Then part 1 is the shelf, and part 3 is the machinery. That might make sense if the person is working near the machinery.

Option C: Top-left (3), top-right (1), bottom-left (2), bottom-right (4). Part 3 is the machinery from a different angle. Part 1 is the shelf. Part 2 is the floor. Part 4 is the person. If part 3 is the machinery, part 1 is the shelf in the background, part 2 is the floor, and part 4 is the person working. That seems plausible.

Option D: Top-left (2), top-right (4), bottom-left (1), bottom-right (3). Part 2 is the floor, part 4 is the person. If part 2 is the floor, part 4 is the person standing on it. Then part 1 is the shelf, part 3 is the machinery. But part 2 is a close-up of the floor, so maybe part 1 is the shelf in the background. Part 4 is the person working near the machinery. That could fit.

Now, let's think about the connections. The original image probably shows a person working in a workshop with various equipment. Part 4 shows a person, so that's likely the main scene. Part 2 is the floor, which would be part of the same scene. Part 1 is the shelf with items, which might be in the background. Part 3 is the machinery, which the person is working on. So arranging them as part 4 (person), part 2 (floor), part 1 (shelf), part 3 (machine) would make sense. That would correspond to option B: top-left (4), top-right (2), bottom-left (1), bottom-right (3).

Alternatively, if part 3 is the machinery, part 1 is the shelf, part 2 is the floor, and part 4 is the person, then part 3 (machine) would be the main focus, part 1 (shelf) in the background, part 2 (floor) under the person, and part 4 (person) working. That would also make sense. So which is correct?

Looking at the options again. Let's check the labels. The original image is divided into four parts labeled 1, 2, 3, 4. The correct arrangement would need to match the original image's layout. If part 1 is the shelf (top-left), part 2 is the floor (top-right), part 3 is the machinery (bottom-left), and part 4 is the person (bottom-right), then the correct order would be 1, 2, 3, 4. But the options don't have that. The options are rearranged.

Wait, the options are about the labels. For example, option B says top-left is part 4, top-right is part 2, bottom-left is part 1, bottom-right is part 3. So the original image's top-left (part 1) would be replaced with part 4, etc. So the reconstructed image would have part 4 in the top-left, part 2 in the top-right, part 1 in the bottom-left, and part 3 in the bottom-right. That would reconstruct the original image. But the original image's parts are labeled 1, 2, 3, 4. So the correct answer is the one that matches the original labels' positions.

Alternatively, maybe the original image is split into four parts, and the labels 1,2,3,4 are assigned to each part. The question is asking which arrangement of the labeled parts (as per the options) would reconstruct the original image. So the correct answer is the one where the parts are arranged in the order of the original labels.

But the options are about the labels. For example, option B says the top-left part should be part 4, which is the original part 4. So if the original image's top-left is part 4, then the answer is B. But how do we know which part is the original top-left?

Alternatively, perhaps the original image is split into four quadrants, and each quadrant is labeled 1,2,3,4. The question is asking which of the options (A-D) correctly maps the labeled parts to their positions in the reconstructed image. So the correct answer is the one where part 1 is in the top-left, part 2 in the top-right, part 3 in the bottom-left, and part 4 in the bottom-right. But the options don't have that. The options are rearranged.

Wait, the options are about the labels. For example, option B says the top-left part should be part 4, which is the original part 4. So if the original image's top-left is part 4, then the answer is B. But how do we know which part is the original top-left?

Alternatively, perhaps the original image is divided into four parts, and the labels 1,2,3,4 are assigned to each part. The question is asking which of the options (A-D) correctly arranges the labeled parts to reconstruct the original image. So the correct answer is the one where part 1 is in the top-left, part 2 in the top-right, part 3 in the bottom-left, and part 4 in the bottom-right. But the options don't have that. The options are rearranged.

Wait, the options are about the labels. For example, option B says the top-left part should be part 4, which is the original part 4. So if the original image's top-left is part 4, then the answer is B. But how do we know which part is the original top-left?

Alternatively, perhaps the original image is split into four quadrants, and the labels 1,2,3,4 are assigned to each quadrant. The question is asking which of the options (A-D) correctly maps the labeled parts to their positions in the reconstructed image. So the correct answer is the one where part 1 is in the top-left, part 2 in the top-right, part 3 in the bottom-left, and part 4 in the bottom-right. But the options don't have that. The options are rearranged.

Wait, the options are about the labels. For example, option B says the top-left part should be part 4, which is the original part 4. So if the original image's top-left is part 4, then the answer is B. But how do we know which part is the original top-left?

Alternatively, perhaps the original image is divided into four parts, and the labels 1,2,3,4 are assigned to each part. The question is asking which of the options (A-D) correctly arranges the labeled parts to reconstruct the original image. So the correct answer is the one where part 1 is in the top-left, part 2 in the top-right, part 3 in the bottom-left, and part 4 in the bottom-right. But the options don't have that. The options are rearranged.

Wait, perhaps the original image is split into four quadrants, and the labels 1,2,3,4 are assigned to each quadrant. The question is asking which of the options (A-D) correctly maps the labeled parts to their positions in the reconstructed image. So the correct answer is the one where part  is in the top-left, part  in the top-right, part in the bottom-left, and part in the bottom-right. But the options don't have that. The options are rearranged.

Alternatively, perhaps the original image is split into four parts, and the labels 1,2,3,4 are assigned to each part. The question is asking which of the options (A-D) correctly arranges the labeled parts to reconstruct the original image. So the correct answer is the one where part  is in the top-left, part in the top-right, part in the bottom-left, and part in the bottom-right. But the options don't have that. The options are rearranged.

Wait, maybe I'm overcomplicating. Let's look at the options again. The options are about the labels. For example, option B says the top-left part should be part 4, which is the original part 4. So if the original image's top-left is part 4, then the answer is B. But how do we know which part is the original top-left?

 Looking at the question image, part 1 is the shelf with items, part is the floor, part is the machinery from a different angle, and part is the person working. The original image's top-left would likely be part, which is the machinery from a different angle. But part is the machinery, which is part of the machinery setup. So if the original image's top-left is part, then the answer would be B: top-left part is part, top right is part, bottom left is part, bottom right is part. But that would reconstruct the original image. But part is the machinery, part is the shelf, part is the floor, and part is the person. So the original image's top-left is part, which is the machinery. So the answer would be B: top-left part is part, top right is part, bottom left is part, bottom right is part. But that would reconstruct the original image. So the correct answer is B.

</think>

The answer is B.

ThinkMorph-7B correct

Parsed: A · time: 149.3s

Generated thought 1
Raw model output
<think>To solve this 2×2 jigsaw puzzle, I begin by carefully examining the visual content of each of the four labeled pieces and identifying how they might connect to reconstruct the original image. 

Piece 1 (top-left): This piece features the upper portion of a large, dusty cylindrical object (likely the top of a stove or generator) with the label 'ST. MAGNUS' and the number '282' written on it. Behind the object, there is a shelf with various items and a stone wall, with some hanging objects visible on the left edge. The lighting is consistent with the rest of the pieces, and the perspective shows the top of the main object and the upper background.

Piece 2 (top-right): This piece is dominated by the floor, with a few scattered objects, including a blue C-clamp and the lower part of the same large cylindrical object seen in Piece 1. The perspective is from above the machinery, looking toward the right side. The upper edge shows the side of the machinery, suggesting a connection with another piece that contains the top of the machinery.

Piece 3 (bottom-left): This piece shows the lower portion of the large cylindrical object, including its base and more of the floor. The object's writing continues from above, and the clamp and other small objects seen in Piece 2 are visible here as well. The left side of the piece shows the side of the machinery, and the background continues the stone wall and shelf theme from Piece 1. This piece appears to connect with Piece 1 vertically, as it extends downward from the upper piece.

Piece 4 (bottom-right): This piece shifts the scene to the right, showing a person standing in the background, some barrels, and a large fan. The left side of this piece contains the rightmost part of the large machinery seen in other pieces, with the cylindrical object extending from the left toward the center of the piece. The lighting and perspective indicate that this piece is more about the background and side objects, rather than the main machinery.

Now, let's reason through how these pieces fit together:
- The main machinery is a vertical element, so Pieces 1 and 3 must be stacked (1 above 3) to show the full object from top to bottom.
- Piece 1 contains the top of the machinery and the upper background, so it should be in the top-left.
- Piece 3 contains the base of the machinery and the floor directly below, so it should be in the bottom-left.
- Piece 2 contains the floor and the upper machinery (C-clamp and machinery side) which matches the right side of the machinery in Piece 1, suggesting it fits top-right.
- Piece 4 contains the person, barrels, and the extended machinery, which matches the right background and floor, suggesting it fits bottom-right.

However, looking at the options, none of them match this direct arrangement. Let's re-examine the options:
Option A: Top-left - 4, Top-right - 1, Bottom-left - 2, Bottom-right - 3.
This places the person and machinery side (Piece 4) in the top-left, which doesn't fit the perspective since the main machinery's top is in Piece 1. So this is likely incorrect.

Option B: Top-left - 4, Top-right - 2, Bottom-left - 1, Bottom-right - 3.
This places Piece 4 (background, person, machinery side) in the top-left, Piece 2 (floor, clamp, machinery side) in the top-right, Piece 1 (top of machinery, shelf) in the bottom-left, and Piece 3 (bottom of machinery, floor) in the bottom-right. This arrangement does not align well because the main machinery's top (Piece 1) should be above its base (Piece 3), but here Piece 1 is bottom-left and Piece 3 is bottom-right, which would not allow the vertical continuity.

Option C: Top-left - 3, Top-right - 1, Bottom-left - 2, Bottom-right - 4.
This places Piece 3 (bottom of machinery) in the top-left, which doesn't make sense since the machinery's top must be at the top. This is also incorrect.

Option D: Top-left - 2, Top-right - 4, Bottom-left - 1, Bottom-right - 3.
This places Piece 2 (floor, clamp, machinery side) in the top-left, Piece 4 (background, person, machinery) in the top-right, Piece 1 (top of machinery, shelf) in the bottom-left, and Piece 3 (bottom of machinery, floor) in the bottom-right. Again, the vertical alignment of the machinery is broken.

Let's try a different approach by matching visual boundaries:
- The blue clamp in Piece 2 must be aligned with the machinery in Piece 1.
- The writing on the machinery in Piece 1 continues into Piece 3.
- The person and machinery in Piece 4 must be to the right of the main machinery, matching the background seen in Piece 2.

Given all this, the only option where the machinery's top and bottom are correctly aligned, and the background and floor pieces are in logical positions is:
A. The top-left part should be Part 4; the top-right part should be Part 1; the bottom-left part should be Part 2; and the bottom-right part should be Part 3.</think><image_start>
<image_end><think>Now that I have assembled the image according to my reasoning, I will verify its coherence by closely examining the visual continuity and natural flow across the seams where the pieces join. Starting from the left side, the top-left segment now features the person and machinery, which smoothly transitions into the adjacent segment below. The machinery's vertical alignment is preserved, with the top portion clearly connecting to the lower section, and the writing on the machinery continues without interruption from the upper to the lower part. The blue C-clamp is properly attached to the machinery, and its position makes sense relative to the rest of the scene. The floor area flows naturally across all quadrants, with no abrupt changes in texture or color, and the boundaries between the pieces do not draw attention due to mismatched lines or angles. The background elements, such as shelves and wall details, also match up seamlessly, confirming that the spatial relationships between objects are consistent. The right side maintains a logical arrangement of the remaining machinery and the person in the background, with the arched doorway and other objects remaining in their expected places. Overall, the assembled image presents a coherent, continuous scene without any visible visual breaks or inconsistencies. This confirms that the arrangement of pieces to reconstruct the original image is: 

The answer is (A): The top-left part should be Part 4; the top-right part should be Part 1; the bottom-left part should be Part 2; and the bottom-right part should be Part 3.</think><answer>A</answer>

399 · correct choice B

Input 1
Exact model input text
<img><|image_1|></img> Question: The image below is divided into four parts by white strips, forming a 2×2 jigsaw puzzle. The parts are labeled "1" (top-left), "2" (top-right), "3" (bottom-left), and "4" (bottom-right). These parts are from a single original image but have been shuffled. Your task is to determine the correct arrangement of the physically labeled parts to reconstruct the natural image.
Options:
A. The top-left part should be Part 2; the top-right part should be Part 4; the bottom-left part should be Part 1; and the bottom-right part should be Part 3.
B. The top-left part should be Part 1; the top-right part should be Part 3; the bottom-left part should be Part 2; and the bottom-right part should be Part 4.
C. The top-left part should be Part 3; the top-right part should be Part 4; the bottom-left part should be Part 2; and the bottom-right part should be Part 1.
D. The top-left part should be Part 2; the top-right part should be Part 1; the bottom-left part should be Part 3; and the bottom-right part should be Part 4.
Please select the correct answer from the options above. 

BAGEL-7B-MoT correct

Parsed: B · time: 103.8s

No image emitted.

Raw model output
<think>


Okay, let's try to figure out the correct arrangement of the parts. The question is about a 2x2 jigsaw puzzle where each part is labeled 1, 2, 3, 4. The goal is to reconstruct the original image by determining which part goes where.

First, I need to look at each of the four parts in the question image. Let's start by analyzing each part:

1. Part 1 (top-left): This shows a room with a checkered wall, a washing machine, and a door. The perspective is from the doorway looking into the room.
2. Part 2 (top-right): This is a close-up of a wooden floor with a light reflection. It seems like a continuation of the floor from another part of the room.
3. Part 3 (bottom-left): This is a plain blue wall with a door frame. The door is open, and the wall is solid blue.
4. Part 4 (bottom-right): This shows a corner of the room with a blue wall and a small brown object on the floor, possibly a box or a piece of furniture.

Now, I need to figure out how these parts fit together. Let's think about the original image. The correct arrangement should form a coherent scene. Let's consider the options given:

Option A: Top-left (Part 2), top-right (Part 4), bottom-left (Part 1), bottom-right (Part 3). Hmm, Part 2 is the floor, which doesn't seem to fit as a top-left part. Part 1 is the room view, which might be the main part. But I'm not sure.

Option B: Top-left (Part 1), top-right (Part 3), bottom-left (Part 2), bottom-right (Part 4). Part 1 is the room, which could be the main part. Part 3 is the blue wall. If Part 1 is top-left, then maybe the room is the main part. But Part 3 is a wall, so maybe that's part of the background. Not sure.

Option C: Top-left (Part 3), top-right (Part 4), bottom-left (Part 2), bottom-right (Part 1). Part 3 is the blue wall. If that's top-left, then the rest would have to fit around it. But Part 1 is the room, which might not fit as a bottom-right part.

Option D: Top-left (Part 2), top-right (Part 1), bottom-left (Part 3), bottom-right (Part 4). Part 2 is the floor, which again doesn't seem like a part of the main scene. Part 1 is the room, which could be the main part. But Part 2 is the floor, so maybe that's part of the bottom-left?

Wait, maybe I should look for continuity. The original image probably has a room with a floor, walls, and a door. Let's try to reconstruct:

If Part 1 is the room (top-left), then the top-right part should be the continuation of the room. But Part 3 is a blue wall. Alternatively, maybe the room is the main part, and the other parts are parts of the surrounding area. Alternatively, the blue wall (Part 3) could be part of the background.

Alternatively, let's think about the options again. Let's check each option's arrangement:

Option A: Top-left (Part 2) – floor. Top-right (Part 4) – corner with a box. Bottom-left (Part 1) – room. Bottom-right (Part 3) – blue wall. That doesn't seem to fit. The room part is bottom-left, which might not be the main part.

Option B: Top-left (Part 1) – room. Top-right (Part 3) – blue wall. Bottom-left (Part 2) – floor. Bottom-right (Part 4) – corner with box. Hmm, maybe. The room is top-left, but the blue wall is top-right. The floor is bottom-left, and the corner is bottom-right. That might not make sense.

Option C: Top-left (Part 3) – blue wall. Top-right (Part 4) – corner with box. Bottom-left (Part 2) – floor. Bottom-right (Part 1) – room. That seems like the room is bottom-right, which might not be the main part.

Option D: Top-left (Part 2) – floor. Top-right (Part 1) – room. Bottom-left (Part 3) – blue wall. Bottom-right (Part 4) – corner with box. Wait, if Part 1 is the room, then the top-right part is the room. But the room part is usually the main part. So maybe the room is top-right, and the floor is top-left. But that might not make sense.

Alternatively, maybe the correct arrangement is that the room (Part 1) is the main part, and the other parts are parts of the surrounding area. For example, the blue wall (Part 3) could be part of the background. The floor (Part 2) is part of the room, and the corner with the box (Part 4) is another part of the room.

Wait, looking at the options again. Let's think about the original image. The correct arrangement should form a cohesive image. Let's imagine the four parts:

If Part 1 is the room (with the checkered wall and washing machine), then the top-left part is the room. The top-right part (Part 3) is the blue wall. The bottom-left part (Part 2) is the floor. The bottom-right part (Part 4) is the corner with the box. But that might not fit. Alternatively, maybe the room is the main part, and the other parts are parts of the surrounding area.

Alternatively, maybe the correct arrangement is:

Top-left: Part 1 (room)
Top-right: Part 3 (blue wall)
Bottom-left: Part 2 (floor)
Bottom-right: Part 4 (corner with box)

But that would make the room in the top-left, blue wall in top-right, floor in bottom-left, and corner in bottom-right. That seems possible. But I'm not sure. Alternatively, maybe the blue wall is part of the background, and the room is the main part.

Alternatively, let's think about the options again. The correct answer is likely Option B: top-left (Part 1), top-right (Part 3), bottom-left (Part 2), bottom-right (Part 4). Because Part 1 is the room, which is the main part. Part 3 is the blue wall, which could be part of the background. Part 2 is the floor, which is part of the room. Part 4 is the corner with the box, which is another part of the room. That makes sense. The room is the main part, with the blue wall as part of the background, the floor as part of the room, and the corner with the box as another part of the room.

Alternatively, maybe the correct answer is Option D: top-left (Part 2), top-right (Part 1), bottom-left (Part 3), bottom-right (Part 4). But Part 2 is the floor, which would be the top-left part. That might not make sense as the main part.

Alternatively, let's look for continuity. The original image probably has a room with a floor, walls, and a door. Part 1 is the room with the checkered wall and washing machine. Part 3 is a blue wall. Part 2 is the floor. Part 4 is a corner with a box. So arranging them as:

Top-left: Part 1 (room)
Top-right: Part 3 (blue wall)
Bottom-left: Part 2 (floor)
Bottom-right: Part 4 (corner with box)

But that would make the room in the top-left, blue wall in top-right, floor in bottom-left, and corner in bottom-right. That seems plausible. But I'm not sure. Alternatively, maybe the blue wall is part of the background, and the room is the main part. So the correct arrangement would be:

Top-left: Part 1 (room)
Top-right: Part 3 (blue wall)
Bottom-left: Part 2 (floor)
Bottom-right: Part 4 (corner with box)

But I'm not entirely sure. Alternatively, maybe the correct answer is Option B: top-left (Part 1), top-right (Part 3), bottom-left (Part 2), bottom-right (Part 4). That way, the room is the main part, the blue wall is part of the background, the floor is part of the room, and the corner with the box is another part of the room. That seems to make sense. So the answer would be Option B.

</think>
The correct arrangement of the parts to reconstruct the natural image is determined by analyzing the continuity and coherence of each section. 

- Part 1 (room with checkered wall and washing machine) should be the main focus, forming the top-left section.  
- Part 3 (blue wall) fits as the top-right section, providing a background element.  
- Part 2 (floor) aligns with the bottom-left section, completing the room's flooring.  
- Part 4 (corner with a box) completes the bottom-right section, adding a secondary detail to the room.  

This arrangement ensures all elements logically connect to form a cohesive scene.  

The answer is (B).

ThinkMorph-7B correct

Parsed: B · time: 69.5s

Generated thought 1
Raw model output
<think>To solve this 2×2 jigsaw puzzle, I begin by closely examining the visual details in each of the four labeled pieces:

Piece 1 (top-left): This piece shows a wooden door with glass panels on the left edge, partially open, leading into a room with a checkered black-and-white wall and a white washing machine or cabinet. The floor is dark near the doorway, transitioning to lighter wood further inside.

Piece 2 (top-right): This piece is dominated by a light wooden floor, with a bright reflection in the center. The upper left shows a partial view of the door’s edge and a table leg, suggesting it is adjacent to the door. There’s no wall visible, indicating this is likely a central floor segment.

Piece 3 (bottom-left): This piece shows the left side of a blue wall with the edge of the wooden door at the left boundary. There is no floor visible, and the wall continues upward. The door’s position matches the perspective seen in Piece 1.

Piece 4 (bottom-right): This piece shows the lower right corner of the room, with a blue wall, a light wooden floor, and a small brown box near the wall. The wall and floor meet at a right angle, and the wall continues upward, suggesting this is the lower right portion of the original image.

Next, I reconstruct the image by matching visual cues:
- The checkered room and washing machine in Piece 1 must be at the back of the scene, so Piece 1 fits in the top-left or top-right position.
- The door’s edge continues from Piece 1 in Piece 3, as both show the same door and wall alignment. Therefore, Piece 3 should be directly below Piece 1.
- Piece 2, with the floor and the door’s edge, matches the central foreground of the image, suggesting it fits top-right.
- Piece 4, with the small box and the continuation of the wall and floor, matches the bottom-right position, as it visually connects to the right edge of Piece 2 and the lower part of Piece 1.

Testing these placements, the only arrangement that achieves seamless continuity of the door, wall, and floor, and aligns all room features correctly is:
Top-left: Piece 1
Top-right: Piece 3
Bottom-left: Piece 2
Bottom-right: Piece 4

This matches option B.</think><image_start>
<image_end><think>Now that I have assembled the puzzle pieces according to my reasoning, I will carefully examine the resulting image for visual coherence and naturalness. First, I observe the alignment of the door: the vertical edge of the door and its frame are continuous from the top-left to the bottom-right, with no visible breaks or mismatches. The checkered wall and the room beyond the doorway appear undisturbed, and the washing machine is fully intact, positioned correctly against the back wall. The transition of the wooden floor is seamless, with the lighting reflection centered and the floorboards running smoothly from one quadrant to the next. The blue walls meet at the correct angles, and the corner is well-defined, showing no signs of misalignment. The small brown box sits naturally against the wall and floor, with the perspective lines up as expected. There are no abrupt changes in color or texture at the piece boundaries, and all object boundaries—such as the door, wall, and floor—are continuous. The scene as a whole looks natural and undistorted, indicating that the pieces have been arranged into a coherent whole. This confirms that the answer is: (B) The top-left part should be Part 1; the top-right part should be Part 3; the bottom-left part should be Part 2; and the bottom-right part should be Part 4.</think><answer>B</answer>

400 · correct choice D

Input 1
Exact model input text
<img><|image_1|></img> Question: The image below is divided into four parts by white strips, forming a 2×2 jigsaw puzzle. The parts are labeled "1" (top-left), "2" (top-right), "3" (bottom-left), and "4" (bottom-right). These parts are from a single original image but have been shuffled. Your task is to determine the correct arrangement of the physically labeled parts to reconstruct the natural image.
Options:
A. The top-left part should be Part 4; the top-right part should be Part 1; the bottom-left part should be Part 2; and the bottom-right part should be Part 3.
B. The top-left part should be Part 2; the top-right part should be Part 4; the bottom-left part should be Part 3; and the bottom-right part should be Part 1.
C. The top-left part should be Part 2; the top-right part should be Part 3; the bottom-left part should be Part 4; and the bottom-right part should be Part 1.
D. The top-left part should be Part 1; the top-right part should be Part 4; the bottom-left part should be Part 3; and the bottom-right part should be Part 2.
Please select the correct answer from the options above. 

BAGEL-7B-MoT wrong

Parsed: None · time: 60.6s

No image emitted.

Raw model output
<think>


Okay, let's try to figure out the correct arrangement of the puzzle parts. The question is about reconstructing the original image from four shuffled parts labeled 1, 2, 3, and 4. The options are A, B, C, or D. 

First, I need to analyze each part of the image. Let's look at the question image. The four parts are arranged in a 2x2 grid. Each part shows a different section of the same room, which appears to be a conference or meeting room. The key is to match the parts based on their content and how they fit together.

Looking at the options:

Option A: Top-left (Part 4), Top-right (Part 1), Bottom-left (Part 2), Bottom-right (Part 3)
Option B: Top-left (Part 2), Top-right (Part 4), Bottom-left (Part 3), Bottom-right (Part 1)
Option C: Top-left (Part 2), Top-right (Part 3), Bottom-left (Part 4), Bottom-right (Part 1)
Option D: Top-left (Part 1), Top-right (Part 4), Bottom-left (Part 3), Bottom-right (Part 2)

Now, let's examine each part:

1. Part 1 (Top-left): This shows a ceiling light fixture with a lampshade. The background includes blue curtains and a whiteboard with some writing. The perspective is from below, looking up at the light.

2. Part 2 (Top-right): This part shows a table setup with chairs. The table has a white tablecloth, and there are water bottles and notepads. The background includes blue curtains and a person standing near the whiteboard.

3. Part 3 (Bottom-left): This is another view of the table setup, similar to Part 2 but from a different angle. The chairs and table setup are visible, and the background is consistent with blue curtains.

4. Part 4 (Bottom-right): This part also shows the ceiling light fixture, similar to Part 1, but from a different angle. The background includes blue curtains and a whiteboard with writing, similar to Part 1.

Now, let's try to reconstruct the original image. The original image is divided into four quadrants. The top-left quadrant (Part 1) shows the ceiling light and part of the whiteboard. The top-right quadrant (Part 2) shows the table setup with chairs and the person near the whiteboard. The bottom-left quadrant (Part 3) shows another angle of the table setup. The bottom-right quadrant (Part 4) shows the ceiling light from a different angle and part of the whiteboard.

Looking at the options, let's check each one:

Option A: Top-left (4), Top-right (1), Bottom-left (2), Bottom-right (3)
- Part 4 (bottom-right) would be the ceiling light from a different angle. But the original image's top-left quadrant is Part 1, which shows the ceiling light. So this doesn't fit.

Option B: Top-left (2), Top-right (4), Bottom-left (3), Bottom-right (1)
- Part 2 (top-left) is the table setup. But the original image's top-left quadrant is the ceiling light. So this is incorrect.

Option C: Top-left (2), Top-right (3), Bottom-left (4), Bottom-right (1)
- Part 2 (top-left) is the table setup. Again, the original top-left should be the ceiling light. So this is wrong.

Option D: Top-left (1), Top-right (4), Bottom-left (3), Bottom-right (2)
- Part 1 (top-left) is the ceiling light. Part 4 (top-right) is the ceiling light from another angle. Part 3 (bottom-left) is the table setup. Part 2 (bottom-right) is the table setup from another angle. This seems to fit because the top-left and top-right parts both show the ceiling light, and the bottom parts show the table setup. The original image's top-left quadrant is the ceiling light (Part 1), top-right is the ceiling light (Part 4), bottom-left is the table setup (Part 3), and bottom-right is the table setup (Part 2). This matches the structure of the original image.

Therefore, the correct answer should be Option D.

</think>
The correct arrangement of the puzzle parts is determined by analyzing the content and spatial relationships in each quadrant. The top-left quadrant (Part 1) and top-right quadrant (Part 4) both feature the ceiling light fixture, while the bottom-left (Part 3) and bottom-right (Part 2) show the table setup. This matches the structure of the original image, where the ceiling light is visible in the top-left and top-right sections, and the table setup is in the bottom sections. 

**Answer:** D. The top-left part should be Part 1; the top-right part should be Part 4; the bottom-left part should be Part 3; and the bottom-right part should be Part 2.

ThinkMorph-7B correct

Parsed: D · time: 129.4s

Generated thought 1
Raw model output
<think>To solve this 2×2 jigsaw puzzle, I begin by carefully analyzing the visual content of each labeled part and how they might fit together to reconstruct a coherent scene. 

Part 1 (top-left): This piece shows a ceiling with a large, cream-colored lamp, some ceiling fixtures, and blue curtains in the background. The left side of the image includes a bright, white wall or window area, which is cut off by the white strip. The lower edge of the piece has no visible furniture, but the top edge contains the lamp and ceiling.

Part 2 (top-right): This piece focuses on a conference table with chairs, notepads, water bottles, and a background of blue curtains and a white wall. There is a lamp visible on the left edge, which appears to be the same style as the lamp in Part 1. The top edge of this part has the lamp and some ceiling, suggesting it could align with the lamp from another piece.

Part 3 (bottom-left): This piece shows more chairs and tables, with a patterned carpet visible at the bottom. The back wall is still visible, and the blue curtains continue. There is no ceiling visible in this piece, only the tops of chairs and tables, so it likely belongs in the lower half of the image.

Part 4 (bottom-right): This piece features the large lamp from a high angle, with the ceiling visible and blue curtains on both sides. The bottom of the piece shows a person writing on a whiteboard, with the words 'strategic plan' visible. There is no furniture in the foreground, indicating it belongs in an upper position, likely to the right.

Now, to reconstruct the image, I look for visual continuity and alignment of objects. The lamp in Part 1 and Part 4 is a key feature. Part 4 shows the lamp from a lower angle, and the lamp base in Part 4 aligns with the lamp in Part 1, suggesting they are vertically adjacent, with Part 1 above Part 4. However, the white wall/window area in Part 1 is only present in the top-left of the original image, matching the layout in the assembled image. The person writing on the whiteboard in Part 4 is clearly visible in the top-right of the original image, confirming Part 4 must be in the top-right.

Next, considering the tables and chairs: Part 2 shows a table with chairs and a notepad, and the lamp from Part 1 lines up with the lamp in Part 4. The arrangement of the chairs in Part 2 matches the bottom-right section of the original image, where the table and chairs are closest to the lamp and whiteboard. Part 3 features more chairs and carpet, matching the bottom-left of the original image.

Therefore, the correct arrangement to reconstruct the natural image is:
Top-left: Part 1
Top-right: Part 4
Bottom-left: Part 3
Bottom-right: Part 2

This matches option D.</think><image_start>
<image_end><think>Now that I have assembled the image by arranging the four puzzle parts as determined previously, I will verify the coherence and naturalness of the result. First, I observe the overall scene: a conference room with blue curtains, white walls, long tables with notepads and water bottles, rows of chairs, and a large lamp hanging from the ceiling. The key is to check visual continuity across the seams where the original pieces meet.

Starting from the top, the lamp is perfectly centered and suspended from the ceiling, with no visible breaks or misalignments in its structure. The ceiling lines and recesses flow smoothly across the image, and the lighting is consistent throughout. The blue curtains on both sides are uninterrupted and maintain their vertical lines, confirming the left and right boundaries are correctly joined.

Looking at the lower half, the carpet pattern and the arrangement of chairs and tables form a continuous field. The tables and chairs align precisely, with notepads and water bottles matching up between segments. There are no abrupt color or object mismatches; the perspective and depth are preserved, especially around the vanishing lines of the tables and chairs.

On the right side, the person writing on the whiteboard is fully visible and in a plausible position relative to the room. The background walls, curtains, and furniture all align naturally, with no evidence of duplicated or missing elements. The overall composition is harmonious, and every object boundary is seamless.

Comparing back to the original pieces, each visual element—lamp, curtain, table, chair, and person—is restored to its intended place, confirming the solution forms a single, coherent conference room scene without any visual anomalies.

The answer is: (D) The top-left part should be Part 1; the top-right part should be Part 4; the bottom-left part should be Part 3; and the bottom-right part should be Part 2.</think><answer>D</answer>