ThinkMorph: released supervision, inspected directly
Four deterministic examples per released training task. Each card shows what the model sees and the exact full-image target used as its “visual thought.” This is training-data inspection—not model output.
Chart Refocus
00001
Problem imageSupervised visual thought
Exact question / prompt
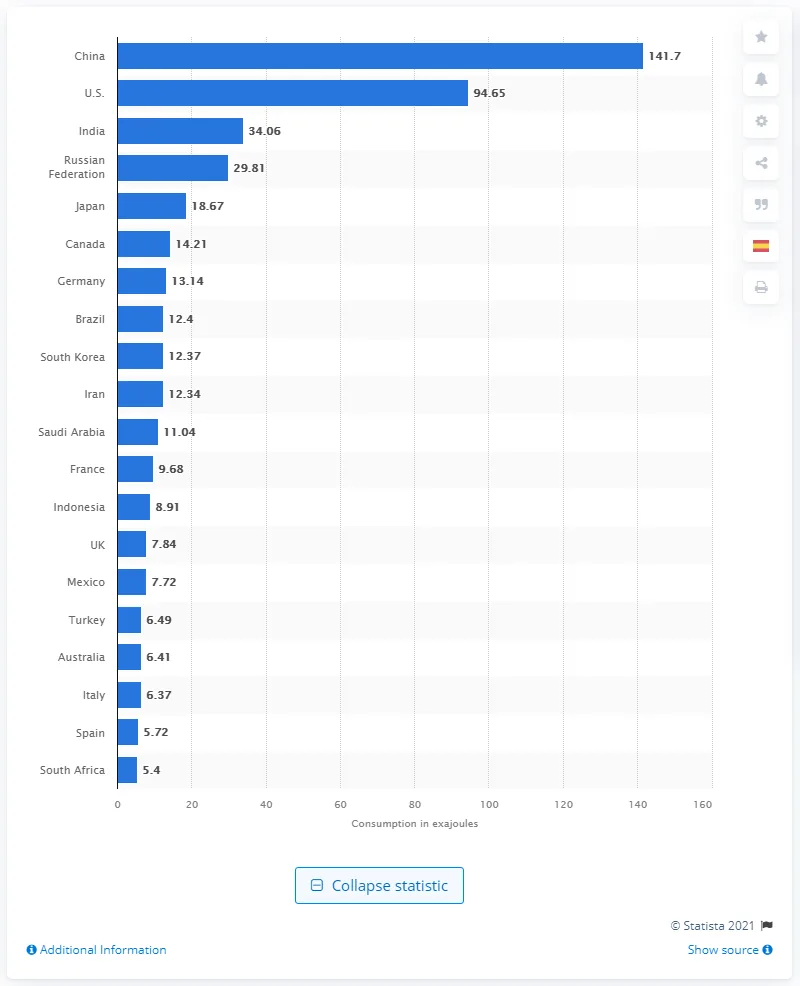
How many exajoules did China use in 2019?
Ground truth: 141.7
Teacher text before image
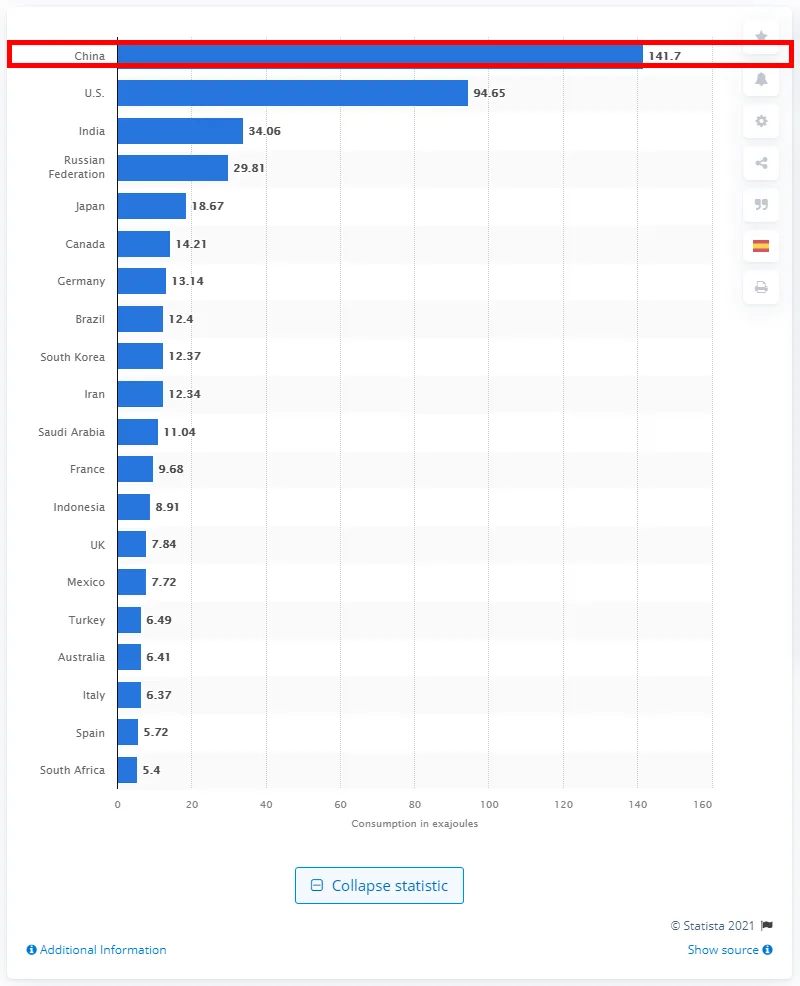
To answer the question about China's energy consumption in 2019, I need to identify China's data point within the chart. The visualization consists of a horizontal bar chart that lists countries along the vertical axis and their exajoule consumption values along the horizontal axis. Since the question specifically asks for China's value, my attention is drawn to the bar labeled 'China' at the very top of the chart. This bar is also the longest, indicating the highest consumption, and is accompanied by a numerical value. To clearly emphasize the part of the chart that directly answers the query, it makes sense to highlight the entire row associated with China—including the label, the bar, and the specific numerical value. By enclosing this area in a red bounding box, I distinctly mark the region of interest that contains all relevant information for determining China's energy use in 2019.
Teacher text after image
To determine how many exajoules China used in 2019, I look at the visualization that presents a bar chart of energy consumption by country, with each country's bar labeled with its corresponding value in exajoules. The country names are listed on the left, and the consumption values are given at the end of each bar. The region of interest is highlighted with a red box, which encompasses the row labeled 'China,' the longest bar in the chart, and the numerical value at the end of this bar. This visual emphasis ensures that I am focusing on the correct data point. Reading the value at the end of the highlighted bar for China, I see the number 141.7. Therefore, China's energy consumption in 2019 was 141.7 exajoules.
Released text-only CoT baseline target
To answer the question, "How many exajoules did China use in 2019?", I need to look closely at the image, which is a horizontal bar chart displaying energy consumption for different countries in 2019, measured in exajoules.

First, I'll identify China in the chart. I see that the countries are listed on the left side, and each country has a corresponding horizontal blue bar extending to the right, indicating its energy consumption. The countries are arranged in descending order of consumption, so the country at the very top, with the longest bar, will represent the highest consumption.

China is at the very top of the chart. This suggests China had the highest energy consumption among the countries listed for 2019. Now, I need to find the exact value for China. To do this, I look to the right end of China's bar. There is a number displayed next to the bar, which represents China’s energy consumption value.

The value displayed next to China's bar is 141.7. Since the chart’s axis and units are labeled as "Consumption in exajoules," I can confidently say that this value is in exajoules.

To ensure accuracy, I’ll scan the axis at the bottom to double-check the units, which indeed read "exajoules." I also compare the length of China’s bar to the others for context—it is noticeably longer, reflecting that China’s energy consumption is much higher than the next country, the U.S., which is listed at 94.65 exajoules.

Therefore, after reviewing the chart and confirming all details, the amount of energy China used in 2019 is 141.7 exajoules.
00048
Problem imageSupervised visual thought
Exact question / prompt
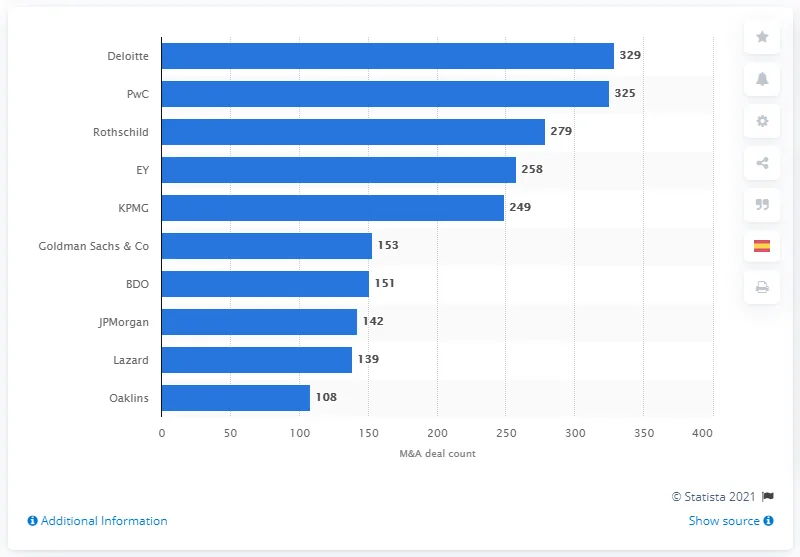
How many deals did Deloitte have in 2018?
Ground truth: 329
Teacher text before image
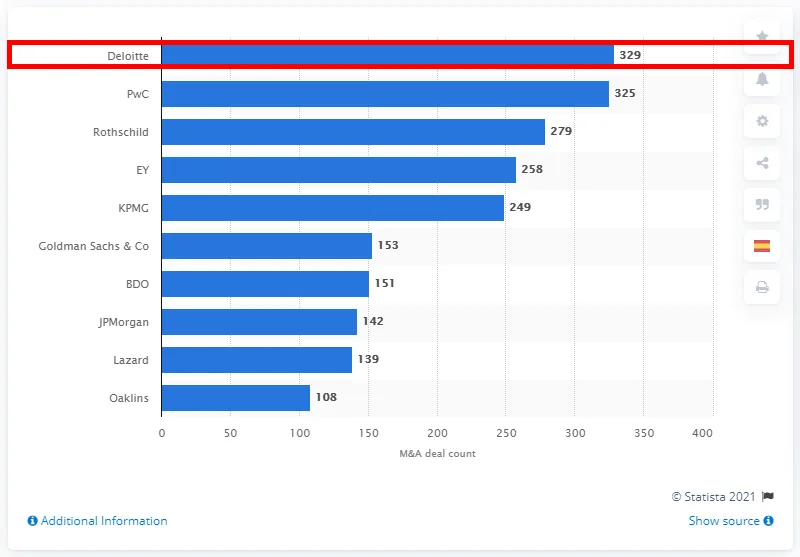
To answer the question about the number of deals Deloitte had in 2018, I need to locate Deloitte in the chart. The visualization is a horizontal bar chart listing various companies on the y-axis and their M&A deal counts on the x-axis. Deloitte is displayed as the topmost entry, with its corresponding bar extending farthest to the right, and its deal count value labeled at the end of the bar. Since the question specifically asks about Deloitte, the relevant area to focus on is the bar and the value label associated with Deloitte in the first row. Therefore, it makes sense to emphasize or highlight the entire row corresponding to Deloitte, including its bar and the value '329', to visually indicate where the answer can be found in the chart.
Teacher text after image
To determine how many deals Deloitte had in 2018, I first locate Deloitte on the bar chart, which lists various companies along the y-axis and their corresponding M&A deal counts as horizontal bars. Deloitte is positioned at the very top of the chart, indicating it is the company of interest. In the edited visualization, the row containing Deloitte's name, bar, and deal count label is clearly highlighted, drawing immediate attention to the relevant data. I then look at the number at the end of Deloitte's bar, which is labeled as '329'. This value represents the total number of deals Deloitte completed in 2018. Therefore, based on the highlighted section of the visualization, the answer to the query is: 329.
Released text-only CoT baseline target
To answer the question, "How many deals did Deloitte have in 2018?", I need to carefully examine the visualization provided. The chart is a horizontal bar graph showing the "M&A deal count" for various companies in 2018. Each company is listed on the vertical axis, and each bar represents the number of deals that company completed, with the actual count written at the end of each bar.

First, I find Deloitte in the list. Deloitte is positioned at the very top, indicating it had the highest number of deals among the companies included in this chart. The bar corresponding to Deloitte is the longest, which visually reinforces that Deloitte led in deal count.

Next, I look for the specific number associated with Deloitte’s bar. At the end of the Deloitte bar, there is a number clearly displayed: 329. This number is in larger font and stands out, making it easy to read and confirming the count.

To ensure accuracy, I compare this with the other entries. The second highest is PwC with 325 deals, followed by Rothschild with 279. These numbers are all clearly labeled, and there’s no ambiguity in the chart. Deloitte’s 329 is the largest value shown and is unambiguously associated with Deloitte.

There are no footnotes or alternative metrics indicated in the chart that would suggest a different number for Deloitte. The chart is straightforward, showing only the M&A deal count for each company in 2018.

Therefore, after a careful and methodical review of the visual information, I conclude that Deloitte had 329 deals in 2018.
00314
Problem imageSupervised visual thought
Exact question / prompt
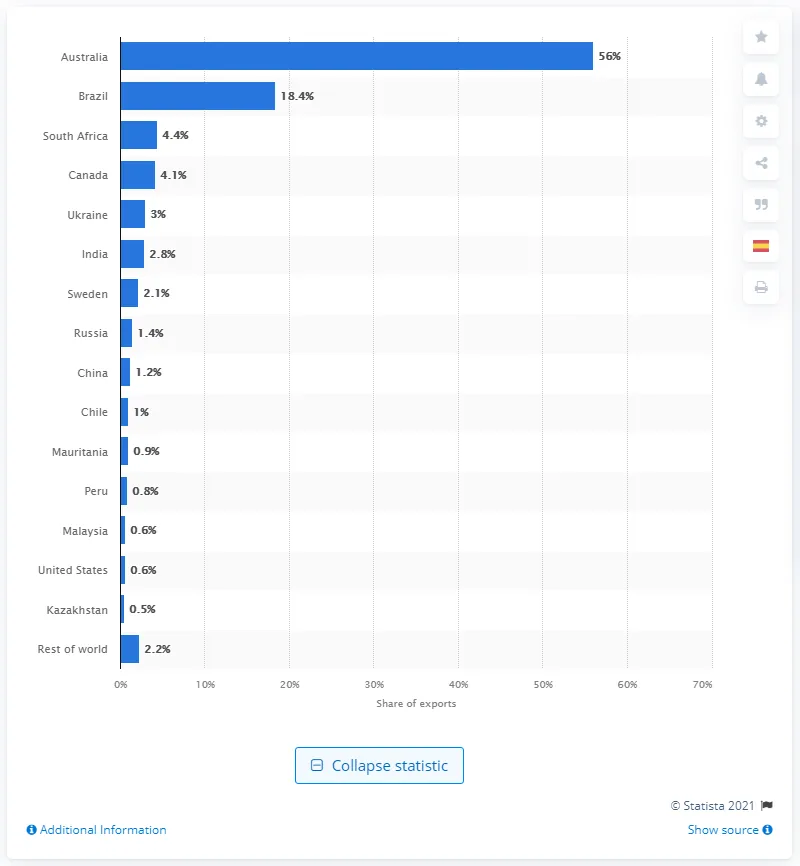
What percentage of global iron ore exports came from Australia in 2020?
Ground truth: 56
Teacher text before image
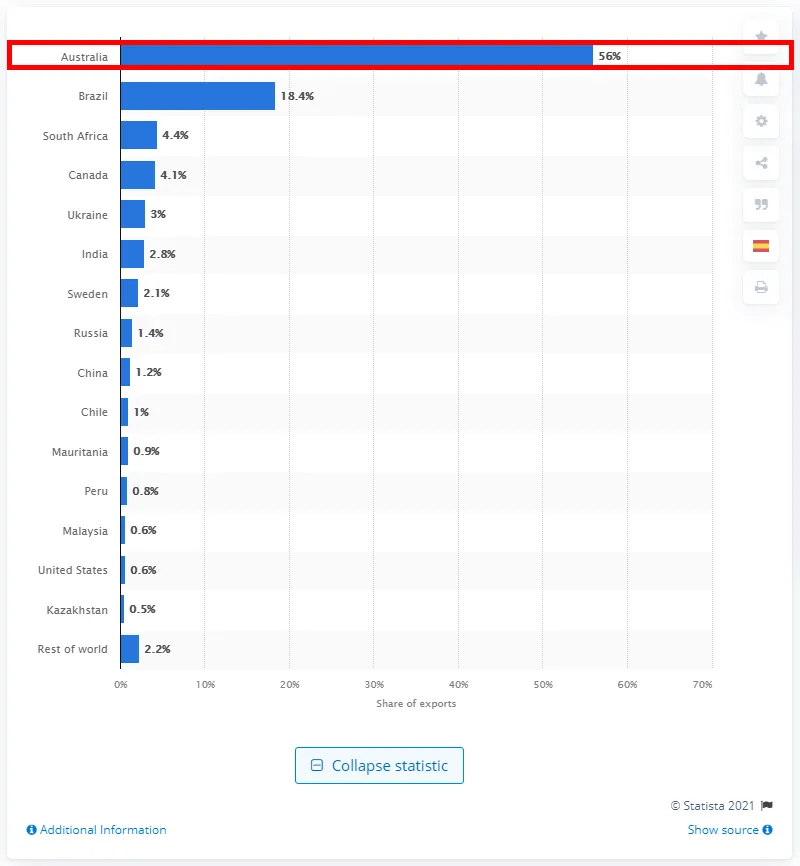
To determine the percentage of global iron ore exports contributed by Australia in 2020, I first need to find the relevant data point on the chart. The bar chart lists countries along the y-axis and their respective shares of exports as horizontal bars, with percentages labeled at the end of each bar. Since the query specifically asks about Australia, I scan the chart for the row corresponding to Australia. Looking at the top of the chart, I see that Australia is the first entry, and the bar extends farthest to the right, with a label showing the percentage value. Because this bar and its percentage label directly answer the question about Australia's share, it is logical to emphasize this entire horizontal section. Highlighting the bar, the country name, and the percentage value for Australia visually isolates the exact area of the chart that provides the necessary information for the query.
Teacher text after image
To answer the question about what percentage of global iron ore exports came from Australia in 2020, I examine the visualization and focus on the relevant data for Australia. The edited image highlights the row corresponding to Australia, making it easy to locate and isolate this information. The horizontal bar associated with Australia is the longest, indicating the highest share among all countries listed. At the end of this bar, there is a clearly labeled percentage value: 56%. This value is the direct answer to the query, as it represents Australia's share of global iron ore exports for that year. Therefore, based on the information highlighted in the visualization, the answer is 56.
Released text-only CoT baseline target
To answer the question about the percentage of global iron ore exports that came from Australia in 2020, I need to carefully examine the data presented in the visualization. The chart appears to be a horizontal bar graph listing various countries and their respective shares of global iron ore exports for the year 2020.

First, I'll identify Australia in the chart. Australia is listed at the very top, which suggests it is the largest exporter. Next to Australia's name, there is a horizontal blue bar that is significantly longer than any other country’s bar, visually emphasizing its dominance in exports.

Now, I need to look for the specific percentage value associated with Australia. The chart conveniently provides percentage values next to each country's bar. For Australia, the value shown is "56%." This indicates that Australia was responsible for 56 percent of all global iron ore exports in 2020.

To ensure accuracy, I’ll cross-reference this percentage with those of other leading exporters. The second country, Brazil, is listed with 18.4%, which is much lower than Australia’s share. All other countries have even smaller percentages (most under 5%), confirming Australia’s position as the clear leader.

Additionally, since the query is specifically about the year 2020 and the chart is labeled accordingly, I can be confident that the data represents the correct timeframe.

Summing up my observations, the chart shows Australia’s share as 56%, which answers the question definitively. Therefore, the percentage of global iron ore exports that came from Australia in 2020 is 56.
01215
Problem imageSupervised visual thought
Exact question / prompt
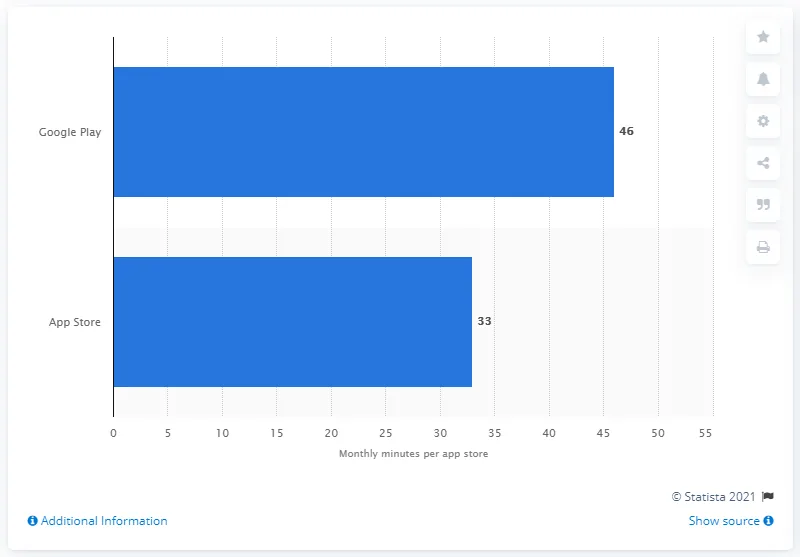
How many minutes per month did Google Play users spend at the app store?
Ground truth: 46
Teacher text before image
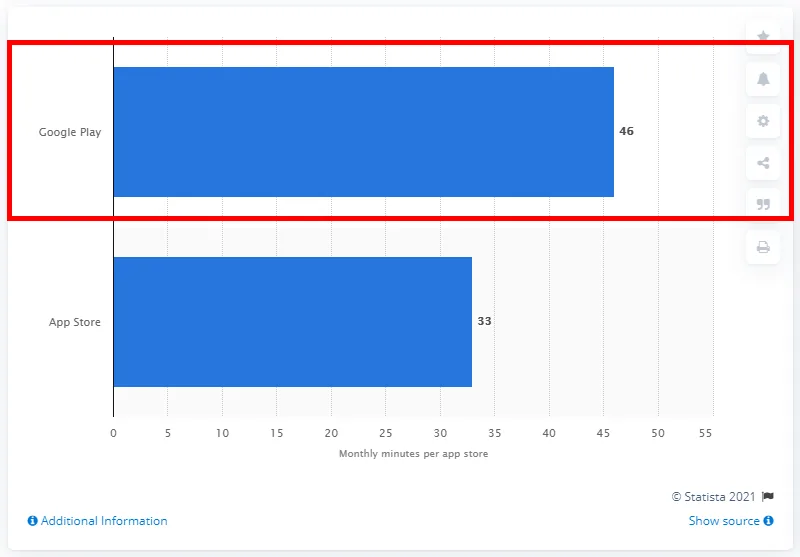
To determine how many minutes per month Google Play users spend at the app store, I need to look for information specific to Google Play within the visualization. The chart displays two horizontal bars, each labeled with an app store name: 'Google Play' and 'App Store.' Since the query is focused on Google Play, my attention turns to the row corresponding to 'Google Play.' This row contains a blue horizontal bar and an adjacent value, which represents the monthly minutes per user. To make this information stand out visually, it makes sense to highlight the entire section associated with Google Play, including its label and the bar itself, as this area directly answers the question. Drawing a bounding box around the Google Play row clearly emphasizes the relevant data for the query.
Teacher text after image
To answer the question of how many minutes per month Google Play users spend at the app store, I first focus on the relevant part of the bar chart. The area corresponding to 'Google Play' is clearly highlighted with a bounding box, making it easy to identify the correct data. Within this highlighted section, the bar represents the monthly minutes per user spent at the Google Play app store. The value '46' is displayed at the end of the bar, indicating the exact number of minutes. Since the label on the left reads 'Google Play' and the associated bar's endpoint is marked with '46', I can confidently conclude that Google Play users spend 46 minutes per month at the app store.
Released text-only CoT baseline target
To answer the question about how many minutes per month Google Play users spend at the app store, I need to closely examine the chart provided.

First, let me assess the type of visualization. This is a horizontal bar chart with two bars, each representing a different app store: Google Play and App Store. Each bar is labeled with its respective value, and the length of the bars corresponds with the number of monthly minutes spent per app store.

Looking at the bar labeled "Google Play", I see that it is the top bar in the chart. Directly to the right of this bar, there is a number, which appears to be the value representing monthly minutes per user. The bar for Google Play is clearly longer than the one below it (for App Store), indicating that users spend more time, on average, in the Google Play store than in the App Store.

Next, I want to confirm the exact value given for Google Play. The number adjacent to the Google Play bar is "46". Additionally, the x-axis provides a scale in increments of 5, from 0 to 55 monthly minutes per app store, allowing for visual verification. The bar for Google Play reaches close to the 45 mark, and the number "46" is clearly displayed, confirming the accuracy of the data presented.

To ensure there is no confusion, I double-check the label and value for the App Store. The App Store bar is shorter and labeled with "33", which further supports that Google Play users spend more time per month in their app store compared to App Store users.

Summing up the evidence from the chart—the label, the length of the bar, and the number "46" next to the Google Play bar—I can confidently conclude that Google Play users spend 46 minutes per month at the app store.
Jigsaw Assembly
00001
Problem imageSupervised visual thought
Exact question / prompt
The image below is divided vertically into two parts by a white strip, forming a 1×2 jigsaw puzzle. The left part is labeled "1" and the right part is labeled "2". These two parts are shuffled and may not be in their original order. Your task is to determine the correct arrangement of the two parts to reconstruct a natural-looking image.

Select the correct answer from the following 2 choices:

(A) Part 1 should be to the left of Part 2
(B) Part 1 should be to the right of Part 2
Ground truth: A
Teacher text before image
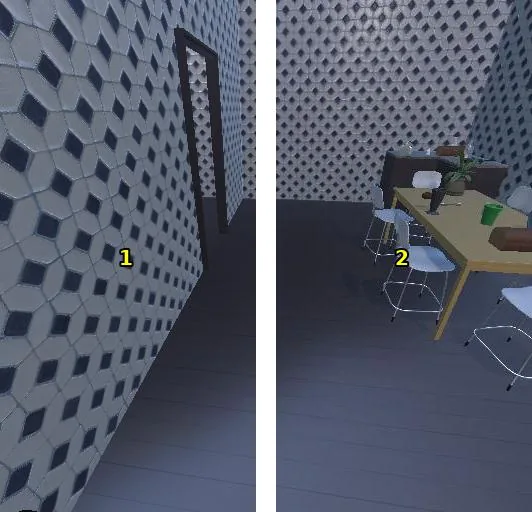
First, I examine the visual content of each piece. Piece 1 (labeled '1') shows the left side of a room, featuring a patterned wall with hexagonal tiles, a doorway with a dark frame, and an empty floor space leading into the room. The perspective suggests we are looking slightly to the right, as the wall and door frame recede into the distance. Piece 2 (labeled '2') displays more of the right side of the same room, with the same patterned wall continuing seamlessly, a table with chairs, and various objects (such as books and a plant) arranged on the table. The floor continues from piece 1, and the wall pattern and lighting remain consistent, reinforcing that these two pieces are adjacent parts of the same room.

Next, I look for visual cues to determine the correct assembly. The edge of piece 1 (on its right) shows the wall and floor continuing without any abrupt change, and the door frame appears to be positioned such that it would naturally lead into the scene seen in piece 2. Piece 2, on its left edge, begins with the continuation of the wall pattern and the floor, exactly where piece 1 ends. The perspective lines and the lighting across both pieces are aligned, suggesting that placing piece 1 to the left and piece 2 to the right will reconstruct a natural-looking image.

Importantly, swapping the pieces (putting piece 2 on the left and piece 1 on the right) would break the continuity of the wall and floor, as the door would awkwardly open into the space occupied by the table, and the perspective would be inconsistent. The objects on the table in piece 2 are set further back in the room, matching the depth suggested by piece 1's doorway.

Therefore, based on the continuity of the wall pattern, the alignment of the floor, the placement of the doorway, and the perspective of all visual elements, the correct assembly is to place part 1 to the left of part 2.
Teacher text after image
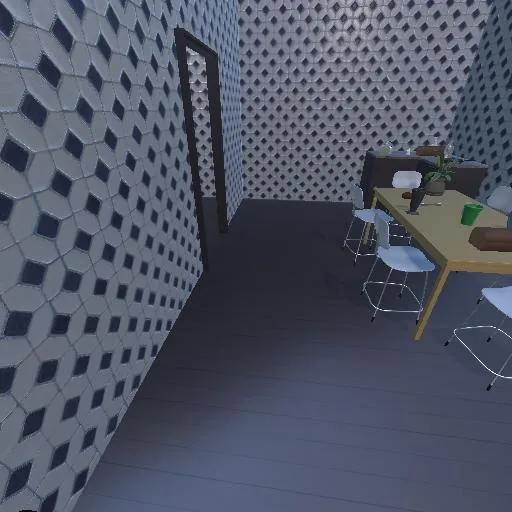
To verify the coherence of the assembled image, I examine the visual continuity across the join between the two pieces. The patterned wall with hexagonal tiles flows smoothly from left to right, with no perceptible break in the pattern or misalignment, indicating proper assembly. The doorway on the left sits naturally at the edge of the left wall and opens into the space that leads directly to the area occupied by the table and chairs on the right. The perspective lines—such as the converging floorboards and the receding walls—are consistent, supporting the sense of depth and spatial orientation in the room. The floor color and texture are uninterrupted, and the lighting appears uniform throughout, with shadows and highlights matching seamlessly across the full image.

Furthermore, the boundaries of objects are well-resolved: the door frame does not intersect awkwardly with the table or chairs, and the table is positioned logically deeper into the room, where the doorway leads. The placement of objects (books, plant, chairs) remains natural, and there is no evidence of duplicated or missing features at the seam. Overall, the room appears as a single, coherent space, preserving the original intent of the photograph and confirming that the parts have been correctly joined.

Based on this thorough inspection of visual continuity, alignment, and natural object boundaries, the answer remains: (A) Part 1 should be to the left of Part 2.
Released text-only CoT baseline target
First, I examine the visual content of each piece. Piece 1 (labeled '1') shows the left side of a room, featuring a patterned wall with hexagonal tiles, a doorway with a dark frame, and an empty floor space leading into the room. The perspective suggests we are looking slightly to the right, as the wall and door frame recede into the distance. Piece 2 (labeled '2') displays more of the right side of the same room, with the same patterned wall continuing seamlessly, a table with chairs, and various objects (such as books and a plant) arranged on the table. The floor continues from piece 1, and the wall pattern and lighting remain consistent, reinforcing that these two pieces are adjacent parts of the same room.

Next, I look for visual cues to determine the correct assembly. The edge of piece 1 (on its right) shows the wall and floor continuing without any abrupt change, and the door frame appears to be positioned such that it would naturally lead into the scene seen in piece 2. Piece 2, on its left edge, begins with the continuation of the wall pattern and the floor, exactly where piece 1 ends. The perspective lines and the lighting across both pieces are aligned, suggesting that placing piece 1 to the left and piece 2 to the right will reconstruct a natural-looking image.

Importantly, swapping the pieces (putting piece 2 on the left and piece 1 on the right) would break the continuity of the wall and floor, as the door would awkwardly open into the space occupied by the table, and the perspective would be inconsistent. The objects on the table in piece 2 are set further back in the room, matching the depth suggested by piece 1's doorway.

Therefore, based on the continuity of the wall pattern, the alignment of the floor, the placement of the doorway, and the perspective of all visual elements, the correct assembly is to place part 1 to the left of part 2. My answer is \boxed{A}.
00048
Problem imageSupervised visual thought
Exact question / prompt
The image below is divided vertically into two parts by a white strip, forming a 1×2 jigsaw puzzle. The left part is labeled "1" and the right part is labeled "2". These two parts are shuffled and may not be in their original order. Your task is to determine the correct arrangement of the two parts to reconstruct a natural-looking image.

Select the correct answer from the following 2 choices:

(A) Part 2 should be to the right of Part 1
(B) Part 2 should be to the left of Part 1
Ground truth: A
Teacher text before image
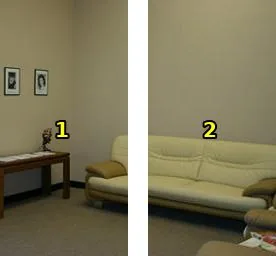
To solve this 1×2 jigsaw puzzle, I start by examining the visual content of each piece in detail. Part 1 (left piece) shows a section of a room with a beige wall, two framed photos hanging, a wooden table beneath the frames, and part of a light-colored sofa—specifically, the left armrest and a small portion of the seat. There is also empty floor space visible. Part 2 (right piece) depicts the remainder of the light-colored sofa, including its central and right sections, with another armrest visible to the far right, plus part of a magazine or paper on a different piece of furniture at the bottom edge. The background wall and carpeting continue seamlessly in both pieces.

To reconstruct a natural-looking image, I look for visual cues that indicate how these pieces should be joined. The most compelling cue is the sofa: part 1 contains the left side of the sofa and part 2 continues the sofa to the right. If part 1 is placed on the left and part 2 on the right, the sofa forms a continuous, uninterrupted piece across the two sections. Additionally, the table in part 1 is positioned against the left wall, which is a logical placement in the overall room layout. The wall color, lighting, and carpet also align smoothly when part 1 is on the left and part 2 is on the right.

If the pieces were reversed, placing part 2 on the left and part 1 on the right, the sofa would appear disjointed, with its right section abruptly cut off and the left section not matching up to any visual cues. The table would also seem misplaced, as it would not logically sit in the center of the room next to the sofa’s right section.

Therefore, the correct assembly is to position part 2 to the right of part 1, seamlessly joining the sofa and maintaining the natural room arrangement.
Teacher text after image
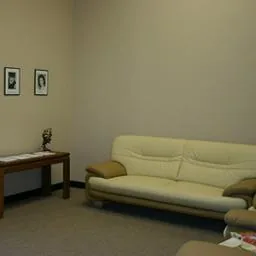
Now that I have assembled the two puzzle pieces in the order previously determined—part 1 on the left and part 2 on the right—I examine the resulting image for coherence and naturalness. The first detail I notice is the seamless union of the sofa: the left armrest and a portion of the seat from part 1 aligns perfectly with the extended seat and right armrest from part 2, creating a continuous and realistic piece of furniture. The table in the left section sits naturally against the wall, positioned logically within the room’s layout, and the two framed photographs above it are spaced appropriately, further enhancing the sense of spatial balance.

The wall color and lighting remain consistent across both sections, with no abrupt shifts or mismatched tones. The carpet also continues uninterrupted from left to right, with no visible breaks or misalignments. The magazine or paper in the bottom right sits on a separate piece of furniture, which does not interfere with the sofa, contributing to the realistic depiction of a living or waiting room. There are no unnatural object boundaries or odd gaps; the room composition flows as it would in reality.

Overall, the assembled image exhibits strong visual continuity and logical placement of objects, confirming that this arrangement produces a coherent and natural-looking scene. The answer is (A): Part 2 should be to the right of Part 1.
Released text-only CoT baseline target
To solve this 1×2 jigsaw puzzle, I start by examining the visual content of each piece in detail. Part 1 (left piece) shows a section of a room with a beige wall, two framed photos hanging, a wooden table beneath the frames, and part of a light-colored sofa—specifically, the left armrest and a small portion of the seat. There is also empty floor space visible. Part 2 (right piece) depicts the remainder of the light-colored sofa, including its central and right sections, with another armrest visible to the far right, plus part of a magazine or paper on a different piece of furniture at the bottom edge. The background wall and carpeting continue seamlessly in both pieces.

To reconstruct a natural-looking image, I look for visual cues that indicate how these pieces should be joined. The most compelling cue is the sofa: part 1 contains the left side of the sofa and part 2 continues the sofa to the right. If part 1 is placed on the left and part 2 on the right, the sofa forms a continuous, uninterrupted piece across the two sections. Additionally, the table in part 1 is positioned against the left wall, which is a logical placement in the overall room layout. The wall color, lighting, and carpet also align smoothly when part 1 is on the left and part 2 is on the right.

If the pieces were reversed, placing part 2 on the left and part 1 on the right, the sofa would appear disjointed, with its right section abruptly cut off and the left section not matching up to any visual cues. The table would also seem misplaced, as it would not logically sit in the center of the room next to the sofa’s right section.

Therefore, the correct assembly is to position part 2 to the right of part 1, seamlessly joining the sofa and maintaining the natural room arrangement. The answer is \boxed{A}.
00312
Problem imageSupervised visual thought
Exact question / prompt
The image below is divided vertically into two parts by a white strip, forming a 1×2 jigsaw puzzle. The left part is labeled "1" and the right part is labeled "2". These two parts are shuffled and may not be in their original order. Your task is to determine the correct arrangement of the two parts to reconstruct a natural-looking image.

Select the correct answer from the following 2 choices:

(A) Part 1 should be to the right of Part 2
(B) Part 1 should be to the left of Part 2
Ground truth: A
Teacher text before image
To solve this 1×2 jigsaw puzzle, I will closely observe the details in each part and determine how they fit together to form a seamless image.

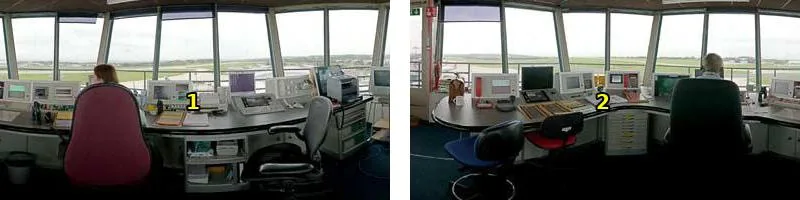
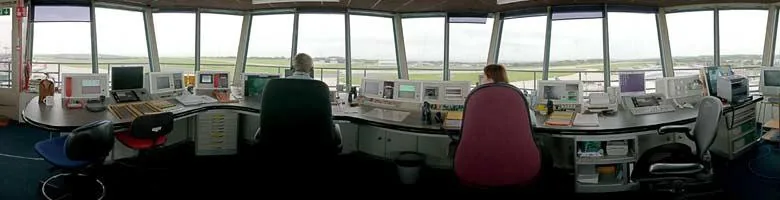
Starting with Part 1 (left piece): The central feature is a person sitting in a chair with a prominent pink back, facing a row of monitors and communication equipment. There’s a trash bin on the floor below the desk area, and the scene is set inside an airport control tower, with large windows showing the runway and sky outside. The right edge of this piece has the continuation of the desk, monitors, and a gray office chair.

Moving to Part 2 (right piece): The main feature is another person, sitting in a dark green chair. The desk continues with similar equipment, monitors, and office supplies. The left edge of this piece reveals the side of the green chair and part of a blue and red office chair. There’s also a continuation of the windows and airport scenery outside.

To determine the correct arrangement, I look for visual continuity. The desk and windows stretch from left to right, and the positioning of the people and chairs must make sense spatially. If I place Part 1 on the left and Part 2 on the right, the pink chair is to the right of the green chair, but the desk and equipment do not align perfectly. However, if I place Part 1 to the right of Part 2, the green chair appears to be more centrally located, with the pink chair to its right. The desk, monitors, and equipment line up seamlessly, and the window frames and outside scenery also connect naturally. The blue and red chair on the left edge of Part 2 fits with the continuation of the desk from Part 1. The lighting and perspective match perfectly, with natural boundaries between objects.

Therefore, based on the continuity of the desk, windows, and the logical positioning of the people and chairs, Part 1 should be to the right of Part 2.
Teacher text after image
Examining the assembled image after placing Part 2 on the left and Part 1 on the right, I observe the visual continuity across the entire scene. The desk surface and its equipment flow seamlessly from left to right, with no abrupt breaks or mismatched boundaries. The blue and red chair on the far left aligns naturally with the curve of the desk, and the transition into the green chair occupied by the leftmost person looks smooth. Moving right, the monitors, paperwork, and other control tower items maintain logical positioning and alignment, with the pink-backed chair fitting perfectly into the workspace next to the gray chair. The window frames and outdoor airport scenery also connect fluidly, with no visual jumps or inconsistencies in perspective. The lighting is consistent throughout the image, and the people in their chairs are spaced naturally, with no overlapping or distortion. Altogether, the assembled image forms a coherent and natural control tower panorama, confirming that the chosen arrangement preserves the integrity of all visual elements. The answer is: (A) Part 1 should be to the right of Part 2.
Released text-only CoT baseline target
To solve this 1×2 jigsaw puzzle, I will closely observe the details in each part and determine how they fit together to form a seamless image.

Starting with Part 1 (left piece): The central feature is a person sitting in a chair with a prominent pink back, facing a row of monitors and communication equipment. There’s a trash bin on the floor below the desk area, and the scene is set inside an airport control tower, with large windows showing the runway and sky outside. The right edge of this piece has the continuation of the desk, monitors, and a gray office chair.

Moving to Part 2 (right piece): The main feature is another person, sitting in a dark green chair. The desk continues with similar equipment, monitors, and office supplies. The left edge of this piece reveals the side of the green chair and part of a blue and red office chair. There’s also a continuation of the windows and airport scenery outside.

To determine the correct arrangement, I look for visual continuity. The desk and windows stretch from left to right, and the positioning of the people and chairs must make sense spatially. If I place Part 1 on the left and Part 2 on the right, the pink chair is to the right of the green chair, but the desk and equipment do not align perfectly. However, if I place Part 1 to the right of Part 2, the green chair appears to be more centrally located, with the pink chair to its right. The desk, monitors, and equipment line up seamlessly, and the window frames and outside scenery also connect naturally. The blue and red chair on the left edge of Part 2 fits with the continuation of the desk from Part 1. The lighting and perspective match perfectly, with natural boundaries between objects.

Therefore, based on the continuity of the desk, windows, and the logical positioning of the people and chairs, Part 1 should be to the right of Part 2.

Final answer: \boxed{A}.
01204
Problem imageSupervised visual thought
Exact question / prompt
The image below is divided into three parts by white strips, forming a 1×3 jigsaw puzzle. The parts are labeled "1", "2", and "3" from left to right. These parts are from a single original image but have been shuffled. Your task is to determine the correct arrangement of the physically labeled parts to reconstruct the natural image.

Select the correct statement from the following choices:

(A) The left part should be Part 1; the middle part should be Part 2; and the right part should be Part 3.
(B) The left part should be Part 2; the middle part should be Part 3; and the right part should be Part 1.
(C) The left part should be Part 3; the middle part should be Part 2; and the right part should be Part 1.
(D) The left part should be Part 2; the middle part should be Part 1; and the right part should be Part 3.
Ground truth: A
Teacher text before image
To solve this 1×3 jigsaw puzzle, I need to carefully analyze the contents of each labeled part and determine how they fit together to reconstruct the original image.

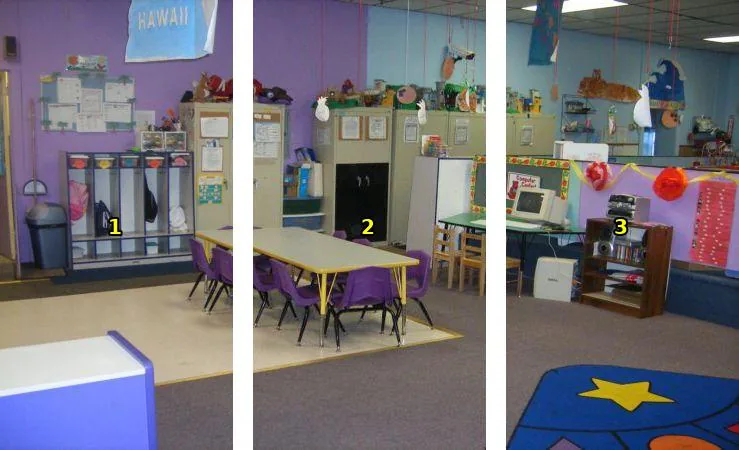
First, I examine Part 1 (leftmost in the separated pieces): It shows a section of a classroom with a coat rack holding bags and hats, a trash can, a bulletin board, and part of a white block in the bottom left. The wall is purple, and there is a blue 'HAWAII' banner near the top. The flooring transitions from carpet to a lighter mat.

Next, Part 2 (middle in the separated pieces): This piece features a table with purple chairs around it, located on the light mat seen in Part 1. Behind the table are beige cabinets and shelves with decorations on top. There is a black double-door cabinet and more bulletin boards on the wall. The wall color continues to be purple, maintaining continuity with Part 1.

Then, Part 3 (rightmost in separated pieces): This part shows a computer desk with a chair and a monitor, a brown shelf with red paper decorations above it, and a colorful carpet with star designs in the foreground. The wall is purple, but transitions to a blue section further right, and there are more decorations and classroom items.

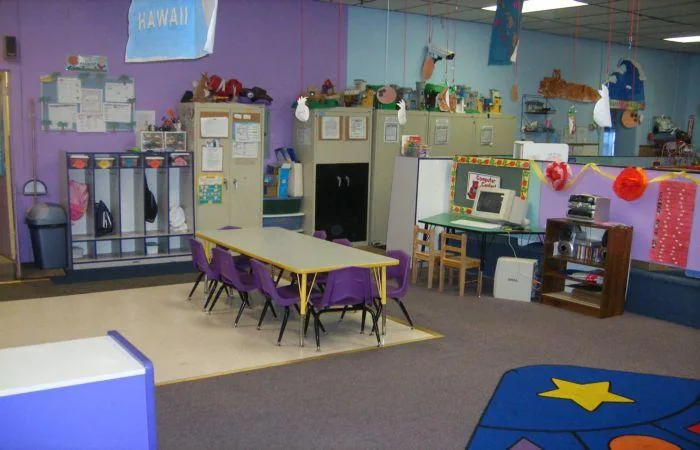
To reconstruct the natural image, I look for continuity in objects, wall colors, and floor boundaries. The light mat in Part 1 continues seamlessly into Part 2, connecting the coat rack and the table with chairs. The purple wall and cabinets in Part 2 also continue into Part 3, where the computer desk and shelf are located. The star carpet in Part 3 logically fits as the rightmost section, matching the perspective and floor pattern.

If I attempt to place Part 2 or Part 3 on the left, the mat and wall colors do not align properly; the objects become disjointed. Only the sequence Part 1 (left), Part 2 (middle), Part 3 (right) allows for all boundaries, objects, and decorations to connect naturally, completing the classroom scene. Therefore, the correct assembly is:

The left part should be Part 1; the middle part should be Part 2; and the right part should be Part 3.
Teacher text after image
Now that I have assembled the image according to my reasoning, I will examine the result for coherence and naturalness. Looking at the reconstructed scene, the boundaries between the previously separated parts are seamless, with no visible discontinuities or abrupt changes. The coat rack on the left flows into the classroom table and chairs in the center, and the light mat under the chairs aligns perfectly with the rest of the flooring, confirming the spatial connection between Parts 1 and 2. The wall color remains consistent throughout, with the purple background extending naturally from left to right. The cabinets and bulletin boards in the middle section continue into the area with the computer desk and shelving unit on the right, establishing clear visual continuity. The colorful carpet with star designs at the bottom right fits logically as the foreground of the rightmost section, and the decorations and objects are arranged in a way that matches a typical classroom setup. All objects and architectural features appear where expected, with no misplaced or cut-off items at the boundaries. Given these observations, the assembled image displays a coherent, natural scene, confirming that the arrangement of Part 1 on the left, Part 2 in the middle, and Part 3 on the right is correct. The answer is (A): The left part should be Part 1; the middle part should be Part 2; and the right part should be Part 3.
Released text-only CoT baseline target
To solve this 1×3 jigsaw puzzle, I need to carefully analyze the contents of each labeled part and determine how they fit together to reconstruct the original image.

First, I examine Part 1 (leftmost in the separated pieces): It shows a section of a classroom with a coat rack holding bags and hats, a trash can, a bulletin board, and part of a white block in the bottom left. The wall is purple, and there is a blue 'HAWAII' banner near the top. The flooring transitions from carpet to a lighter mat.

Next, Part 2 (middle in the separated pieces): This piece features a table with purple chairs around it, located on the light mat seen in Part 1. Behind the table are beige cabinets and shelves with decorations on top. There is a black double-door cabinet and more bulletin boards on the wall. The wall color continues to be purple, maintaining continuity with Part 1.

Then, Part 3 (rightmost in separated pieces): This part shows a computer desk with a chair and a monitor, a brown shelf with red paper decorations above it, and a colorful carpet with star designs in the foreground. The wall is purple, but transitions to a blue section further right, and there are more decorations and classroom items.

To reconstruct the natural image, I look for continuity in objects, wall colors, and floor boundaries. The light mat in Part 1 continues seamlessly into Part 2, connecting the coat rack and the table with chairs. The purple wall and cabinets in Part 2 also continue into Part 3, where the computer desk and shelf are located. The star carpet in Part 3 logically fits as the rightmost section, matching the perspective and floor pattern.

If I attempt to place Part 2 or Part 3 on the left, the mat and wall colors do not align properly; the objects become disjointed. Only the sequence Part 1 (left), Part 2 (middle), Part 3 (right) allows for all boundaries, objects, and decorations to connect naturally, completing the classroom scene. Therefore, the correct assembly is:

The left part should be Part 1; the middle part should be Part 2; and the right part should be Part 3.

Thus, the answer is \boxed{A}.
Spatial Navigation
frozenlake_s3_1481_cot
Problem imageSupervised visual thought
Exact question / prompt
You are a maze solver. Your goal is to guide a player from the start to the goal on a grid map while avoiding holes. The player can move one square at a time in the directions left (L), right (R), up (U), or down (D). The frozen lake is not slippery; the player will always move in the intended direction. Moving off the edge or falling into a hole results in failure. Reaching the goal means success.

Provide your solution as a sequence of moves wrapped in \boxed{{}}, such as \boxed{L,R,U,D}. The moves should be comma-separated.
Ground truth: D,R
Teacher text before image
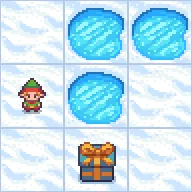
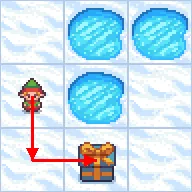
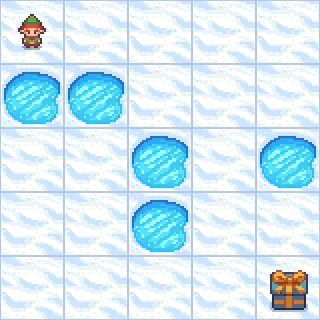
I'll begin by laying out the structure of this maze. The grid is 3 rows by 3 columns. The starting square is at the second row, first column. The goal square is located in the third row, second column. There are three ice holes to watch out for: one in the first row, second column; one in the first row, third column; and another in the second row, second column. The remaining squares are safe frozen surfaces.

With this setup in mind, it's time to draw out the path through the maze.
Teacher text after image
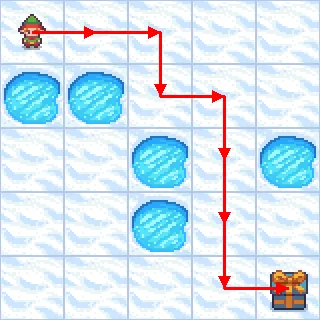
Now, examining my solution, I see that the path starts from the second row, first column. The first move is down, which brings me to the third row, first column—a safe frozen surface. The next move is right, landing on the third row, second column, which is the goal square. Both moves avoid all ice holes and stay within the boundaries of the maze.

Therefore, the correct sequence of moves is \boxed{D,R}.
Released text-only CoT baseline target
Let's solve this frozen lake maze step by step.

**First, let's define the symbols used in the maze:**
- **S** = Start (where the player begins)
- **G** = Goal (the destination to reach)
- **H** = Hole (dangerous; stepping here means failure)
- **F** = Frozen floor (safe to walk on)

**Now, let's transcribe the maze from the image as a text map:**

```
F H H
S H F
F G F
```

This means the maze is a 3x3 grid arranged as follows (columns are left to right, rows are top to bottom):

| (0,0) F | (0,1) H | (0,2) H |
| (1,0) S | (1,1) H | (1,2) F |
| (2,0) F | (2,1) G | (2,2) F |

Now, let's locate the positions:
- The **Start (S)** is at (1,0).
- The **Goal (G)** is at (2,1).
- **Holes (H)** are at (0,1), (0,2), and (1,1).
- **Frozen floor (F)** is everywhere else.

**Step-by-step solution:**

1. **From the start (1,0), what moves are possible?**
   - **Up (U):** (0,0) — Safe (F).
   - **Down (D):** (2,0) — Safe (F).
   - **Left (L):** Off the grid (invalid).
   - **Right (R):** (1,1) — Hole (H), so that's not safe.

2. **Which move gets us closer to the goal?**
   - The **Goal (G)** is at (2,1), so we need to reach row 2, column 1.
   - **First move:** Let's go **Down (D)** to (2,0) (safe).

3. **From (2,0):**
   - **Up (U):** Back to (1,0) (already visited).
   - **Down (D):** Off the grid (invalid).
   - **Left (L):** Off the grid (invalid).
   - **Right (R):** (2,1) — This is the **Goal (G)**.

4. **So, the shortest safe path is:**
   - **Down (D) from the start (1,0) to (2,0).**
   - **Right (R) from (2,0) to the goal (2,1).**

**Final answer:**
\boxed{D,R}

This sequence safely guides the player from the start to the goal, avoiding all holes.
frozenlake_s4_482_cot
Problem imageSupervised visual thought
Exact question / prompt
You are a maze solver. Your goal is to guide a player from the start to the goal on a grid map while avoiding holes. The player can move one square at a time in the directions left (L), right (R), up (U), or down (D). The frozen lake is not slippery; the player will always move in the intended direction. Moving off the edge or falling into a hole results in failure. Reaching the goal means success.

Provide your solution as a sequence of moves wrapped in \boxed{{}}, such as \boxed{L,R,U,D}. The moves should be comma-separated.
Ground truth: D,D,R,D,R,R
Teacher text before image
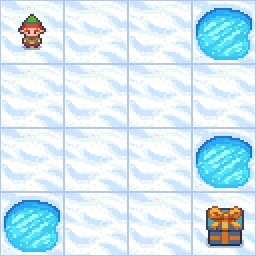
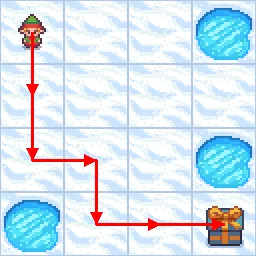
To make sense of the maze, I’ll break down its layout by rows and columns. The grid is four rows by four columns. The starting point is at the top-left corner, which is position (row 1, column 1). The goal is at the bottom-right corner, (row 4, column 4). There are three ice holes: one is in the top row, third column; another is in the third row, fourth column; and the last one is in the bottom row, first column. All the other squares are safe frozen surfaces.

With this structure in mind, now I can move on to plotting a safe path from the start to the goal.
Teacher text after image
Time to confirm that my solution—the path drawn in red—is valid. Starting from the top-left, the moves are: down, down, right, down, right, right.

Let me check each step:
- First move: down to row 2, column 1 (safe).
- Second move: down to row 3, column 1 (safe).
- Third move: right to row 3, column 2 (safe).
- Fourth move: down to row 4, column 2 (safe).
- Fifth move: right to row 4, column 3 (safe).
- Sixth move: right to row 4, column 4, which is the goal.

The path avoids all the ice holes and reaches the goal without stepping off the grid. Everything checks out.

So, the correct path is \boxed{D,D,R,D,R,R}.
Released text-only CoT baseline target
Let's solve the maze by analyzing the map step-by-step.

### **Maze Symbols Explained**
- **S** = Start (where the player begins)
- **G** = Goal (the destination to reach)
- **F** = Frozen lake (safe to walk on)
- **H** = Hole (danger! Falling in means failure)

### **Maze Text Map**
Here is the transcription of the 4×4 maze grid from top-left to bottom-right:

```
S F F H
F F F F
F F F H
H F F G
```

Let's break down the maze into coordinates for clarity.
Rows go from top to bottom (Row 1 to Row 4), and columns go from left to right (Column 1 to Column 4):

|        | Col 1 | Col 2 | Col 3 | Col 4 |
|--------|-------|-------|-------|-------|
| **Row 1** |   S   |   F   |   F   |   H   |
| **Row 2** |   F   |   F   |   F   |   F   |
| **Row 3** |   F   |   F   |   F   |   H   |
| **Row 4** |   H   |   F   |   F   |   G   |

- Player starts at **(Row 1, Col 1)**.
- Goal is at **(Row 4, Col 4)**.
- Holes are at **(Row 1, Col 4)**, **(Row 3, Col 4)**, and **(Row 4, Col 1)**.

---

### **Step-by-Step Pathfinding**

Let's find a safe path from Start (S) to Goal (G):

#### **Step 1: Move Down**
From **(1,1)** to **(2,1)**.
Safe (F).

#### **Step 2: Move Down**
From **(2,1)** to **(3,1)**.
Safe (F).

#### **Step 3: Move Right**
From **(3,1)** to **(3,2)**.
Safe (F).

#### **Step 4: Move Down**
From **(3,2)** to **(4,2)**.
Safe (F).

#### **Step 5: Move Right**
From **(4,2)** to **(4,3)**.
Safe (F).

#### **Step 6: Move Right**
From **(4,3)** to **(4,4)**.
Goal (G) reached!

---

### **Path Avoids All Holes**
- We never step on a hole (H).
- We remain inside the maze boundaries.
- We reach the goal in 6 moves.

---

### **Final Move Sequence**
Expressed as directions:
- **D** (Down)
- **D** (Down)
- **R** (Right)
- **D** (Down)
- **R** (Right)
- **R** (Right)

So, the correct sequence of moves to solve the maze is:

\boxed{D,D,R,D,R,R}
frozenlake_s5_74_cot
Problem imageSupervised visual thought
Exact question / prompt
You are a maze solver. Your goal is to guide a player from the start to the goal on a grid map while avoiding holes. The player can move one square at a time in the directions left (L), right (R), up (U), or down (D). The frozen lake is not slippery; the player will always move in the intended direction. Moving off the edge or falling into a hole results in failure. Reaching the goal means success.

Provide your solution as a sequence of moves wrapped in \boxed{{}}, such as \boxed{L,R,U,D}. The moves should be comma-separated.
Ground truth: R,R,D,R,D,D,D,R
Teacher text before image
First, I'll take stock of the maze layout. The grid is 5 rows by 5 columns. The starting square is located at the top-left corner, which is position (row 1, column 1). The goal is positioned at the bottom-right corner, specifically (row 5, column 5).

There are several ice holes scattered throughout the maze:
- In row 2, columns 1 and 2 both contain holes.
- In row 3, column 3 and column 5 are holes.
- In row 4, column 3 is also a hole.

All other squares are safe frozen surfaces that can be walked on. With these positions in mind, I can visualize the safe paths and the obstacles.

Now, it's time to plot a route from the starting square to the goal, avoiding all the ice holes along the way.
Teacher text after image
Now, I'll carefully verify the route I plotted on the maze. Starting at the top-left, the path moves right twice, which brings me to the third column of the first row, safely avoiding the holes in the second row. From here, I move down once, landing in the third column of the second row, which is clear. Then, another right move places me in the fourth column of the second row.

Next, I move down into the fourth column of the third row, which is safe. Then, three consecutive down moves take me to the fourth column of the fifth row, staying clear of all ice holes. Finally, a right move leads directly to the goal at the bottom-right corner.

Throughout this sequence, each step passes only through safe frozen squares, never landing on a hole or moving off the grid. The route successfully connects the start to the goal without any errors.

So, the correct path is:

\boxed{R,R,D,R,D,D,D,R}
Released text-only CoT baseline target
Let's solve this maze step-by-step:

### **Symbol Definitions**
- **S**: Start position (where the player begins)
- **G**: Goal (destination to reach)
- **H**: Hole (danger—stepping here means failure)
- **F**: Frozen floor (safe to step on)

---

### **Maze Text Map**
Let’s transcribe the maze using the symbols:

```
S F F F F
H H F F F
F F H F H
F F H F F
F F F F G
```

This is a 5x5 grid. The top-left is the starting point (**S**), and the bottom-right is the goal (**G**). Holes (**H**) are scattered and must be avoided.

---

### **Step-by-Step Reasoning**

#### **1. Analyzing Possible Moves from the Start**

- The player starts at the top-left corner (let's call this position (1,1)).
- Moving **Left** or **Up** is not possible (edge of the grid).
- **Down** moves into a hole (row 2, column 1), which is not allowed.
- **Right** moves to (1,2), a safe frozen floor (**F**).

#### **2. Planning a Safe Route**

Let’s map out a path that avoids all holes:

**From (1,1) S:**
- **Right** to (1,2) F
- **Right** to (1,3) F

At (1,3), moving **Down** would land on (2,3) F (safe). Let's keep going:

- **Down** to (2,3) F

Now at (2,3):
- **Right** to (2,4) F (safe)
- **Down** would land at (3,3) H (hole)—not safe.

So, **Right** to (2,4):

- **Right** to (2,4) F

At (2,4):
- **Down** to (3,4) F (safe)

At (3,4):
- **Down** to (4,4) F (safe)
- **Right** to (3,5) H (hole)—not safe.

So, **Down**:

- **Down** to (4,4) F

At (4,4):
- **Down** to (5,4) F (safe)

At (5,4):
- **Right** to (5,5) G (goal)

#### **3. Writing the Move Sequence**

Let’s list out each move:
1. **Right** (to (1,2))
2. **Right** (to (1,3))
3. **Down** (to (2,3))
4. **Right** (to (2,4))
5. **Down** (to (3,4))
6. **Down** (to (4,4))
7. **Down** (to (5,4))
8. **Right** (to (5,5) Goal!)

So, the sequence of moves is:

\boxed{R,R,D,R,D,D,D,R}

---

### **Summary**

By carefully navigating around the holes and only stepping on safe frozen floors, the shortest and safest path from the start (S) to the goal (G) is:

\boxed{R,R,D,R,D,D,D,R}
frozenlake_s6_2126
Problem imageSupervised visual thought
Exact question / prompt
You are a maze solver. Your goal is to guide a player from the start to the goal on a grid map while avoiding holes. The player can move one square at a time in the directions left (L), right (R), up (U), or down (D). The frozen lake is not slippery; the player will always move in the intended direction. Moving off the edge or falling into a hole results in failure. Reaching the goal means success.

Provide your solution as a sequence of moves wrapped in \boxed{{}}, such as \boxed{L,R,U,D}. The moves should be comma-separated.
Ground truth: U,R,R,R,U
Teacher text before image
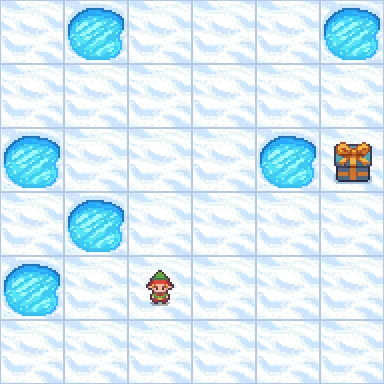
To start, I'll carefully analyze the layout and features of this maze. The grid is six columns wide and six rows tall. The player begins on the fifth row from the top and third column from the left. The goal—the present box—is located at the third row from the top and the sixth column from the left.

There are several dangerous ice holes scattered throughout. Specifically:
- The first row contains holes at columns two and six.
- In the third row, there are holes at columns one and five.
- The fourth row has a hole at column two.
- The fifth row has a hole at column one.

All other squares are safe frozen surfaces. With the layout mapped out, I’ll move on to plotting the safest and shortest route from the starting position to the goal.
Teacher text after image
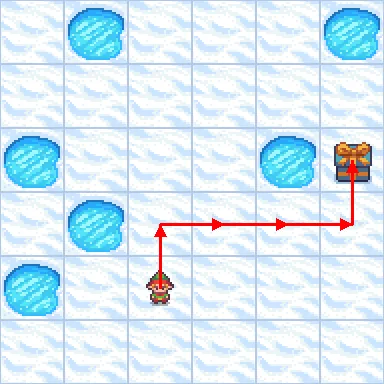
To verify my solution, I’ll follow the red path shown in the image step by step, starting from the initial position.

- The path begins at the starting square (row 5, column 3).
- The first move is upward, landing on (row 4, column 3), which is a safe frozen surface.
- Next, three consecutive moves to the right take the player to (row 4, column 4), (row 4, column 5), and then (row 4, column 6). All of these squares are safe.
- The final move is upward, arriving at (row 3, column 6), which is the goal square.

Throughout this route, there are no holes encountered and no moves off the edge. Each step lands on a safe square, and the path is direct and efficient.

Therefore, my solution is correct and the path is:
\boxed{U,R,R,R,U}
Released text-only CoT baseline target
Let's analyze the maze step by step:

- The player starts near the bottom center of the grid.
- The goal is at the top right, marked by a present.
- There are several ice holes scattered across the grid, which must be avoided.

**Step-by-step reasoning:**

1. **First move (Up):** From the starting square, moving upwards is safe and avoids the ice holes that are to the left and right.
2. **Next three moves (Right, Right, Right):** After moving up, the player is aligned horizontally with the goal. Moving three squares to the right will take the player towards the goal, passing only through safe squares.
3. **Final move (Up):** Once in the column directly below the goal, moving up will reach the goal square without encountering any holes.

Each move avoids the ice holes and stays within the boundaries of the grid.

**Final sequence of moves:**
\boxed{U,R,R,R,U}
Visual Search
00001
Problem imageSupervised visual thought
Exact question / prompt
Which kind of fast food is on the plate?
Ground truth: hot dog
Teacher text before image
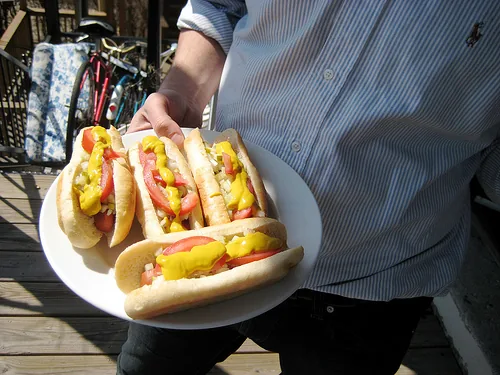
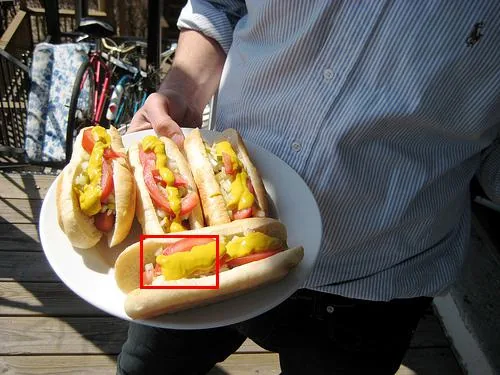
To determine the kind of fast food on the plate, first look for the plate being held in the image. The plate is visible in the foreground, held by a person wearing a blue and white striped shirt. On the plate, there are several elongated sandwich-like food items placed side by side. Each item is in a bun, filled with a sausage and topped with colorful condiments like yellow mustard, chopped vegetables, and possibly relish. The visual clues—long buns, sausages, and classic toppings—suggest that these are a specific type of fast food. To focus on the key element, one of these items should be highlighted, preferably the one in the front and center of the plate, as it is most clearly visible and representative of the entire group. This is where the red bounding box appears, enclosing the frontmost fast food item on the plate.
Teacher text after image
With the frontmost item on the plate highlighted, we can closely observe its shape and contents. It consists of a soft, split bun holding a sausage or frankfurter, topped with mustard, chopped onions, and other condiments typical of a popular fast food. The bun's elongated form and the visible sausage are characteristic of a hot dog, a classic fast food item often served at casual gatherings. The toppings further confirm its identity, as these are standard for hot dogs. By analyzing the highlighted region, it is clear that the kind of fast food on the plate is a hot dog.
Released text-only CoT baseline target
To identify the kind of fast food on the plate, let's closely examine the visual details in the image:

On the plate, there are four food items that all have a similar shape and arrangement. Each item consists of a long, oval-shaped bun that is sliced open on the top. Inside each bun, there is a sausage or frankfurter that is cylindrical and brownish in color. The sausages are topped with various condiments and toppings, including yellow mustard, chopped onions, green relish, and slices of tomato and pickled peppers.

The combination of a sausage inside a sliced bun, along with classic toppings like mustard and relish, is characteristic of a hot dog—a popular fast food item. The way the food is presented, with the sausage nestled in a bun and the toppings on top, further supports this identification.

Therefore, based on these visual clues, the kind of fast food on the plate is a hot dog.
00102
Problem imageSupervised visual thought
Exact question / prompt
What is the curtain on?
Ground truth: door
Teacher text before image
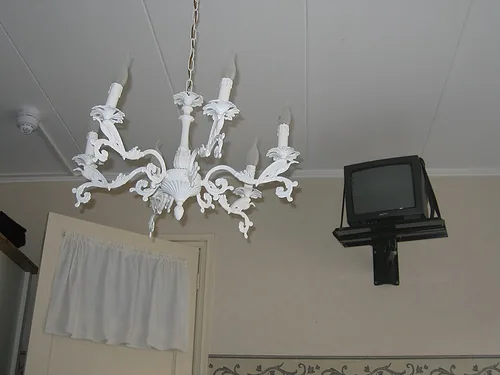
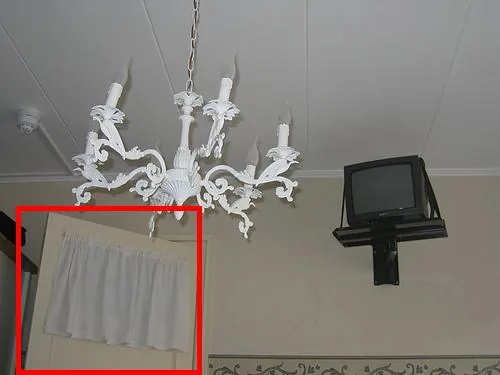
To determine where the red bounding box should go, start by locating the curtain in the image. Look for a piece of fabric that is likely draped or attached to another object. In the lower left quadrant of the image, there is a white, sheer curtain-like fabric stretched horizontally. Next, examine what this curtain is attached to or resting on. You will notice that the fabric is mounted on an off-white, vertically oriented surface that has a handle and rectangular shape, suggesting it is a door. This door is positioned beneath the chandelier and to the left of the television mounted on the wall. Therefore, the correct region to highlight with the red bounding box is the area covering both the curtain and the door beneath it.
Teacher text after image
With the curtain and its supporting structure highlighted in the red box, it becomes clear that the curtain is affixed to the upper part of a door. The door's shape, the presence of a handle, and its placement in the room confirm its identity. The curtain is not on a window or a wall, but rather is installed directly on the door itself. This visual evidence shows that the answer to the question 'What is the curtain on?' is the door.
Released text-only CoT baseline target
To determine what the curtain is on, let's look closely at the image. On the left side of the image, there is a rectangular surface that is vertically oriented. This surface has a handle near the right edge, which is a typical feature of a door. Above this handle, there is a window-like opening covered by a white fabric that is gathered at the top, resembling a curtain.

Importantly, the curtain is not on a wall or a window; instead, it is attached to this vertically oriented surface with a handle, confirming that it is a door. The curtain covers a small window or glass panel in the upper portion of the door.

Therefore, based on these observations, the curtain is on a door.
00639
Problem imageSupervised visual thought
Exact question / prompt
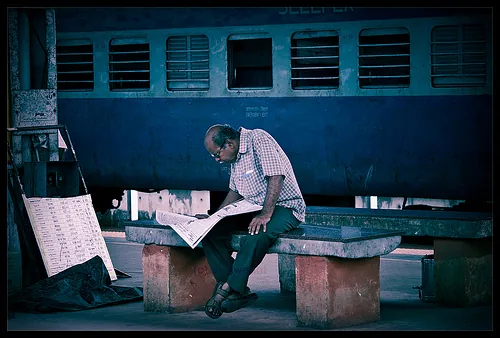
What's the man on?
Ground truth: bench
Teacher text before image
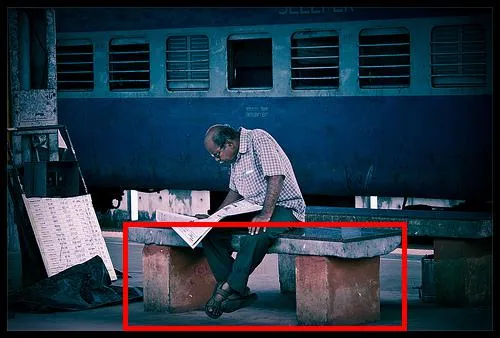
To answer the question, first locate the man in the image. He is positioned in the center, sitting and leaning forward while reading a newspaper. Next, observe what the man is physically situated on. Look at the area directly beneath him: there is a long, rectangular structure with a flat surface that supports his body. This object is elevated off the ground and has block-like supports underneath at both ends, which are visually distinct and separate it from the floor. The object's design and placement clearly indicate it is meant for sitting. The red bounding box should be drawn around this structure, focusing on the entire seating surface and its supports to highlight the object the man is on.
Teacher text after image
With the red bounding box highlighting the structure beneath the man, it becomes clear that he is seated on a public bench. The bench is rectangular, made of solid material, and supported by two thick blocks at each end. Its location on a train station platform and its utilitarian design further confirm that it is intended for sitting while waiting. By visually identifying the object inside the red box as a bench, and noting the man's position directly on top of it, we can confidently conclude that the man is on a bench.
Released text-only CoT baseline target
In the image, there is a man sitting and reading a newspaper. If we closely observe his position, he is seated on a long, flat surface that is supported by rectangular blocks underneath. The surface appears to be made of concrete or stone, and it does not have a backrest or armrests, distinguishing it from a chair. This type of seating is commonly found in public places like train stations.

Additionally, the man is not sitting directly on the ground, nor is he on any movable furniture. The structure is elevated and provides enough space for more than one person, further suggesting it is a bench.

Based on these visual clues—the long, elevated surface, the supporting blocks, and its typical presence in public areas—the man is sitting on a bench.

The answer is: bench.
02431
Problem imageSupervised visual thought
Exact question / prompt
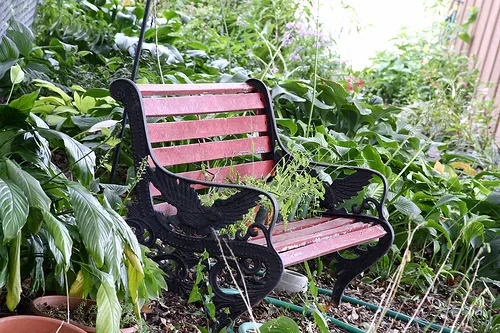
What is underneath the bench made of wood?
Ground truth: hose
Teacher text before image
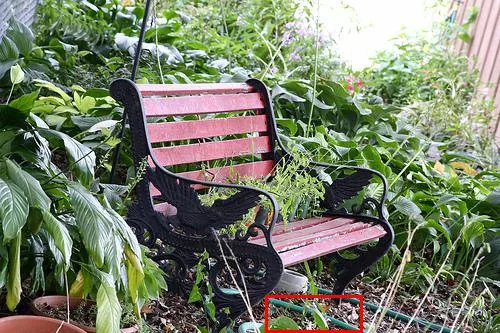
To answer the question, start by scanning the image for a bench. In the center-left portion, there is a bench with slatted, reddish wooden planks and ornate black metal armrests and legs, situated among lush greenery. Confirming that the seat and backrest are made of wood, focus your attention directly beneath the bench, where the ground is partially visible. Look for any objects on the soil or among the plants and leaves under the seat. Pay special attention to objects that look out of place in a garden setting, such as tools, containers, or any coiled items. Upon closer inspection, you can see a green, flexible, tubular object coiled and partially hidden among the leaves and soil right under the seat area. This is the region that should be enclosed by the red bounding box, as it contains the critical item located underneath the wooden bench.
Teacher text after image
With the red bounding box highlighting the area directly under the wooden bench, it becomes clear that a green garden hose is lying partially coiled on the ground. The hose's distinct color and shape set it apart from the surrounding plants and soil, making it easy to identify. Its presence directly beneath the seat of the wooden bench matches the location specified in the question. This visual evidence confirms that the object found underneath the bench is a hose.
Released text-only CoT baseline target
To answer the question about what is underneath the bench made of wood, let's carefully observe the image.

First, notice the bench itself: it has wooden slats painted red and ornate black metal sides. It is placed in a garden area with lots of greenery and plants surrounding it.

Looking directly underneath the bench, you can see a long, flexible object that is green in color and appears to be coiled or laid out in a loop. The texture and appearance of this object are consistent with a garden hose, which is typically found in areas with lots of plants for watering purposes.

There are no other significant objects directly beneath the bench, just some leaves and natural garden debris. The green hose is clearly distinguishable and its placement is directly under the wooden bench.

Therefore, the object underneath the bench made of wood is a hose.